
At a high level, SELMA manages two different curriculum items – programmes and components. A programme can be:
- Your qualifications on offer
- A programme
- A Course you are selling
A component can be a:
- Course or Module (depending on which term is used)
- Unit Standard (a specific type of component accredited by NZQA)
- Assessment
- A subject
The curriculum is maintained and setup by anyone who is assigned a “Registrar” Role in SELMA.
Courses and programmes can be reported through the SDR. You can set this up when you create the course and/or programme in SELMA, and elect what to report to SDR. You may decide, for example, that a certain assessment is irrelevant for the SDR (“No Return”). In this case, you can indicate it as such in SELMA, and can maintain the information in SELMA for the purposes of being an internal tracker for your education provider.
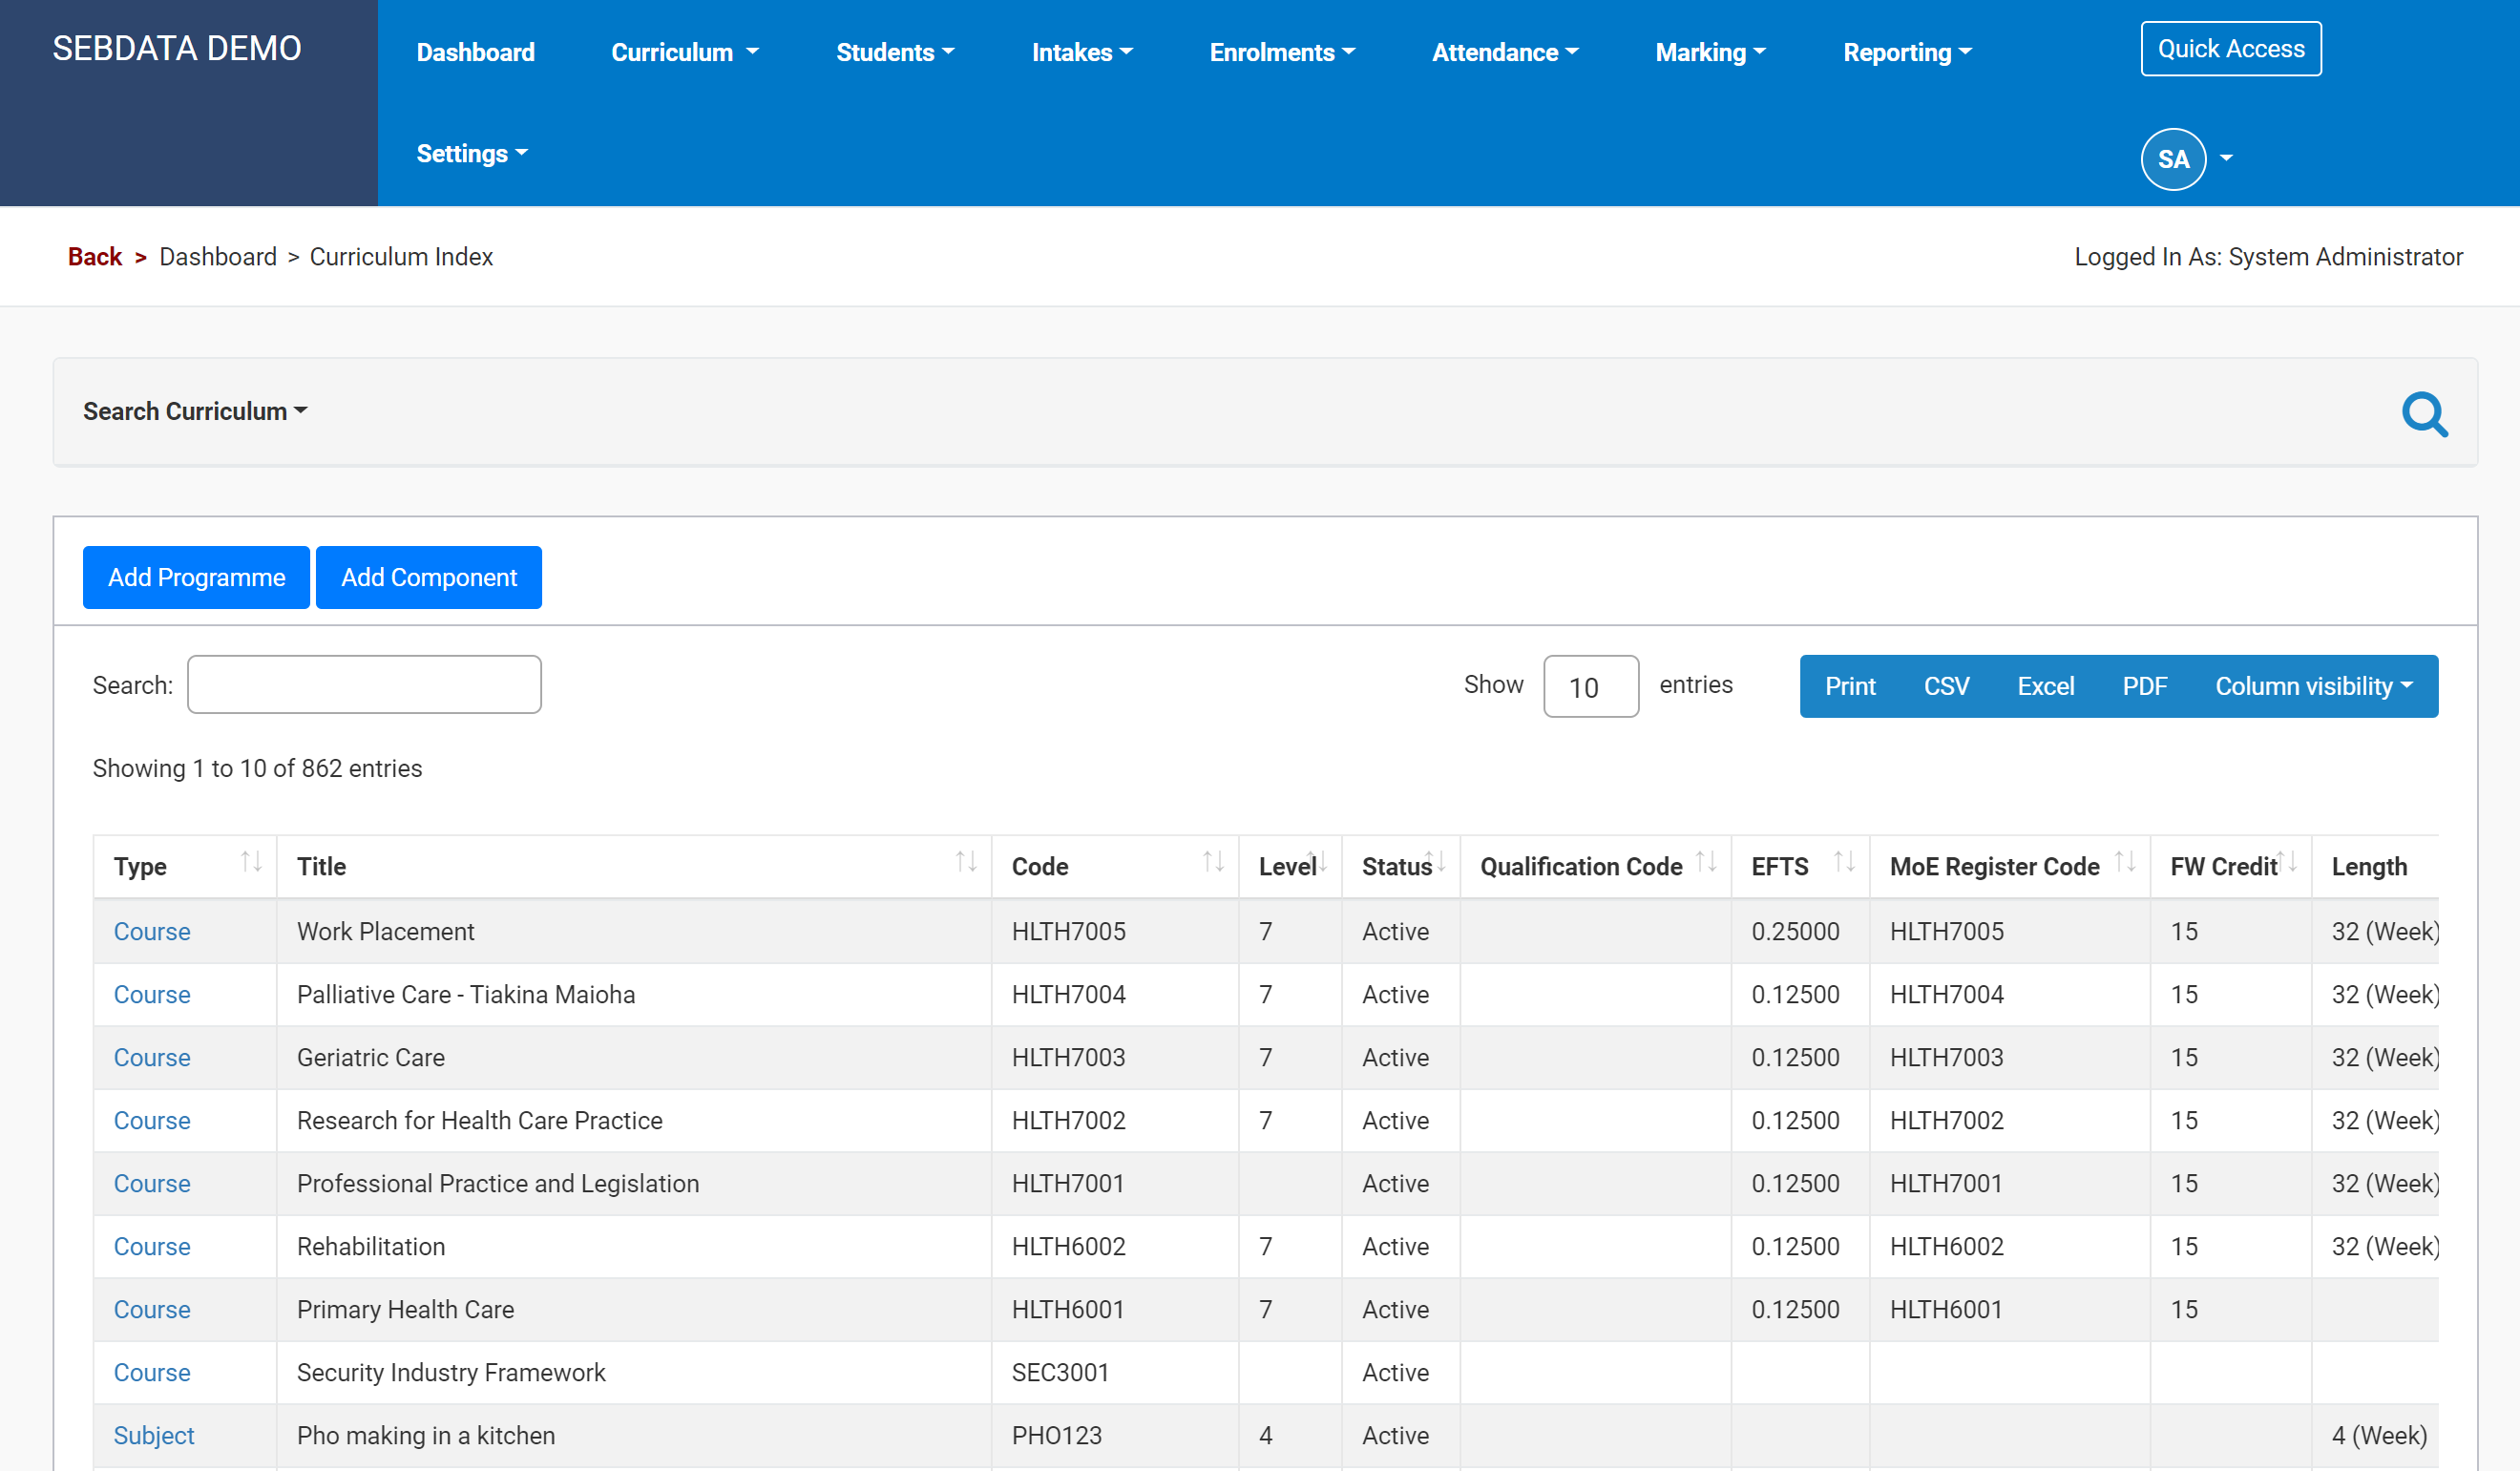
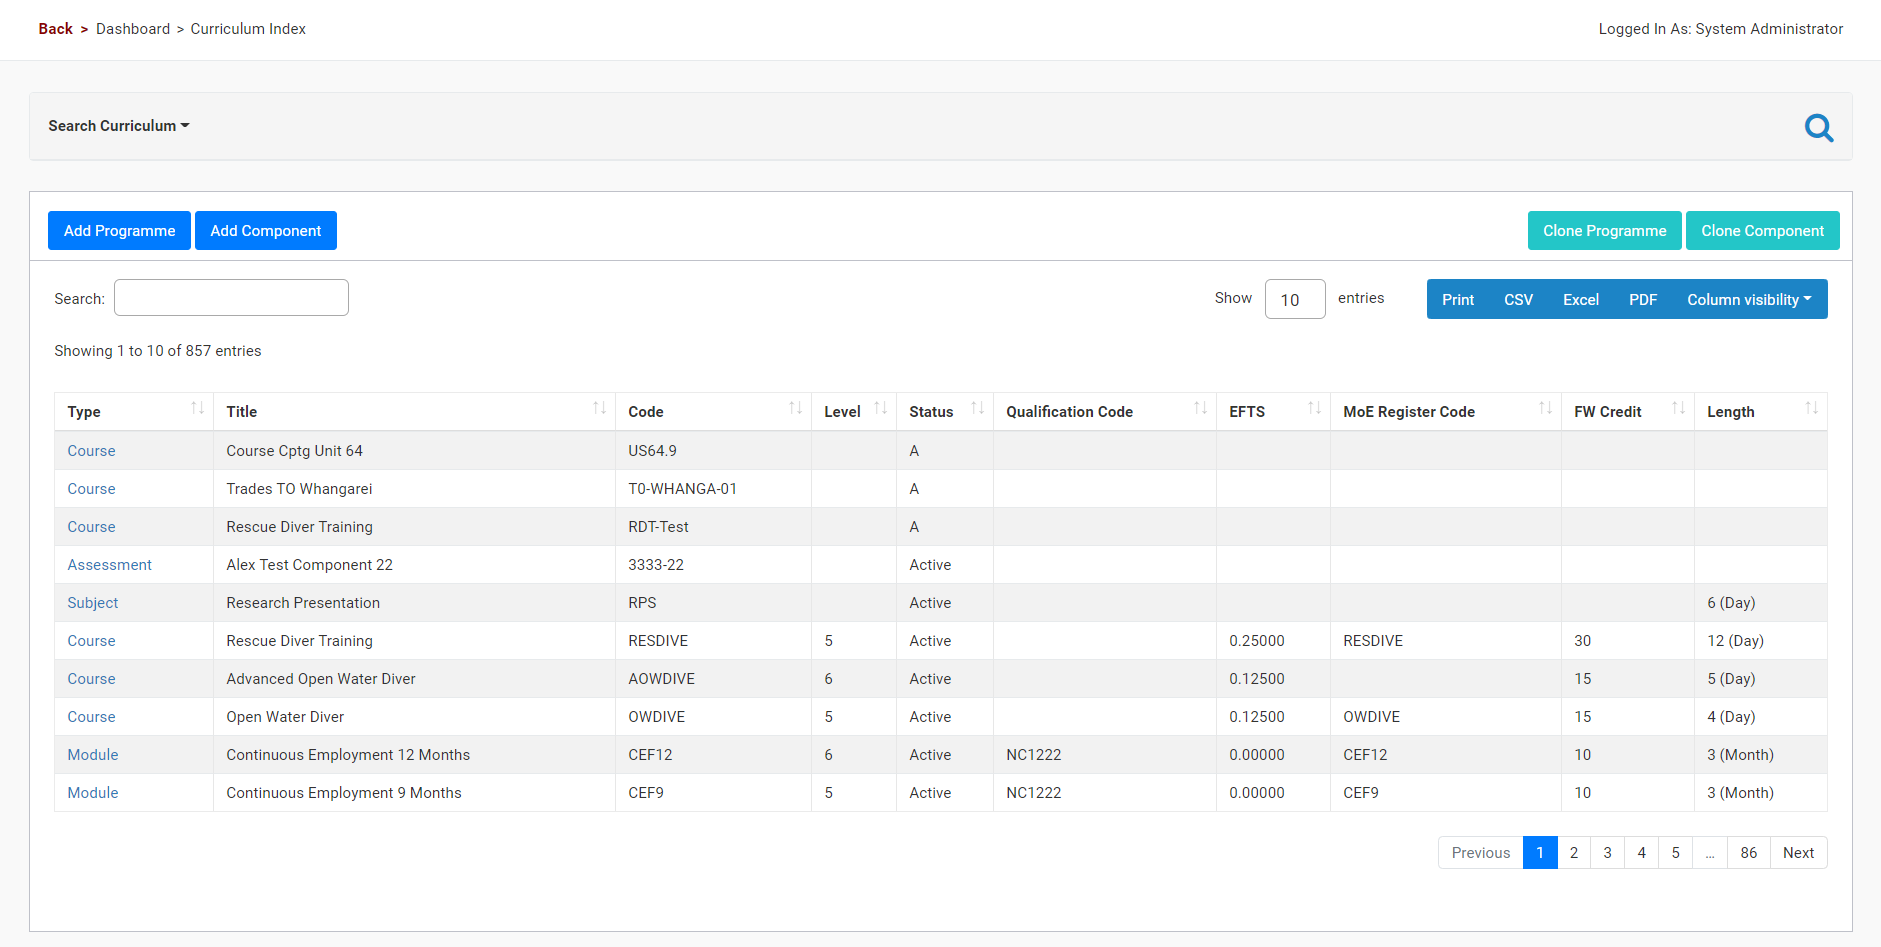
In the top menu, select Curriculum > Manage Curriculum to get to the Curriculum Index. The curriculum index will show you all your curriculum items, whether programme or course, in one screen.
Please refer to “Working with Grids” in this manual to learn how to use grid views in SELMA.
When setting up the curriculum, you start with setting up programmes and components separately, and then attaching the components to a programme.
Oftentimes, curriculum does not change a lot during the year other than setup at the beginning. Nevertheless it remains an important section for checking information about the educational activities of you as a provider, so it pays well to be attentive when setting your curriculum up initially.
Create Components
Components are all the objects you want to attach to a programme later. A typical example is an approved course that you offer. It can also be an assessment or unit standard.
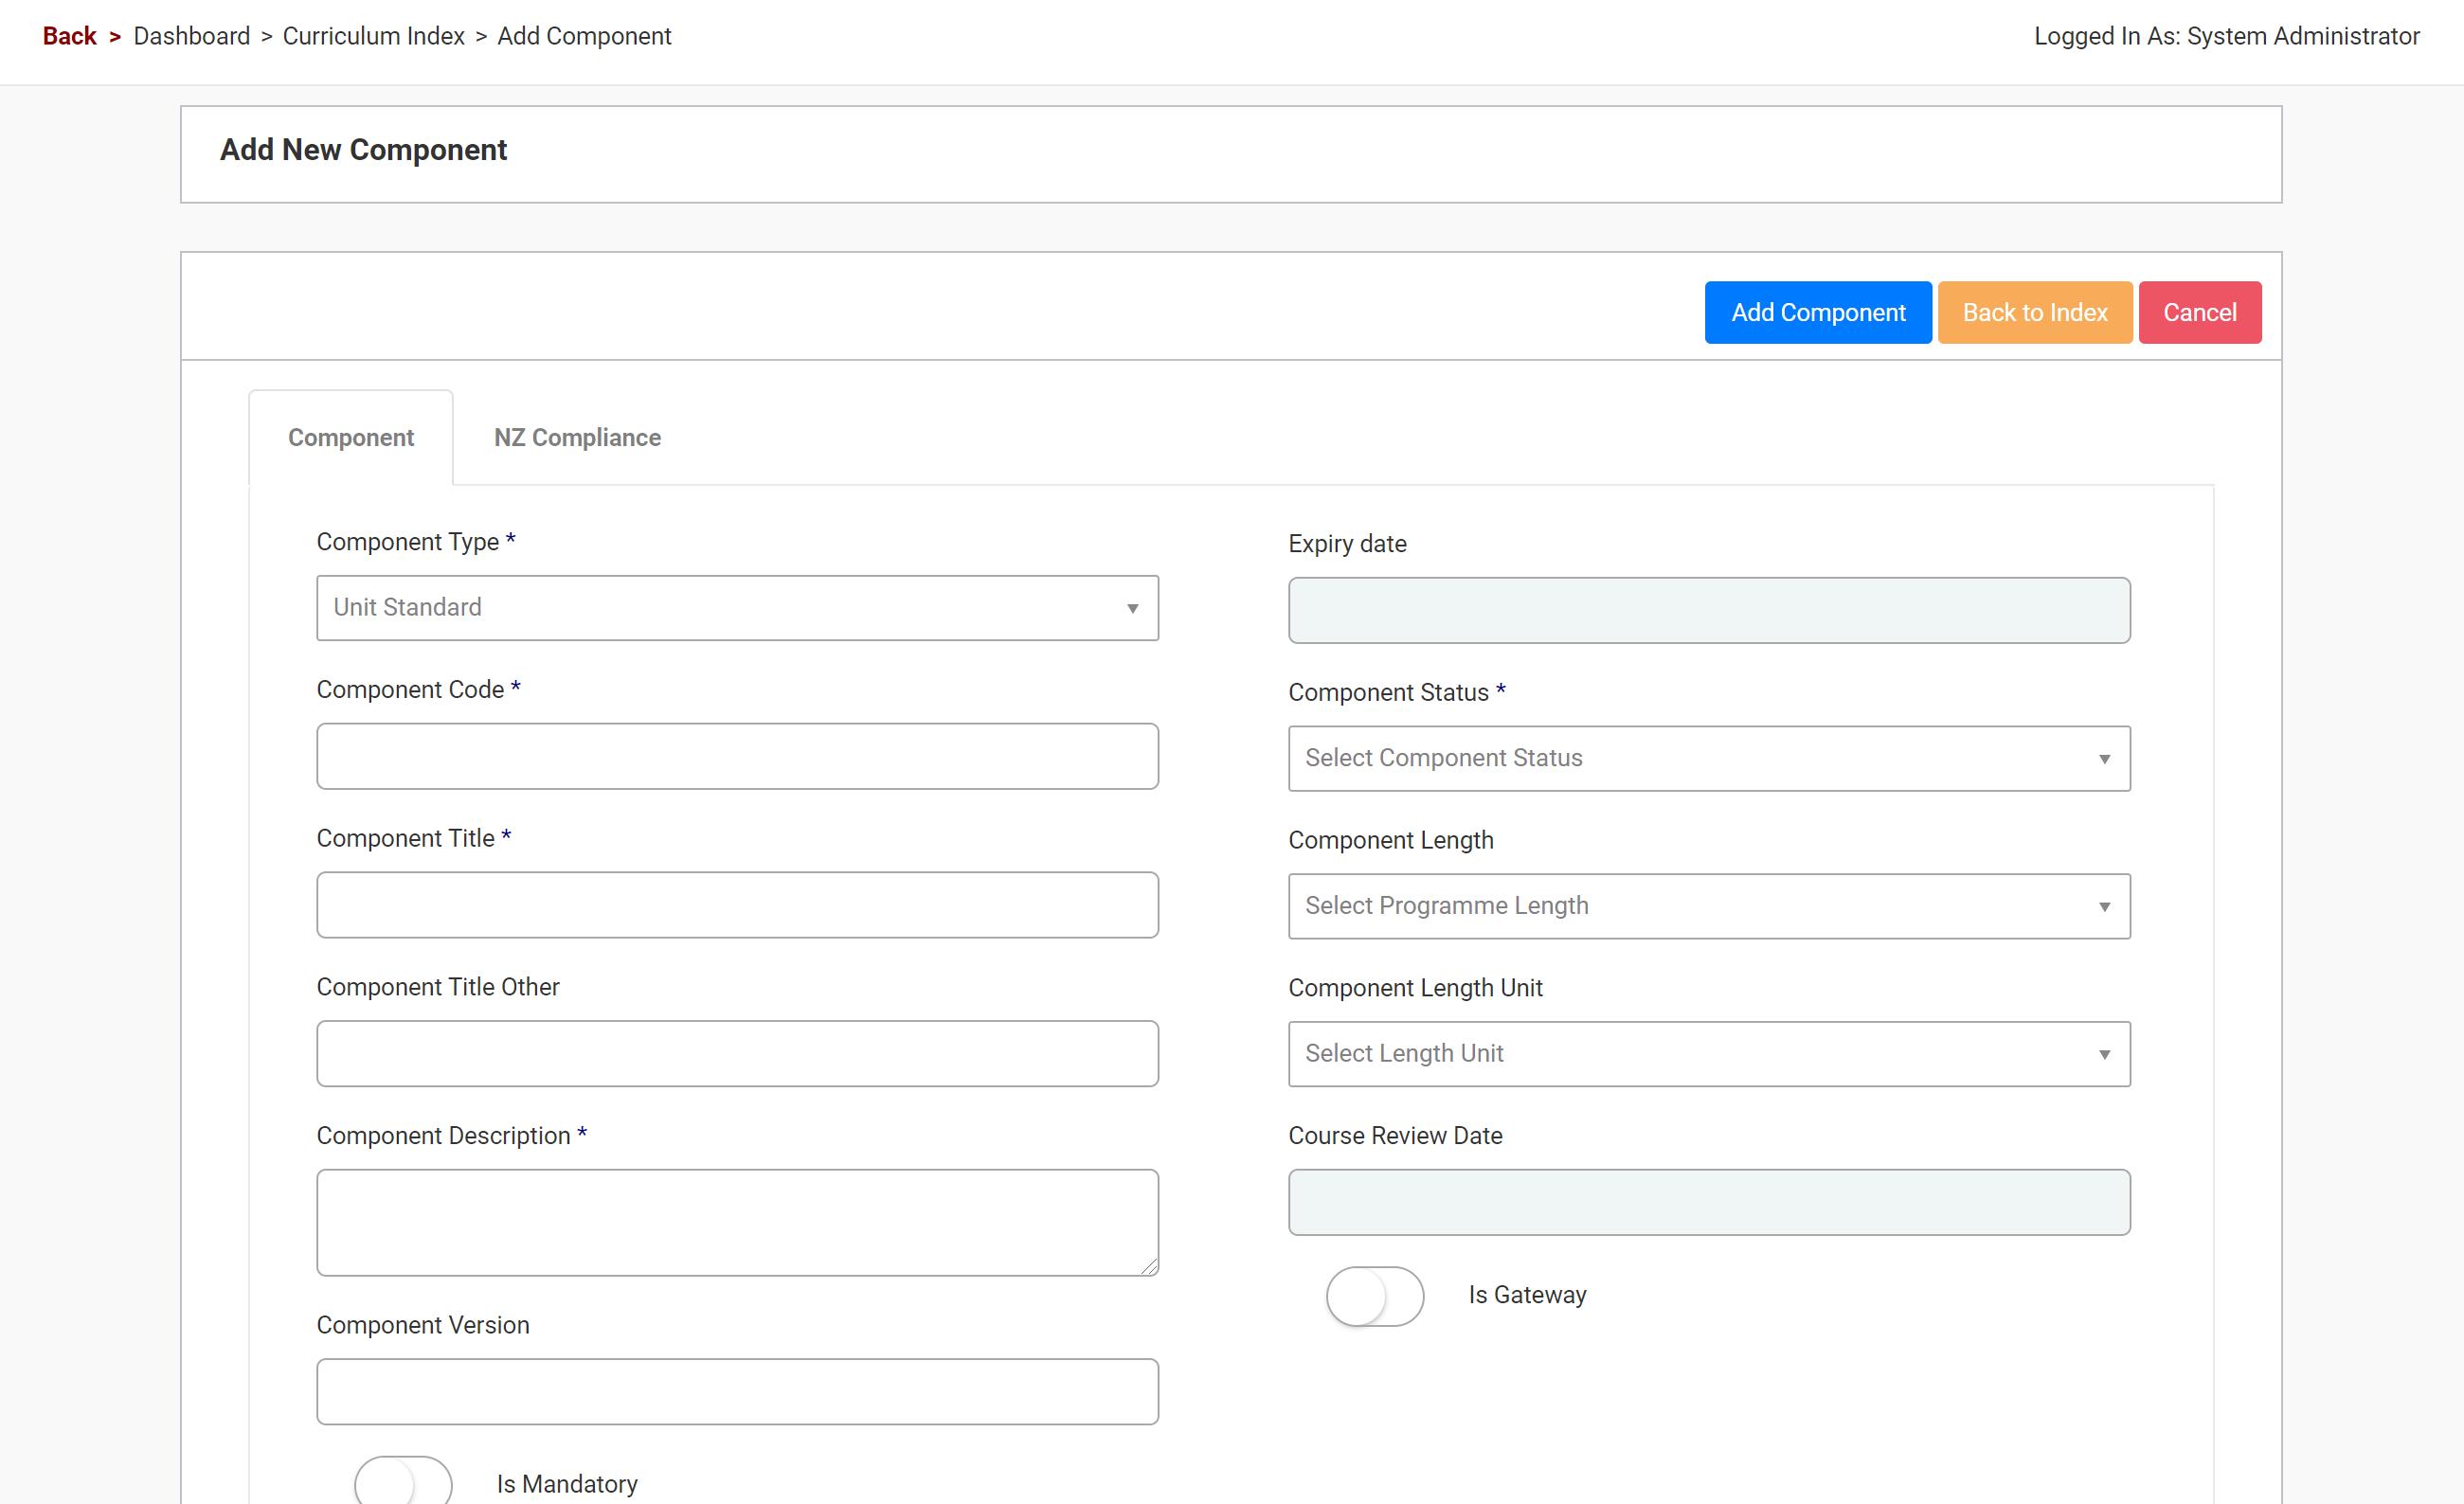
To create a component, click on ‘Curriculum’ in the main menu and then “Create Component”
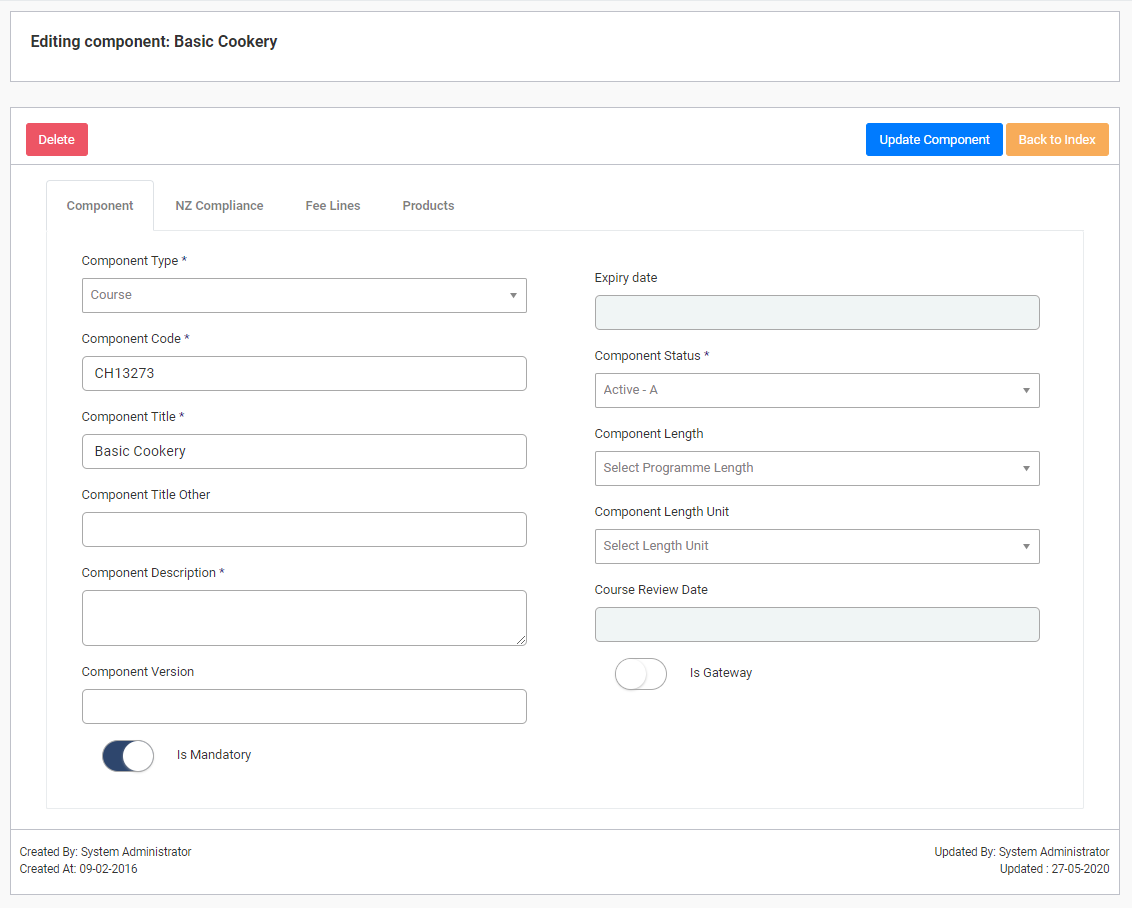
You will be presented with the setup form for a component:

Start with filling in component details like code and title. If it is an approved course that goes into the SDR, use your approval document or STEO to match the information exactly.

| You may create any component you like whether it is reported through and SDR or not. Control what you are creating by selecting the correct Component Type and Return Type (NZ Compliance Section) |
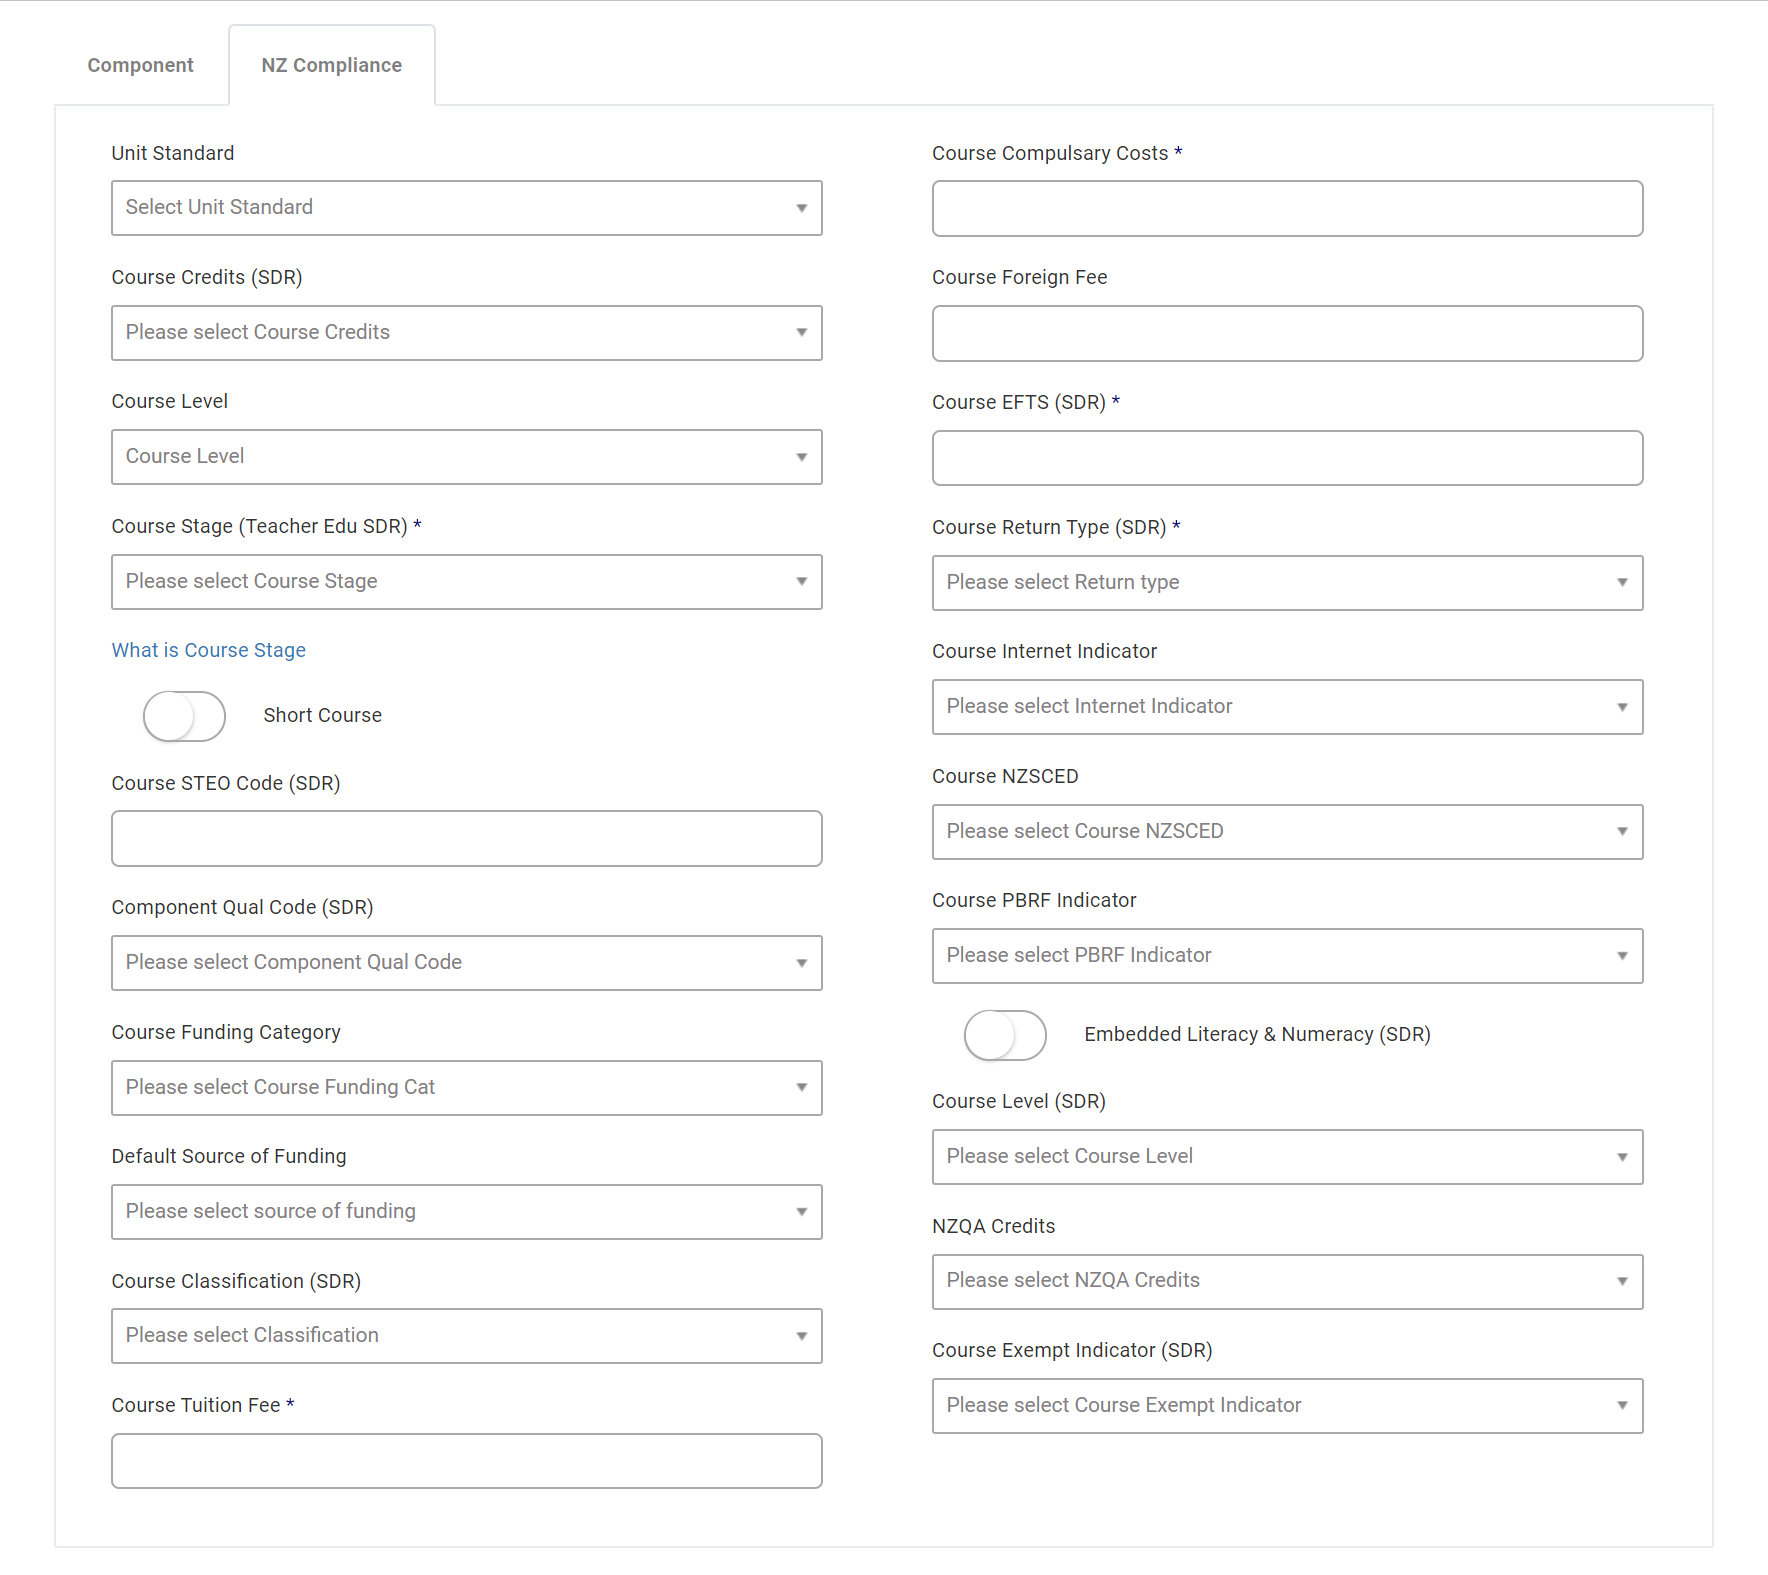
In the ‘NZ Compliance’ section, add further details if your course is approved and needs this information. You will find most of the information in STEO, if your component is not relevant for an SDR you can leave this section blank.
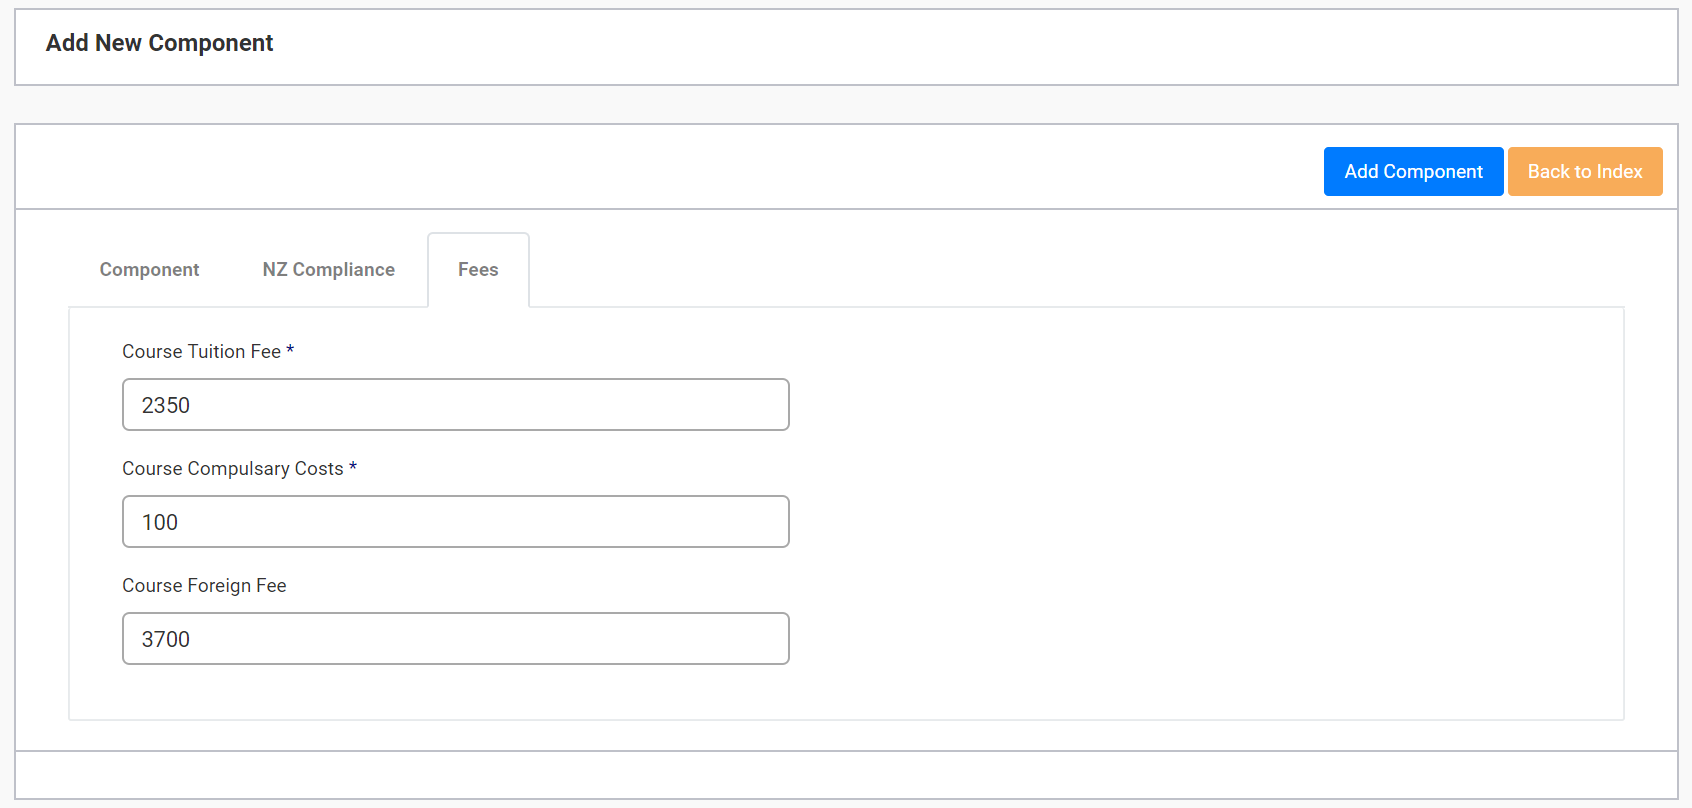
Add the fees (NZ Dollars) into the ‘Fees’ section. This is the fee that is relevant for the SDR and is approved by the TEC (matches the fee STEO). It is also the fee that is used to calculate your Export Levy if you offer your programme to international students (Field: Course Foreign Fee).
When you enrol a student, a fee line is created automatically for the fees below, depending on the students international flag (see Student section), it will use the Tuition Fee or the Foreign Fee.
When saving a component, SELMA will highlight automatically if compulsory fields were not entered or the value does not match entry criteria’s:

Highlight (select) the component (or components) on the left-hand side and click the arrow button to add them to the course you have just created. If the child component you would like to add does not exist, follow the steps of “Create Component” to add it to SELMA.
Create Programmes
At a high-level, programmes are qualifications your organisation offers to your students/clients to complete with you. These can be awarded as certificates, diplomas, bachelors programmes etc.
The programmes you input and create in SELMA don’t necessarily have to be ones that are approved for delivery by NZQA. However, it pays to be sure about this in every case to ensure that you are meeting your obligations as an education provider, so be sure to double check this with your management team.
In any case, the functionality in SELMA allows for programmes that do go through NZQA and those that do not (SDR or non-SDR).
To create a programme, click on ‘Curriculum’ in the main menu and then ‘New Programme’:
You will be forwarded to the Programme Setup form. Start to fill in all information, refer to your STEO if your programme is a NZ approved qualification.
One field to be particularly aware of is the “Progress Measured In” field. As this is what drives the Enrolment Measures for enrolments into the programme. For more information on this, please see the relevant section elsewhere in this manual.
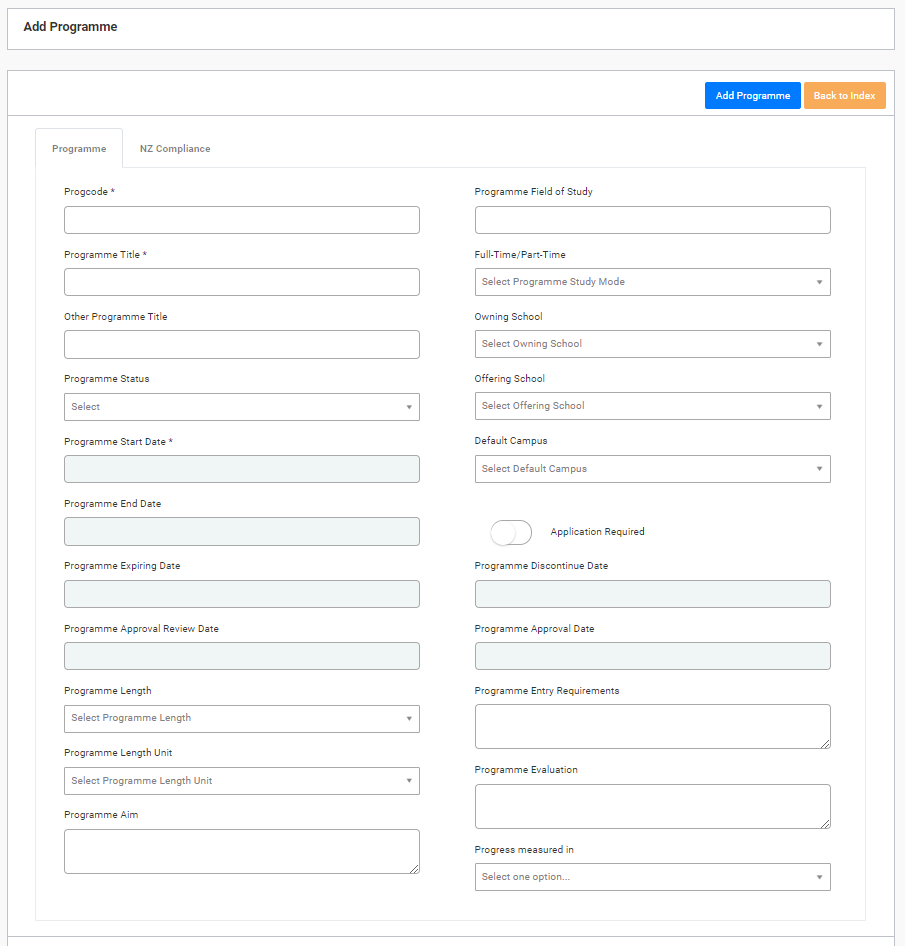
To make use of powerful data calculations in SELMA, enter the Programme Length and Programme Length Unit in the Programme Screen. On the second tab of the programme setup, enter at least all the required fields which are marked with an asterisk (*). This is NZ Compliance relevant information and particularly important if you create a NZQA approved programme in SELMA:
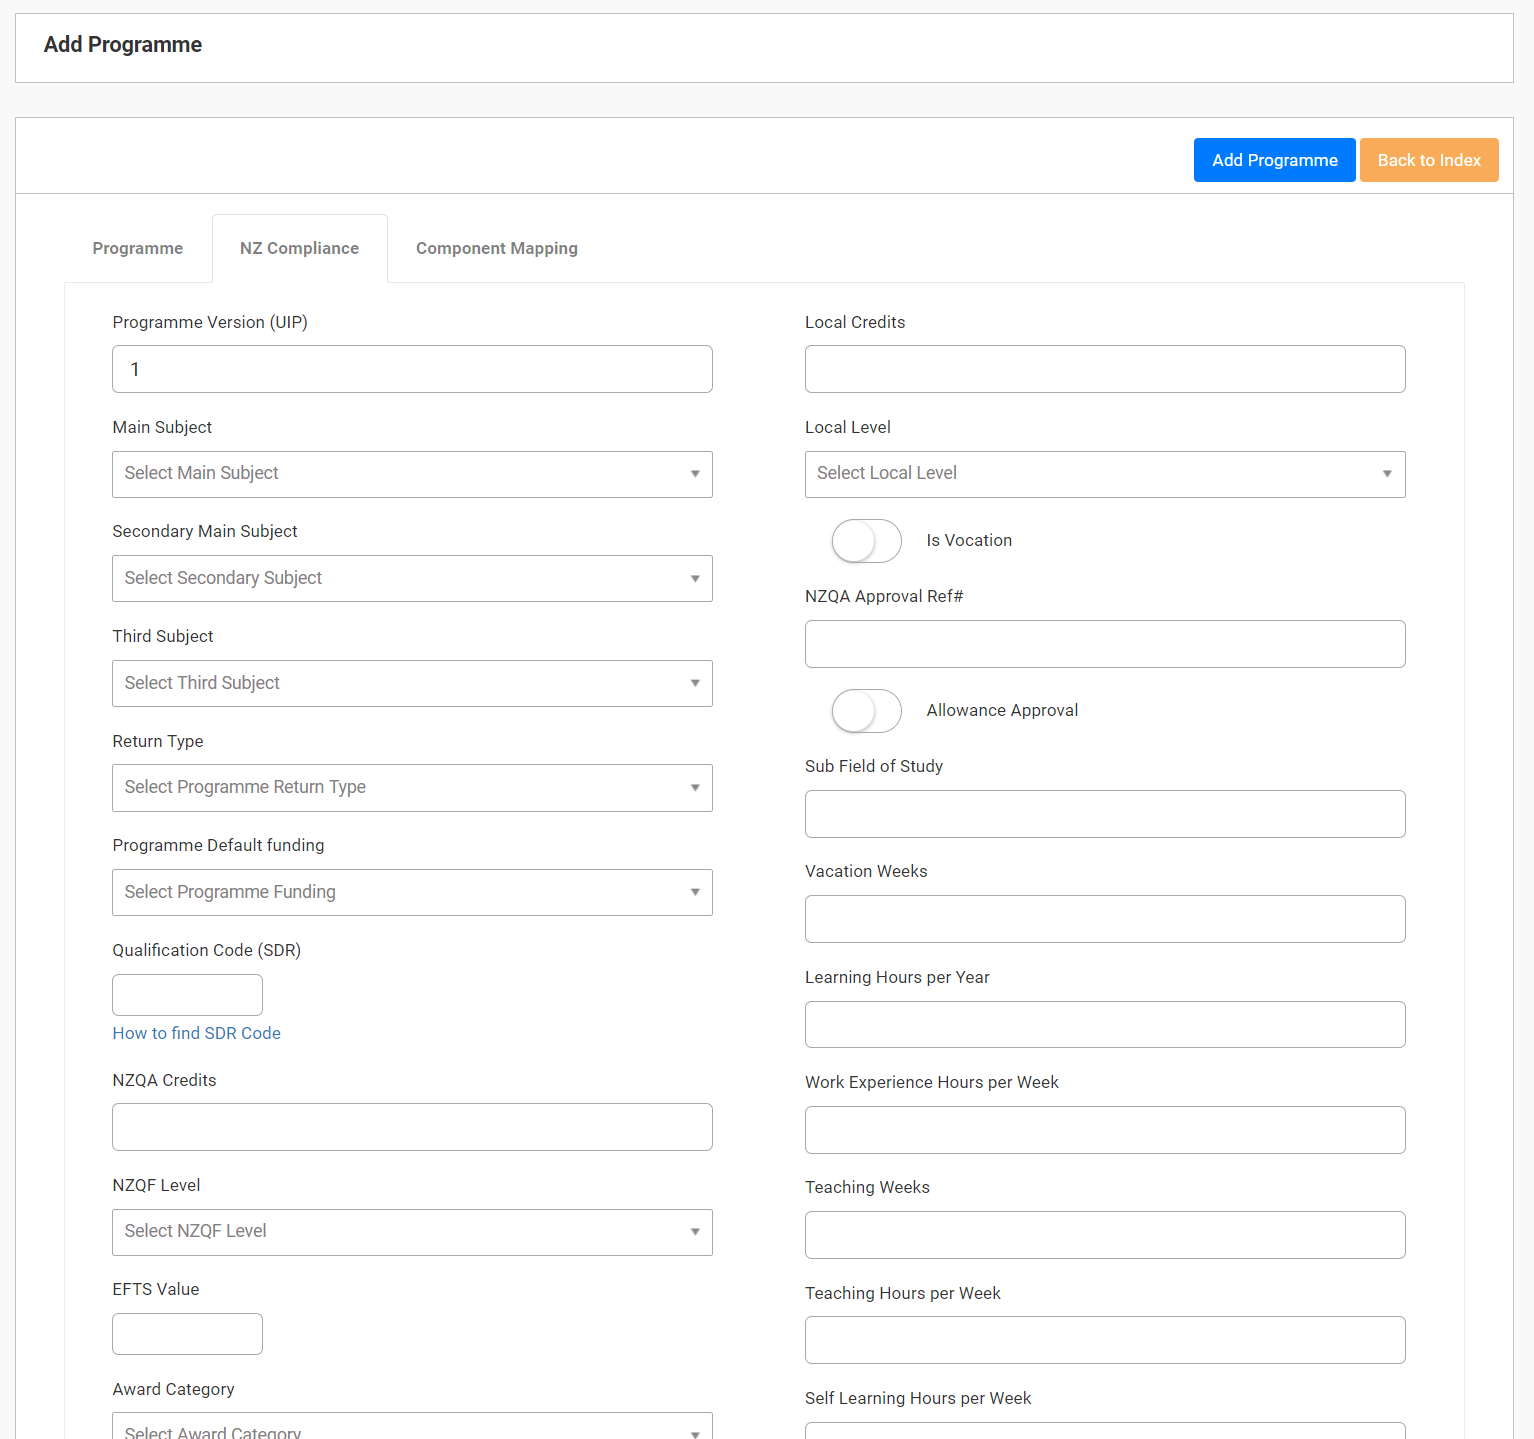
Take care when entering the “Qualification Code”, this is the code your programme is approved for by NZQA, along with being recorded in STEO in your Qualifications section.
The start date is associated with the date approval was granted by NZQA for the programme to be delivered. This has nothing to do with any learner or intake start dates.

| In order to go through a programme setup, it is best to use your programme approval document or have your STEO open in the browser to enter the correct values. |
Once the basic information is entered, create your programme hierarchy in the component mapping tab:
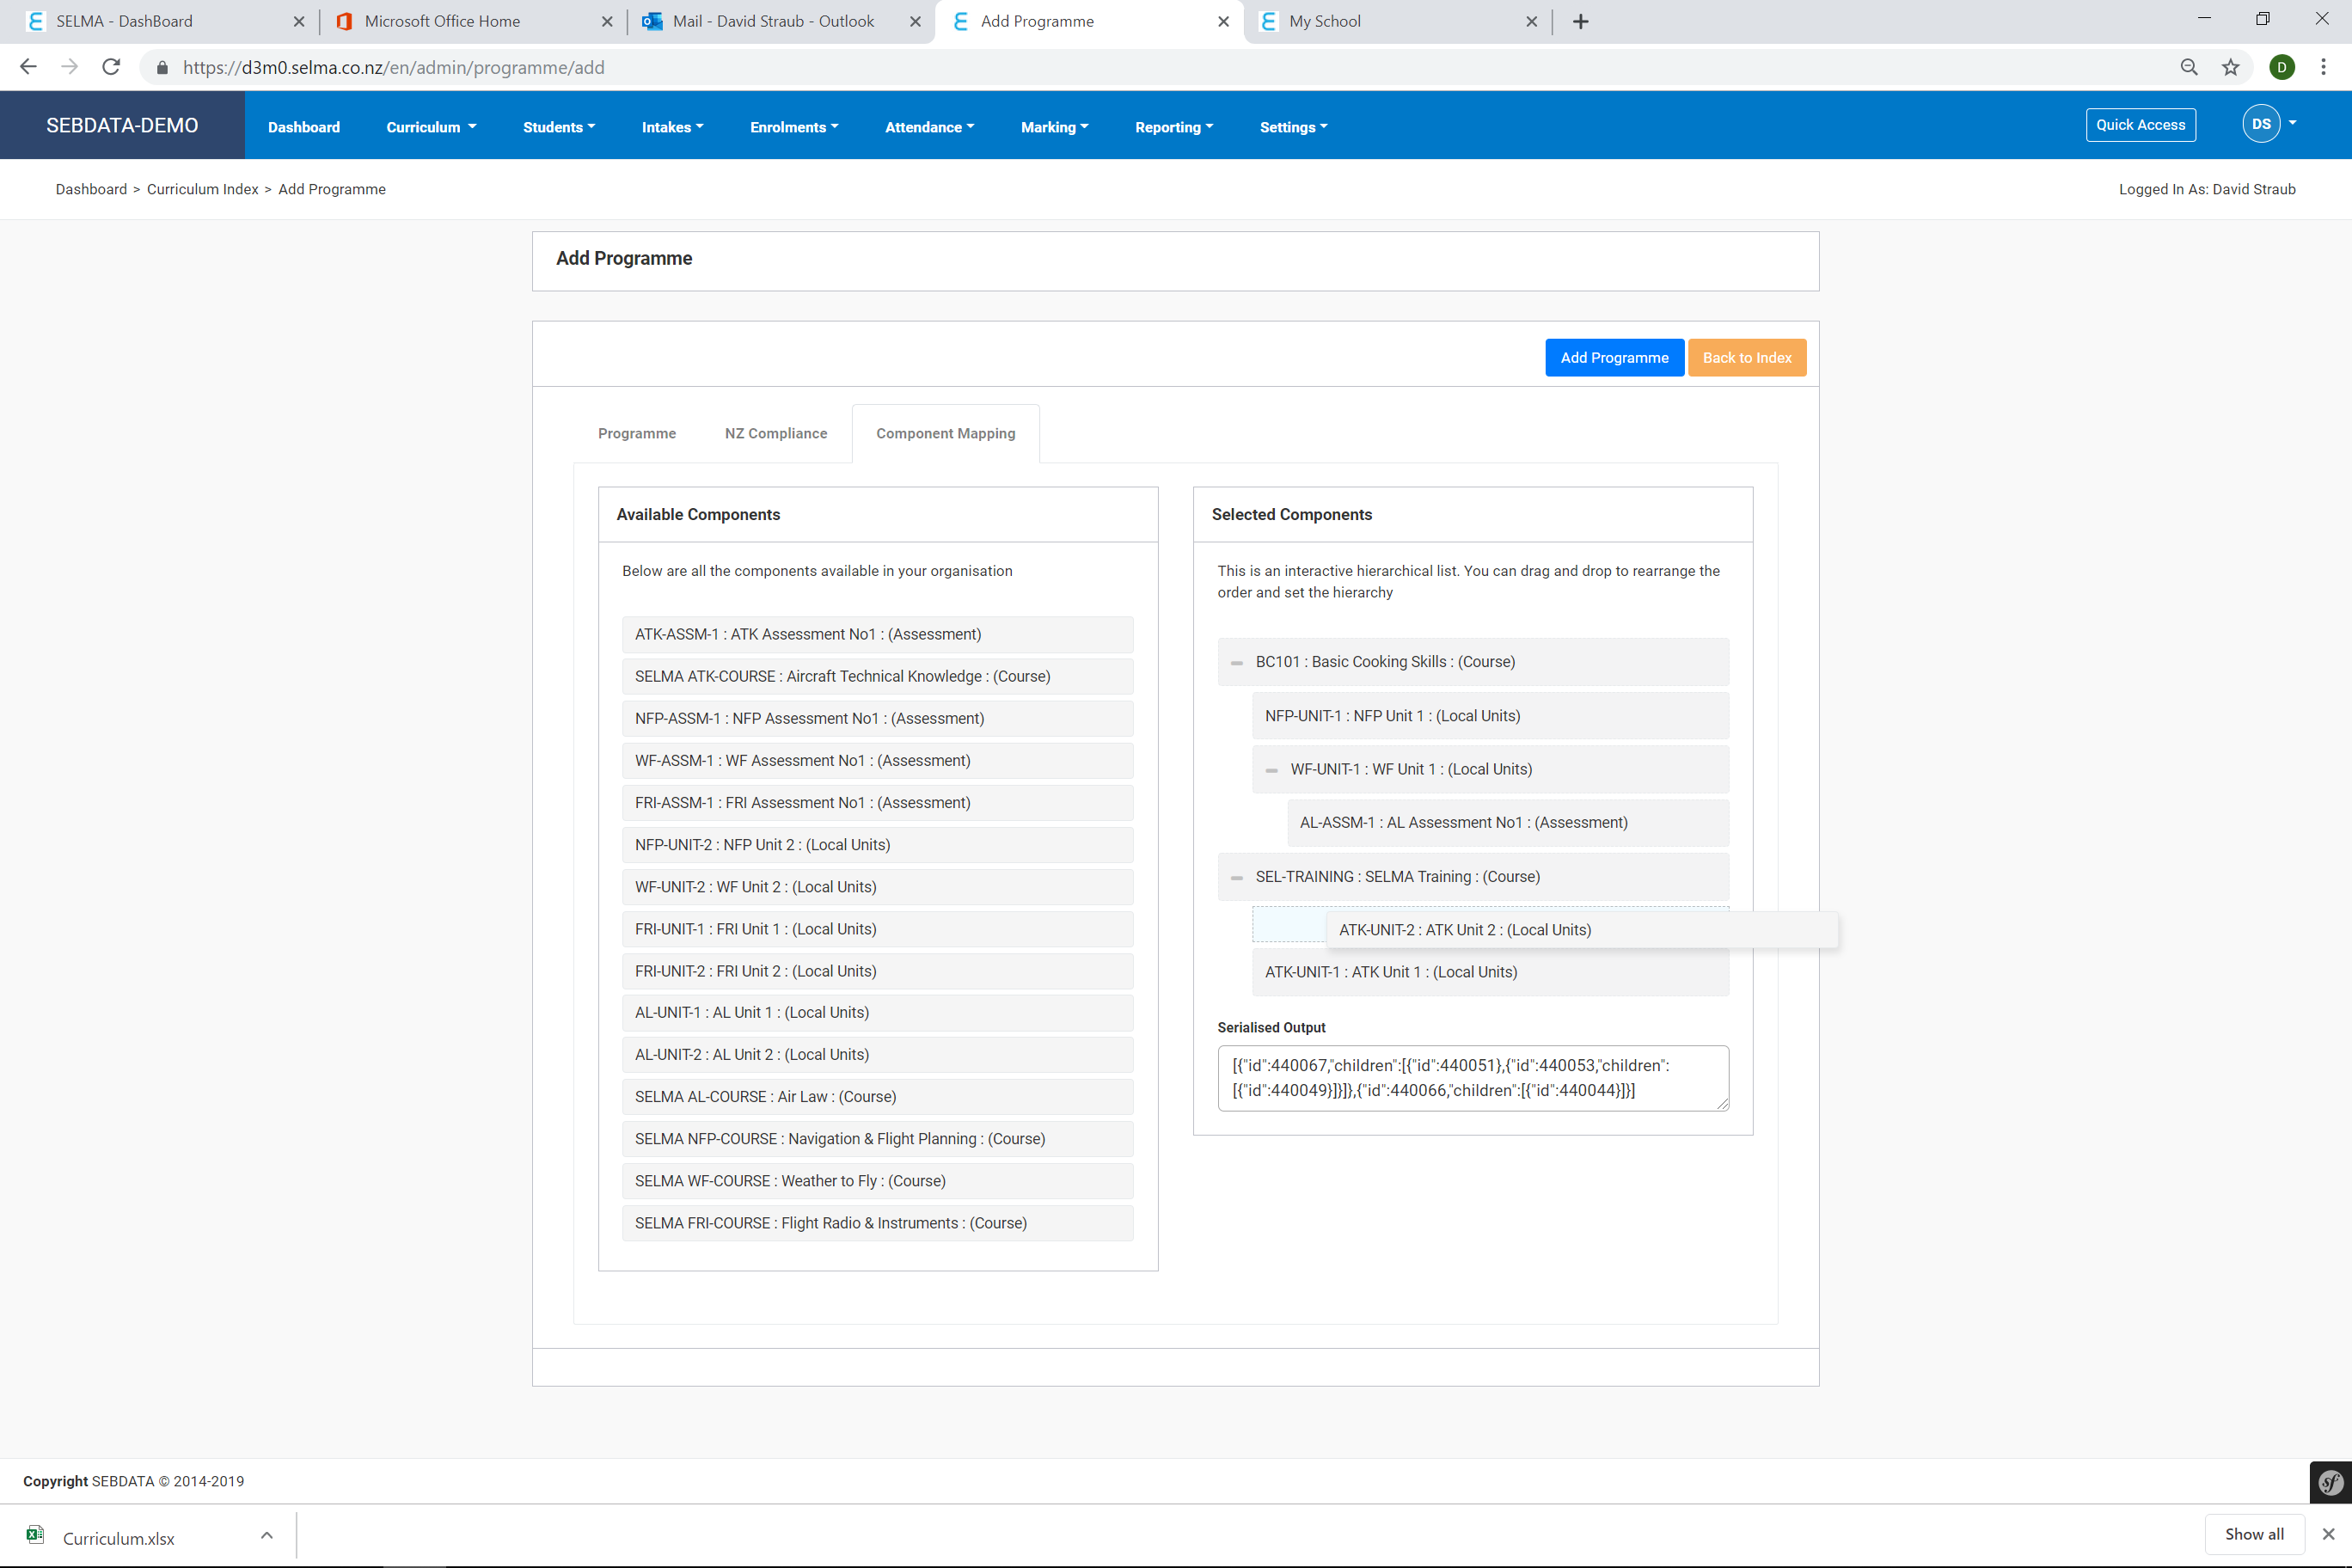
The component mapping screen will show you all available components at the left, these are all active components that are in SELMA. On the “Selected Components” site, you can create the content of your programme.
All selected components become part of your programme – Simply drag and drop components you want in your programme across to the selected section.
The order from top down will define the order of delivery of your components, while the hierarchy of the components are indicated by the degree to which they are indented in this listing. If a component is indented to the right, then it is a child of the component above it.
You can alter this hierarchy ordering here by clicking onto the individual component that you want to change, moving it left or right depending on where you want it to sit, which will define the hierarchy of the components. In the example above, the “NDP Unit 1” is a child component of the “Basic Cooking Skills Course” and so on.
On rare occasions, some Internet Browsers have been known to not register any changes to the programme hierarchy if you have been editing this section. If this happens to you, there is a simple fix: click onto each of the programme components and shift it left and right, then back to its original position.
It should save now. If not, please reach out to us at support@selma.co.nz
Edit Programmes or Components
To edit an existing component or a programme, simply find the curriculum item in the “Manage Curriculum” grid and select it by clicking on the link:
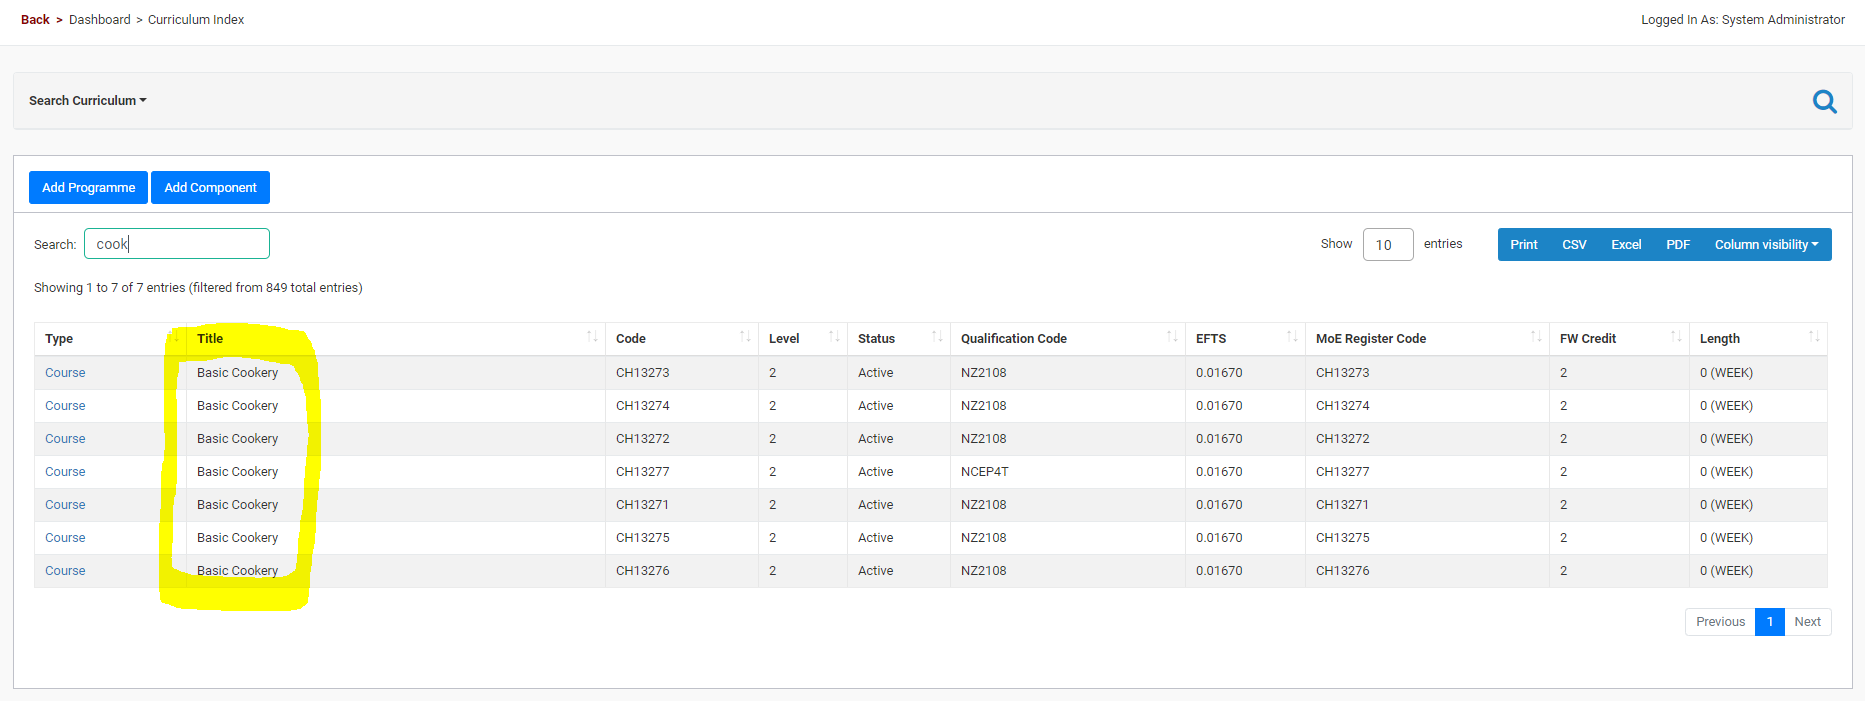
In the above example we searched for “cook” which will reduce the list of available items down to all items containing “cook”. In the case above there is only one matching record. To select it click on the highlighted link.
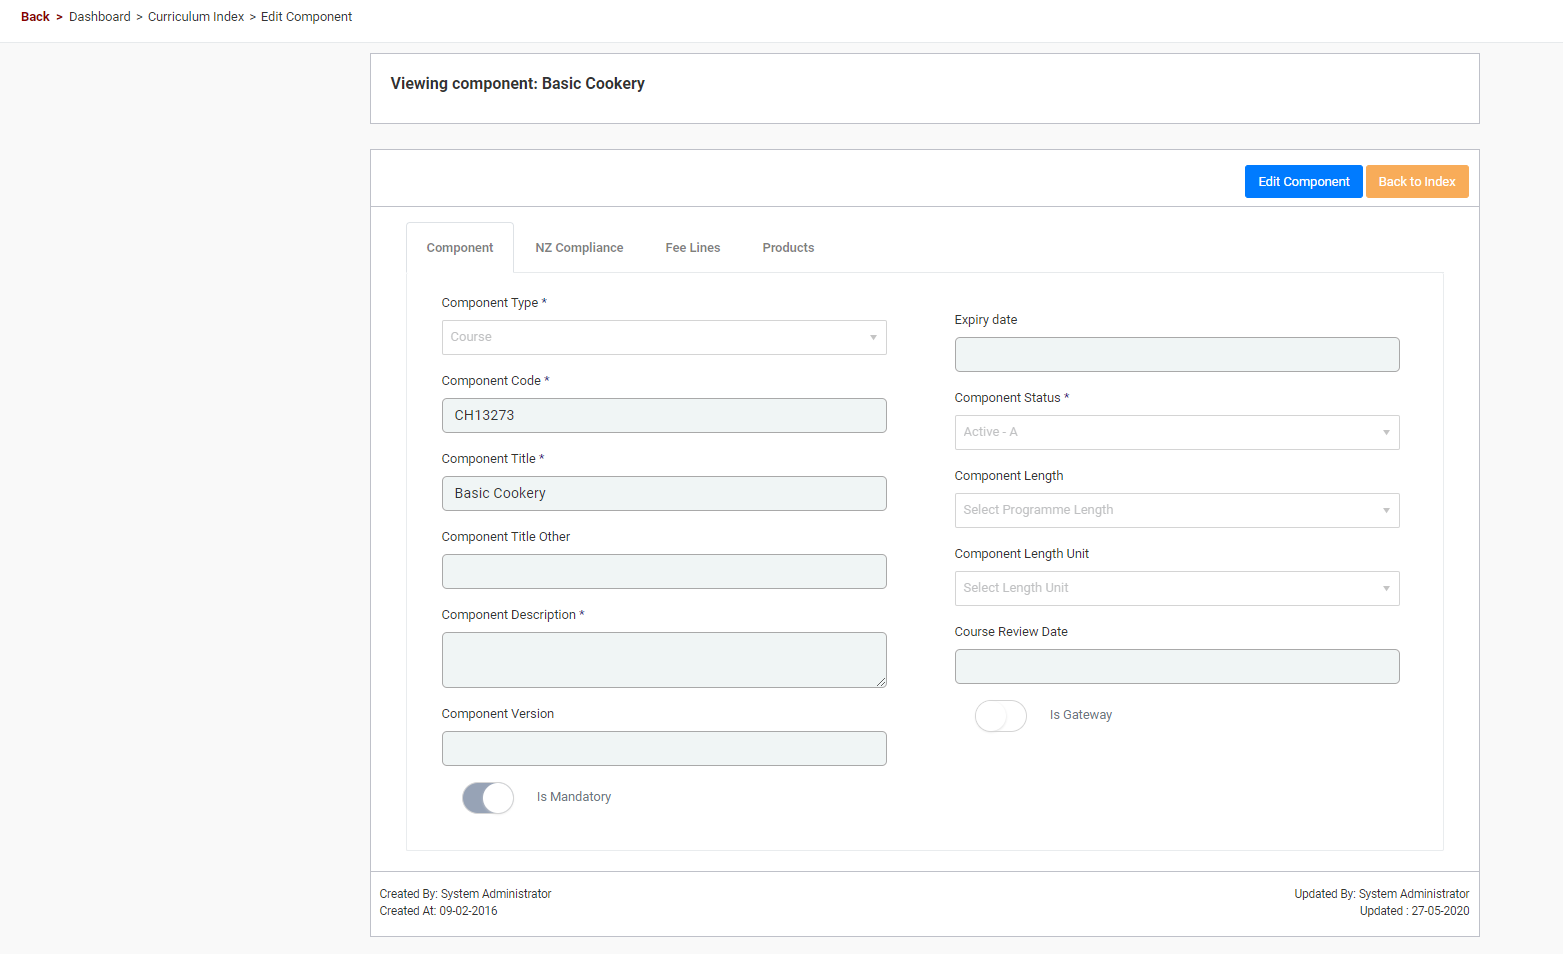
Once the component is selected you are back on the component form. The form title indicates that you are viewing the component. To edit it click the “Edit Component” button and click “Update Component” once you have updated the information. You may be able to delete the record from here however if it has been used in any intake or programme the Delete option will not work. The process to edit a programme is the same.
Fee Lines
Fee Lines are where you will enter information related to fees with regards to a particular programme of study. Users will notice that “Fee Lines” appears also on the course component level as well – this is the same idea, just applied to courses.
The choice of whether to use the Fee Lines section in programme or course level is up to each provider, and depends on each provider’s fee charging model.
Users will also notice that there are Fee information fields under the “NZ Compliance” tab as well. It is important to note a distinction here: these fee fields under the NZ Compliance tab are expressly for SDR reporting purposes only, and do not marry up to invoicing information.
Fee Line information in programmes is what drives invoicing.
Fee Delays
In some instances of SELMA, when editing or creating a fee line, users will notice a field called “Fee Delay (Days)”.
This is to accommodate programmes that take longer than 1 year of study to complete. It allows the education provider to set up the fees for the entire duration of the programme in the same sitting.
This is achieved by adding separate Fee lines for each year of the programme at the same time, except, for the Fees that will apply in a subsequent year of study, the user will add a number of days into the “Fee Delay” field to signal to SELMA how many days to wait (or ‘delay’) before charging this fee for the programme.
If the programme does not take more than a year to complete, users can just input ‘0’ into the Fee Delay field in this case, as it is a compulsory field and SELMA will throw an error if it is not filled in.
Fee Delay Simple Illustration
To illustrate the operation of Fee Delay from a conceptual point of view:
If a programme takes 2 years of study to complete and tuition fees are $8,000 for each year, then the user will be able to add two fee lines at once in the following manner:
- Fee Line #1: $8,000 tuition fee. Fee Delay: ‘0’
- Fee Line #2: $8,000 tuition fee. Fee Delay: ‘365’
The first Fee Line is the tuition fee for year 1, therefore Fee Delay is set to ‘0’ allowing SELMA to charge it immediately.
The second Fee Line is the tuition fee for year 2, therefore Fee Delay is set to ‘365’, prompting SELMA to wait 365 days before charging this second Fee Line.
Clone Programme and Component
SELMA users are able to clone existing programmes and components as required.
This will help administrators interacting with the SELMA system quickly set up new programmes and associated components at a moment’s notice using an already created programme/component as the basis, saving administrators valuable time from not having to construct these manually from scratch and having to input individual field data by hand one by one over and over again.
To begin this process, from the SELMA dashboard, please go to Curriculum ? Manage Curriculum. From here, proceed with one of the two following options:
Clone Programme
Please click the “Clone Programme” button highlighted in the screenshot above (the left one of the two).
The user will be presented with the following screen once they have done this:
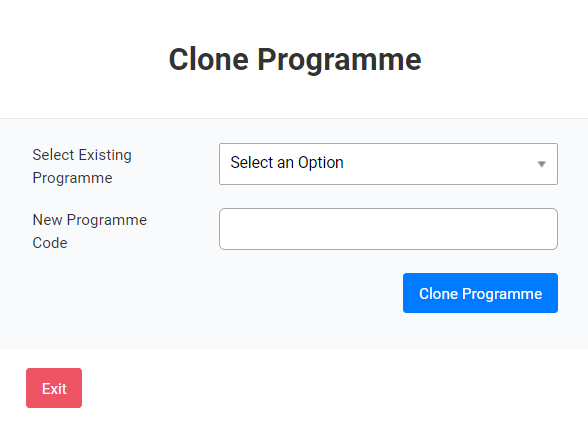
From here, the user is invited to select the programme that already exists in the SELMA system that they would like to clone.
Next, the user is invited to input the programme code that they would like designated to the new programme clone that is created as a result of this process.
When the user is happy with their selections here, they can go ahead and click “Clone Programme”.
If this has all been done adequately, SELMA will display a green success message like the following, and the cloned programme will then be searchable in the curriculum grid:

Clone Component
Please click the “Clone Component” button highlighted in the screenshot above (the right one of the two).
The user will be presented with the following screen once they have done this:
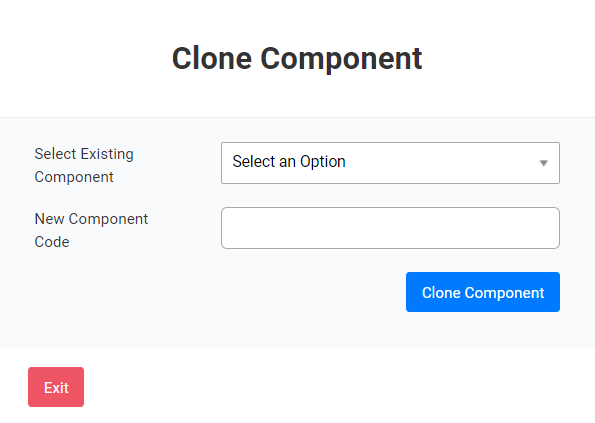
From here, the user is invited to select the component that already exists in the SELMA system that they would like to clone.
Next, the user is invited to input the component code that they would like designated to the new component clone that is created as a result of this process.
When the user is happy with their selections here, they can go ahead and click “Clone Component”.
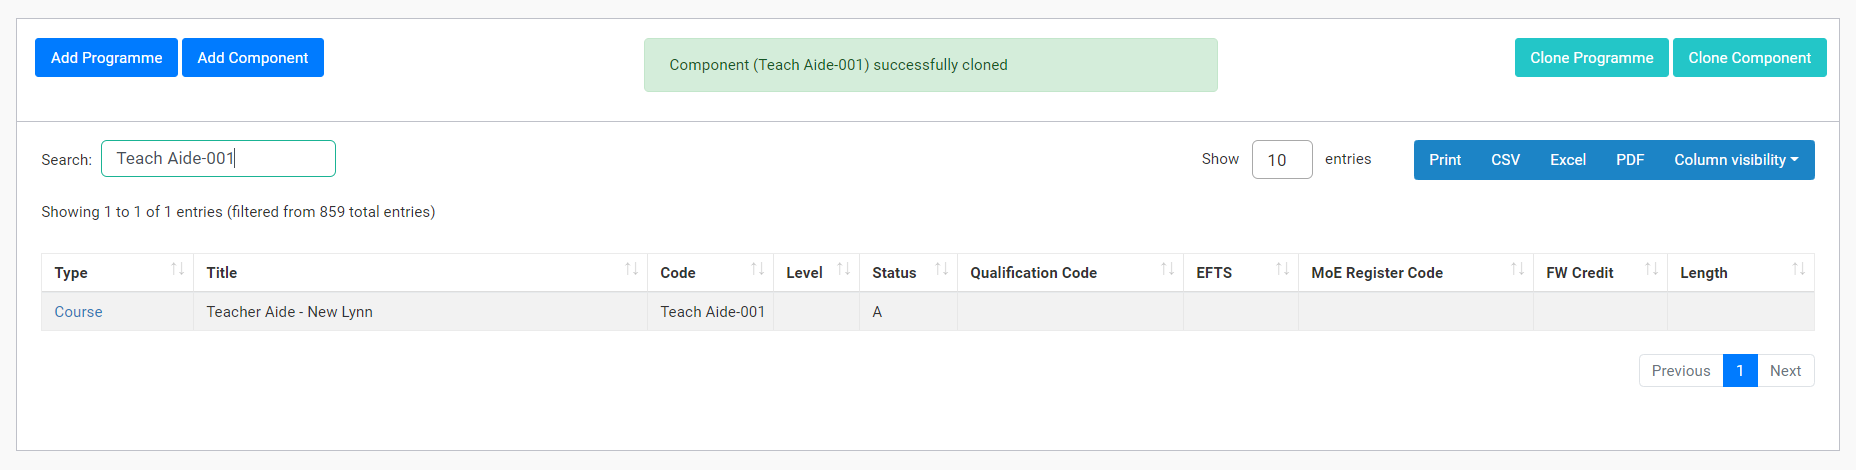
If this has all been done adequately, SELMA will display a green success message like the following, and the cloned component will then be searchable in the curriculum grid:
Unit Standards
Unit standards specify what a candidate for assessment needs to know, do, and understand.
In the SELMA system, unit standards shows up as a particular type of curriculum component that you can create and interact with in the system.
You can access Unit Standards by clicking on “Unit Standards” under the Curriculum tab:
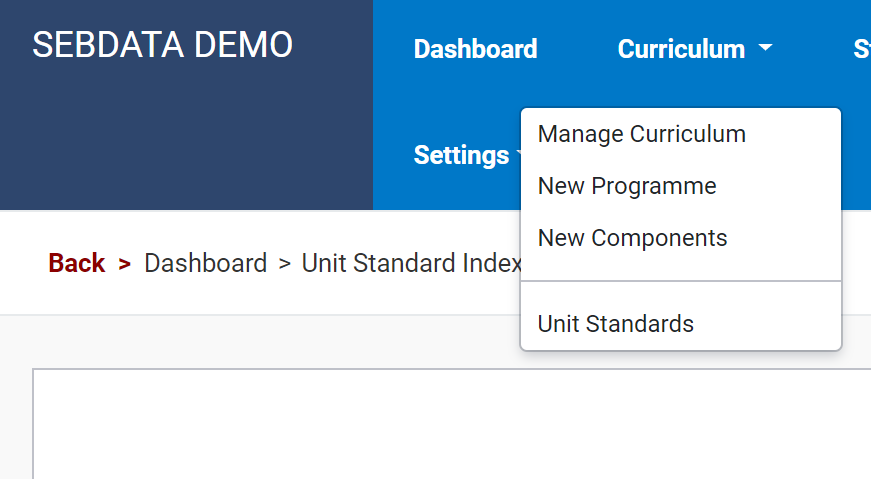
To create a Unit Standard, go to Curriculum ? New Components, then for the “Component Type”, select: “Unit Standard”. Then fill out the rest of the form as completely as possible.
As mentioned elsewhere in this manual, where managing curriculum items you can create different nesting hierarchies between components. Meaning that you can also include Unit Standards as part of this nesting process when setting up your programme/qualification’s hierarchy.
Component marking function
You are now able to mark multiple components as being successful at the same time.
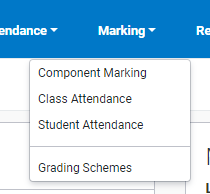
To do this, go to the “Marking” tab, and click “Component Marking”:
From here, select the student and the intake you would like to mark in the drop down menu’s provided, tick one of the customizable options if applicable, then click “Search” to the right:

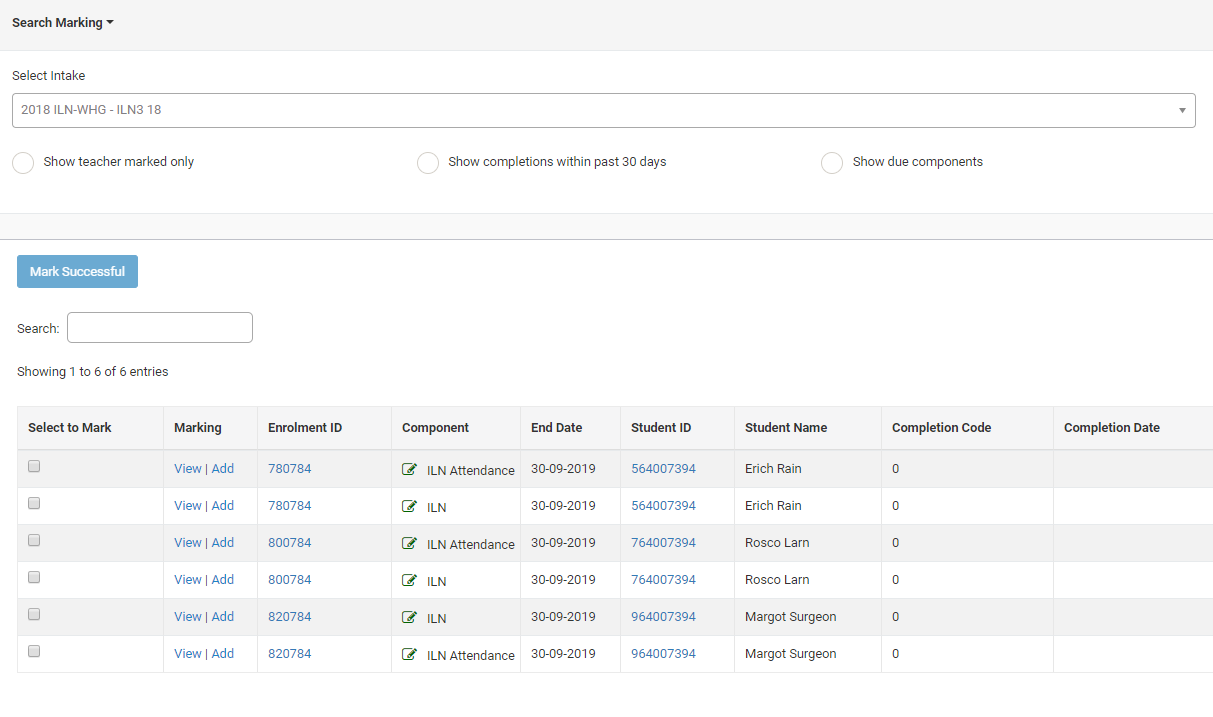
Lastly, select the components you would like to mark, then click “Mark Successful”:
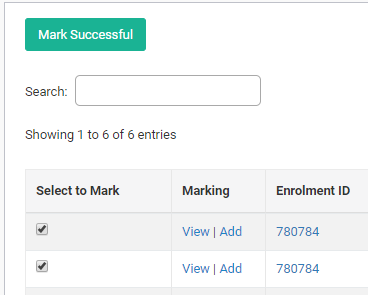
This will mark all selected components as successful: making the completion code as completed as well as entering a completion date.