
When you log-on to SELMA after the completion of the system software update, the user will notice that there are noticeable differences in the dashboard setup of SELMA from what it was before the system update.
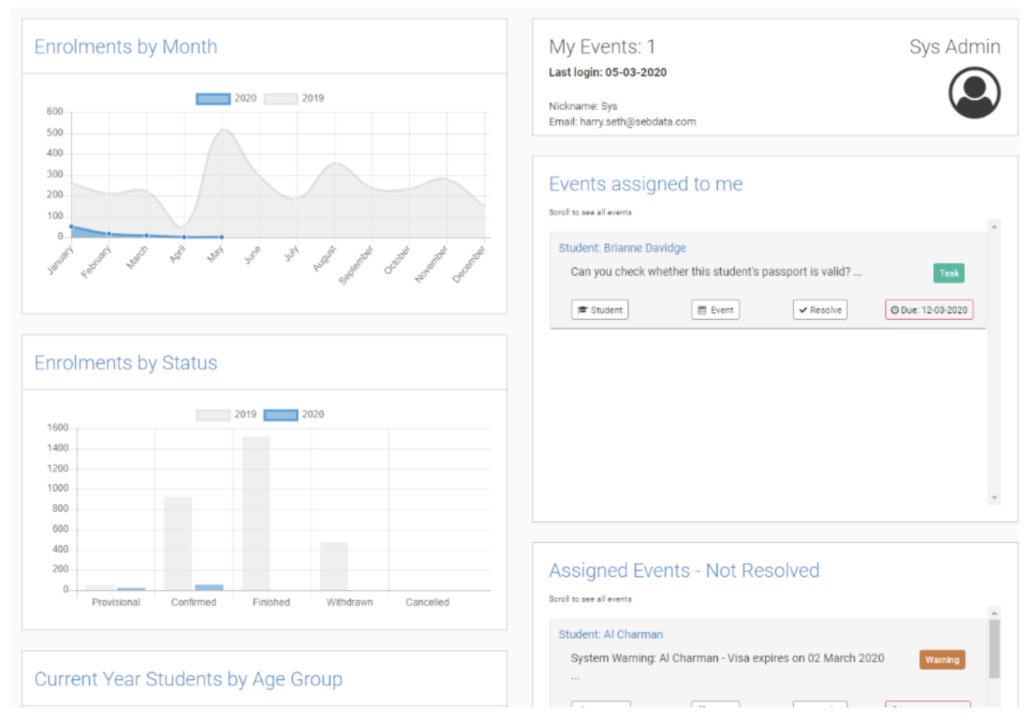
The user will notice – on a high level – that the left side of the dashboard, as seen here in this screenshot, are elements of the dashboard that users are already familiar with.
To the right of this are features that are new to the system. A healthy majority of this document is designed to walk you through these new features, how to use them, how they work, and where to locate them. The big ticket items here are the new task and events system which has been introduced to SELMA in this new system update, as can be seen in the above screenshot.
Of course, any other major changes to the SELMA system not captured in the dashboard will also be included and discussed here, each in their own separate sections.
The screenshots in this software release note have been taken from a sandbox environment of SELMA.
Also, please note that certain sections of this software release update may or may not apply to your education organization depending on whether you have subscribed to certain modules that were released with this software update. To assist with this, each section will begin with a note about who the section applies to.
Events
This software release update about Events in SELMA applies to all users of the SELMA SMS.
What are events?
Events are essentially extensions of the previous “notes” function in SELMA.
Whereas previously, notes were added to student records to keep track of key information, documents, and attachments relating to a student in the SELMA system, Events in SELMA take this concept a step further.
Events are any tasks that need to be completed in relation to a particular student on the SELMA system. You can have time-based triggers – reminders – attached to these events, that will alert you after a predetermined set time to remind you to look at the task, or to action it in some way of your choosing.
You can set these reminders to alert you on a certain day as well about a particular action you want to take.
Events can be either user or system triggered (more on this below).
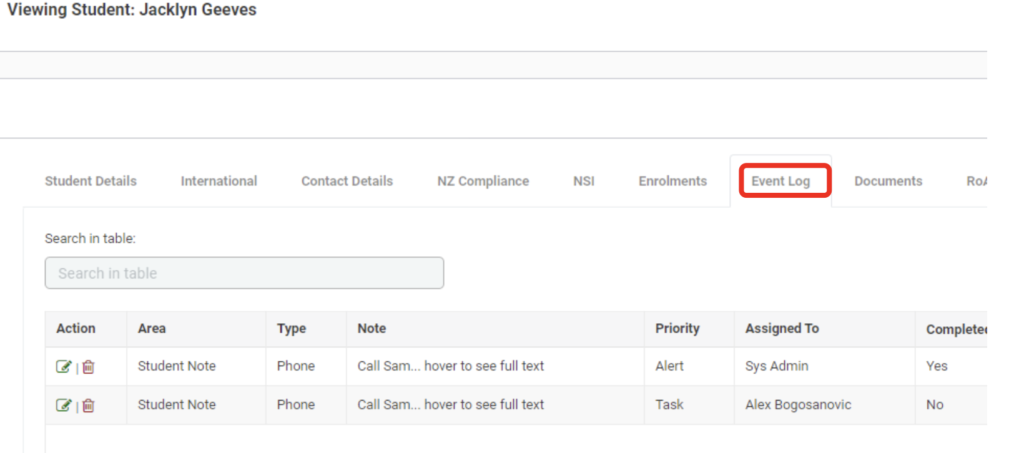
These relate only to students and can be entered into the student’s information – to access this, click into the student of your choice, and navigate to the tab that says “event log”. This is the hub where all events are managed for the student and was where, previously, student notes were contained:
Events are great for any task or action that needs to be taken that has a deadline that you need to meet. For example, if you have an international student who studies with you on a student visa, a possible event for you to create would be to set up an Event to alert you two weeks prior to the students’ visa expiring, which will prompt you to follow up with the student about this.
This is an example of a system triggered event in that, based on a timeline previously established by the user, the system triggers a user as to a certain event at a certain time.
Another type of event is a user triggered event. These events are tasks that need to be completed by a user, but there is no harsh deadline applied (unless the user desires a personal reminder, in which case they can program this into the event).
How to create an event
Creating an event is similar to creating a note in the previous version of SELMA:
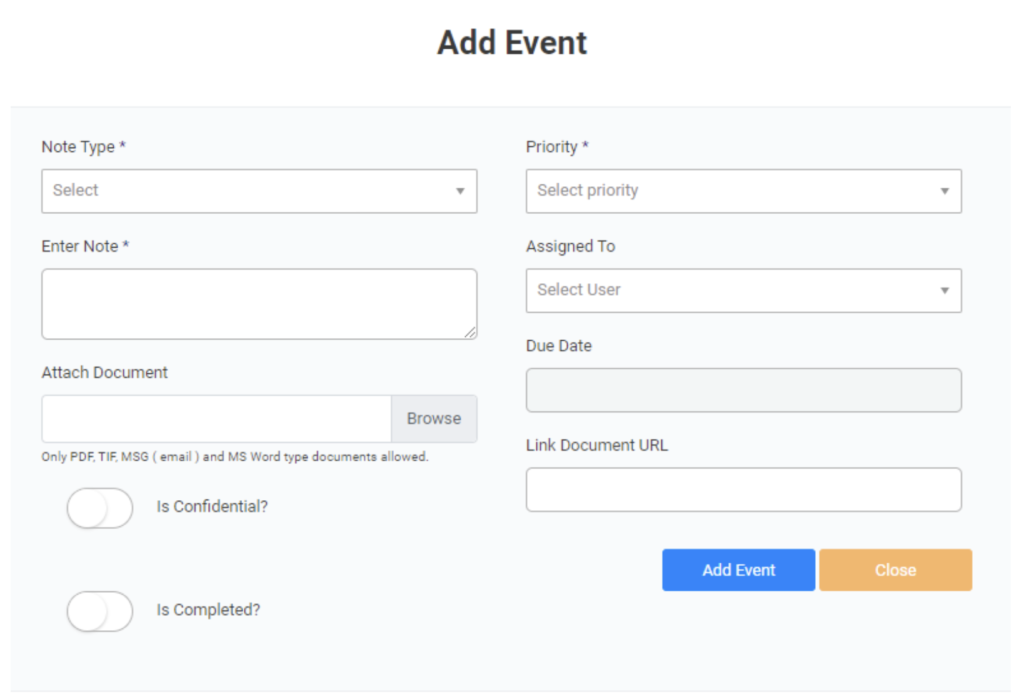
As you can see in the above screenshot, when creating an event the fields on the left side are the ones that you may already be familiar with when creating a note.
The Events functionality adds in all the fields on the right – the priority field, whom the event is assigned to in your team, the due date for the event (this is where the reminder functionality comes in), and also a document URL link field option.
The “assigned to” function allows you to assign an event to a certain member of staff in your organization to take ownership of the task.
The “priority” function allows you to set what type of event it is: alert, task, warning, note only.
If you select “note only”, which – as the name suggests – is just a notes function, this does not show up under Events on the SELMA dashboard. However, all the other “priority” function options do.
Once you have filled in all this information, click “Add Event”, and it will be created in the system:

(above: successfully created events).
Once the event has been successfully created, it will show up in the dashboard of the user to whom the event was assigned, like in the following screenshot:
As mentioned above, notes do not appear here. All other Event types do.
When an Event has successfully been completed and/or addressed, click the “resolved” button above, or else open the Event in the Event log, and select “is completed”, which will remove it from the dashboard so that it no longer alerts you. If the “is completed” button is selected, the Event will remain in the event log for your reference.
Navigating the events menu on the SELMA dashboard
Here is a breakdown of the different sections of the Events log that you can see on your dashboard when you first open up SELMA. These are dynamic ways for you to quickly interact with Events that you need to address, without spending valuable time on going into a particular student’s event log.
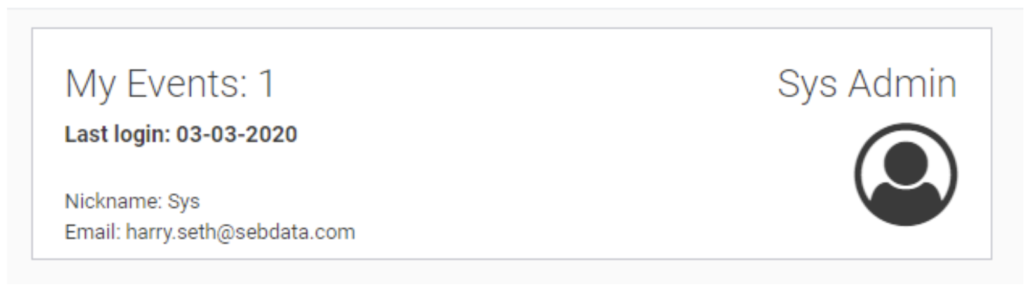
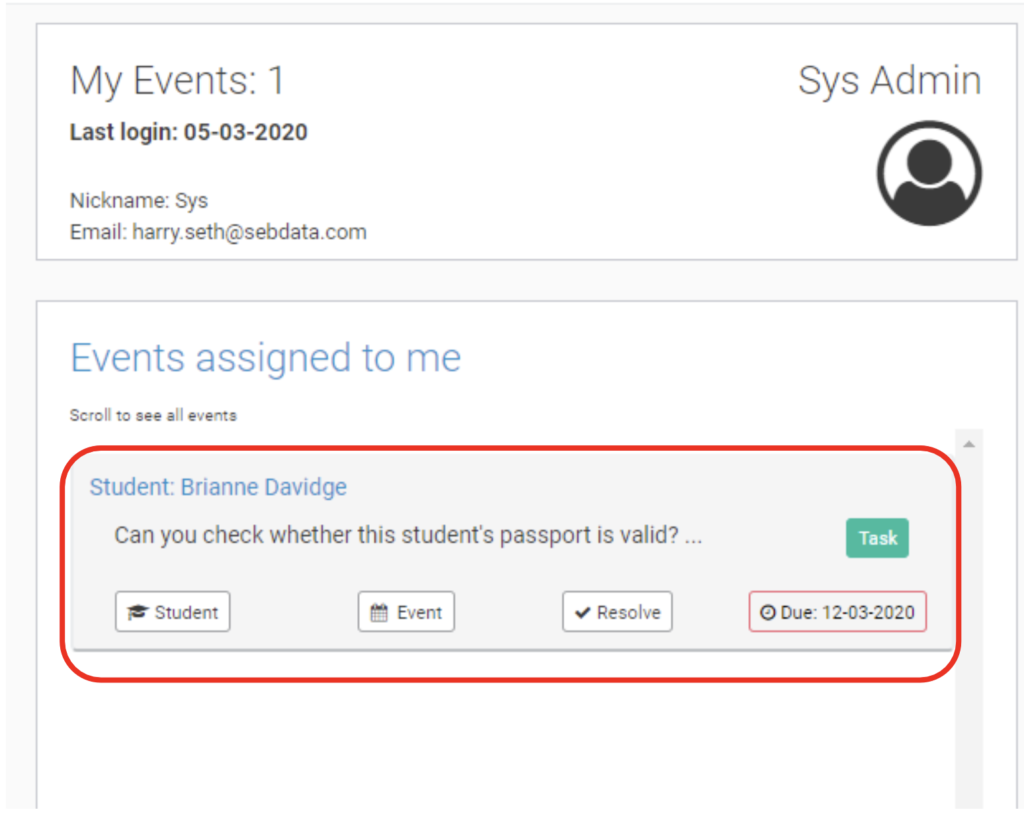
At the top of the page is what you can see in the above screenshot: this gives you an overall snapshot of the number of different Events on your dashboard that you need to address. In this case, the total number of events assigned to this particular user is 1. Their name is displayed on the right, above an icon of a cartoon, shadowed person – in this case, “Sys Admin” – and their name/email address information is displayed below the My Events counter. The system also reports the last day in which this user logged into the system.
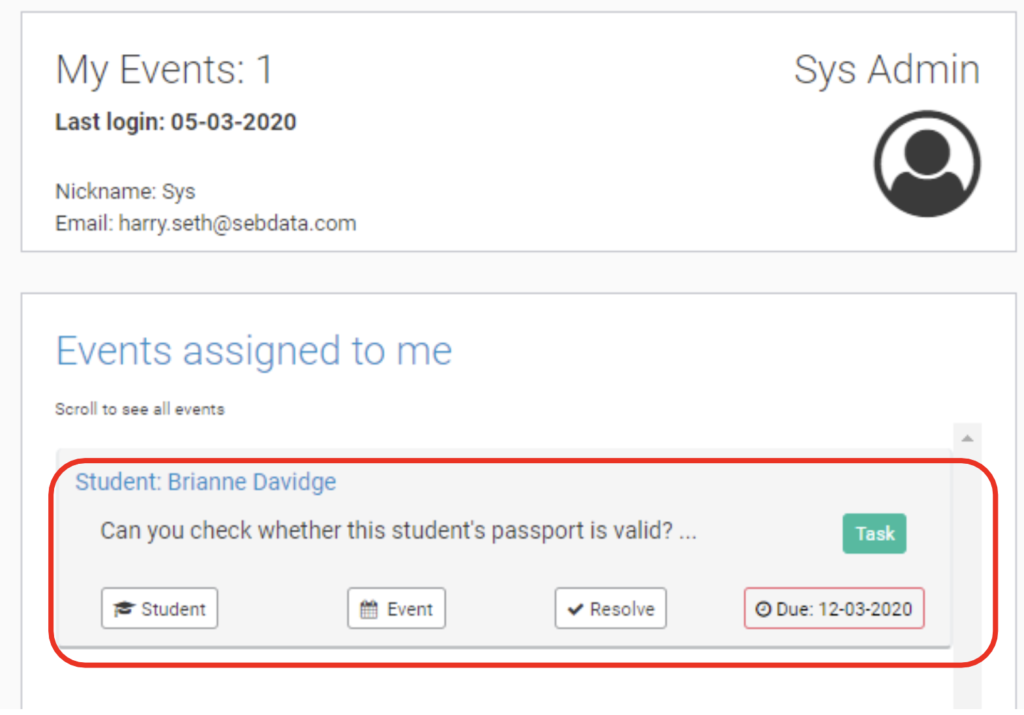
Below this, you have a listing of all Events assigned to this particular user. This fleshes out the Events that the user needs to address, in this case the 1 event that we noted in the previous screenshot, which this user needs to look into.
As you can see in the screenshot, the Event displays which student it is relating to, it shows the type of event it is (in this case a task), it shows a due date for the Event, and finally it allows the user to quickly “Resolve” the Event, if the user knows they have already addressed the task. This will take this Event off their dashboard, and mark the Event as being completed.
To click into and alter details of the Event itself, the user can click the “Event” button in the particular Event in question.
Below this is a complete listing of all outstanding events that have not been resolved. Irrespective of who these events have been assigned to, by virtue of their status being not completed, they pop up here on your dashboard so you can get a bird’s eye view of what Events are yet outstanding, and who is responsible for addressing them.
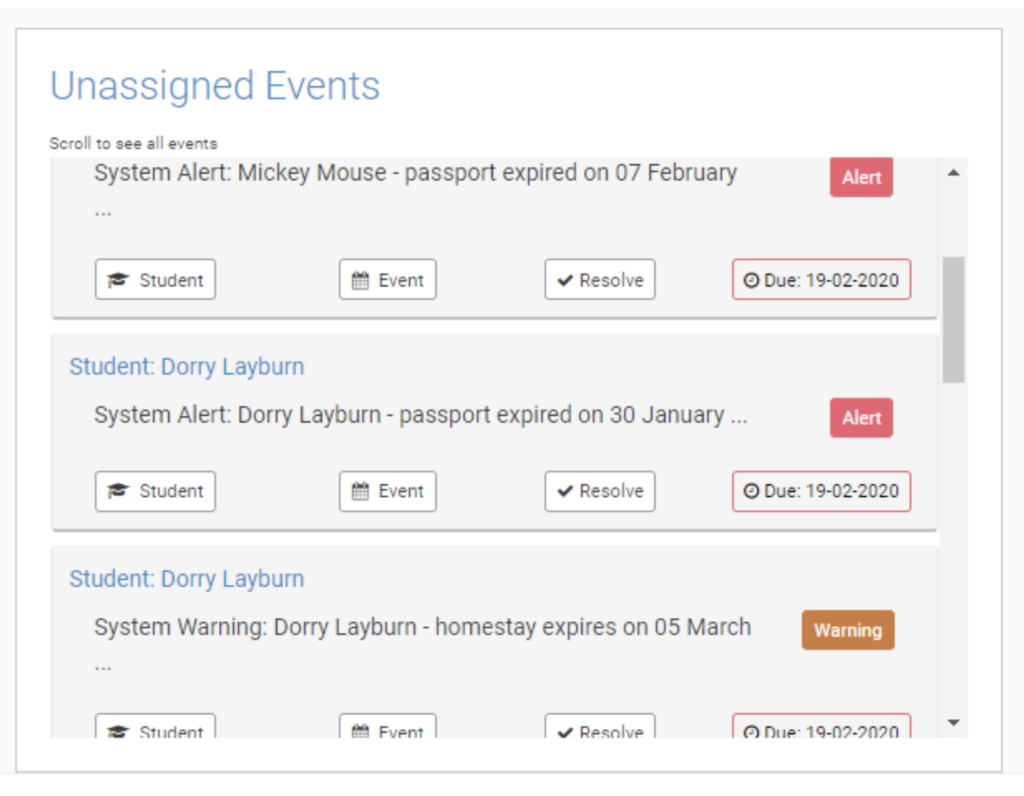
Finally, below this is a listing of all outstanding events that are unassigned. In essence, this means that these are tasks that have to be completed, yet no one is directly responsible for these tasks as they have not been assigned to a particular member of staff to look into.
Stakeholders
Please note – this section about Stakeholders in SELMA only applies to those users of SELMA who have subscribed to the Stakeholders module.
Contacts
Contacts are any person(s) who have some sort of relationship with a student in such a way as that this relationship has an identifiable impact on the student’s education and/or life as a student.
You can have multiple contacts related to one student. Example options can be seen in the screenshot below:
Organisations
Similar to student contacts, organisations are any or all legal entities that are related to students in the sense that they have a stake in the individual’s life as a student.
You can have multiple organisations related to one student. Example options can be seen in the screenshot below:
Communications Functionality
Please note – this section about Communications in SELMA only applies to those users of SELMA who have subscribed to the Communications module.
A new exciting functionality that has been made available with this new update of SELMA is the Communications module. This marks a big step for SELMA in terms of bringing more efficient and effective value to you as an educational organizer. The following sections are dedicated to helping you wrap your head around this new feature of SELMA!
You can now email a student directly in SELMA!
To do this, go into the student you want to contact, click “Edit Student”, and you will be able to see the following button to select:
The rest of this section will walk you through the communications – and emailing – functions within SELMA.
Communications template function
The first thing to note is that you can create your own communication templates. These are essentially documents that you have pre-programmed in a certain format with a particular wording that you like, so that you can send many of these as quickly as possible without having to re-write each from scratch.
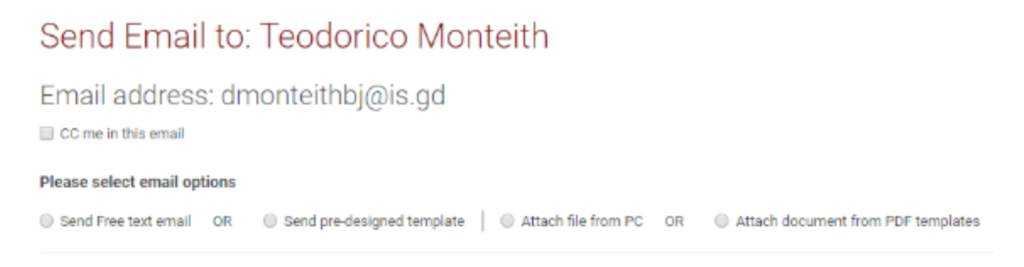
However, these need to be constructed prior to sending. You can mobilize these previously constructed templates by selecting “Send pre-designed template”. In addition to using previously designed communications templates, you can modify existing templates by selecting them and then making edits to the body of the text before you send the email out. This allows for maximum communications flexibility when it comes to emailing students.
You can also select the option that says “Send free text email”, where you can write a text message to the student from scratch without the use of a previously written up template.
Examples of documents that could make good use of this template function are: welcome emails, congratulatory letters of application acceptance, letters of graduation, and so on.
As you can see in the above screenshot – displaying the different options available to you when using the communications template – you can also attach documents and/or pdfs to your email communications with students from your computer.
How do I create my own communications template?
First, click into Settings, and then the button that says “Comms Template”:
Then, select “create new template”:
Fill out the following form that will appear on your screen as fully as possible:
You can make use of the “Mail Merge Fields” on the right side of this page by copying and pasting this into your main text body.
What these do is pull the relevant information about a particular student that sits between the hashtags – for example First Name – and then populates that automatically for you when you go to send out this template, effectively personalising the message for each student automatically without you needing to manually change it each time.
For instance, if you were emailing a student named John, and you set up the main text body as follows:
“ Dear [#firstname#],“
When John receives the email, what he will see in his email inbox will be: “Dear John,”
There are many others that you can chop, change, and experiment with to make your communications template suit your unique communications needs as an education provider.
Classes
Please note – this section about Classes in SELMA only applies to those users of SELMA who have subscribed to the Classes module.
You can now create and manage classes in Intakes.
Intake classes
You can now create classes and add students to these classes regardless of the intake that they are a part of. You can also create enrolments directly into a class, as well as add teachers/tutors to a class too.
Classes can be thought of simply as the particular classroom where a lesson is being taught: the students in these classes can come from various intakes and enrolments, but still be students within the same class.
You can add as many teachers and enrolments into these classes as you like, so: -Each class can have many enrolments
-Each enrolment can be linked to many classes
How do I interact with classes in SELMA?
You can interact with classes by going to Intakes in SELMA, and clicking “manage classes”:
From here, you will be brought to the Class Index:
You can choose to edit particular classes here by clicking the ‘pen and paper’ icon on the left (seen in this screenshot in green colour), or delete them by selecting the trash can icon next to a particular class you want to delete.
To create a new class, click “Create New”:
Fill in the information on the page that displays on your screen after clicking this button as fully as possible:
When you are happy with the information you entered in this above form, you can click “Add Class” to create the class. If it is an active class, be sure to have the “active” button selected before doing so.
Once you have done this, this will add your class to the Class Index, where you can interact with it further:
Accessing classes through enrolments
You can also directly interact with classes through enrolments:
To do this, go into Enrolments, and select a particular enrolment you would like to interact with. You should see a tab on the far right that says “Classes” here:
Once you click “Classes, the following screen will appear:
Click on “Link to Class” to associate a class with a particular Enrolment:
This will show the following screen:
From here, select your Class from the drop down menu, and click “Link Class”:
The above screen will appear, confirming that you have successfully linked a class to an enrolment.
Bug fixes and other miscellaneous small updates
Bug fixes and updates in this section apply to all SELMA SMS users.
Quick general updates
- What was called “Other Organisations” previously is now known as just “Organisations” in this new updated version of SELMA o
- All PowerBI reports under the reporting tab now have a little graph icon next to them: o
- You can now edit the grading scheme in the marking tab:
o Fill out the following fields after you click “create new”, to create a new grading scheme:
▪The “Nationality” field under student information has been removed. If you have been using these in the past, the information you inputted has not been lost, just shifted somewhere else. If you have any concerns around this, please get in contact with support
Programme fees are now distinguished between domestic, international, or all:
Support channels for SELMA users
The SELMA user is supported in two ways when using the SELMA system:
- User Manual: this is the SELMA user manual that is updated regularly to give you up to date information about the SELMA system, its different parts, and how to use it best for your educational needs
- Support Ticket: this is for when you have a dynamic query about the use of the SELMA system, in which case you can send an email to our support email address (support@selma.co.nz), or lodge a SELMA support ticket. It is difficult to estimate turnover rate for these tickets as queries vary wildly in nature, but rest assured the SELMA team are working hard to resolve these for you as quickly as possible Both of these support channels can be accessed by clicking on the button with the user’s initials within SELMA, on the right hand side of the screen: The User Manual button used to be labelled “Help” before this particular software update. Page 26
Mass component marking function
You are now able to mark multiple components as being successful at the same time. To do this, go to the “Marking” tab, and click “Component Marking”:
From here, click the Intake you would like to mark in the drop down menu and then click “Search” to the right:
Lastly, select the Intakes you would like, then click “Mark Successful”:
This will mark all selected components as successful.
Advanced searching function streamlining
If you have used the Advanced Search functions in any of the SELMA grids, you will notice that some selectable fields include before it a drop down menu that allows you to select: “equal” or “contains”, and other such search parameters related to the string you enter in the field next to it.
We noticed that some of these are redundant fields, and so have opted to remove these where it does not logically make sense for the particular search field:
Intakes with “draft” status cannot be accessed
We have now fixed this bug in the system so you can now see any draft intakes that you are working on, without it disappearing never to be seen again:
As you can see in the above screenshot, the default Intake grid now displays all Open and Draft status intakes. If you have an intake that is closed, it will not show up here.
To access closed Intakes, you will have to use the Advanced Search function at the top of the Intake Index page: