This manual explains how SELMA works with the ITR (Industry Training Register). It is important to also consult and understand the ITR manual here: https://www.tec.govt.nz/assets/Forms-templates-and-guides/ITR-User-Guide-version-3.2-May-2021.pdf
On this page:
- Create and Maintain Programmes
- Create Employer and Contacts
- Validate Students for ITR
- Change Employer
- Create an ITR Intake
- Enrol a Student into an ITR Programme
- Update an ITR Enrolment
- Complete an ITR Enrolment (successfully)
- Withdraw a Student from an ITR Enrolment
- Delete an ITR Enrolment
- Record a Mac Visit
- Manage Messages in the ITR Reporting Screen
Create and Maintain Programmes
In SELMA, the ITR works only for intakes and enrolments that are for an ITR programme. When a new programme is created, and the return type is set to “ITR”, every enrolment into it will automatically be an ITR enrolment. You can use SELMA simultaneously for programmes that are not reported through the ITR (e.g. SDR programmes or programmes that do not need to be reported at all).
To create a new programme go to Curriculum -> New Programme
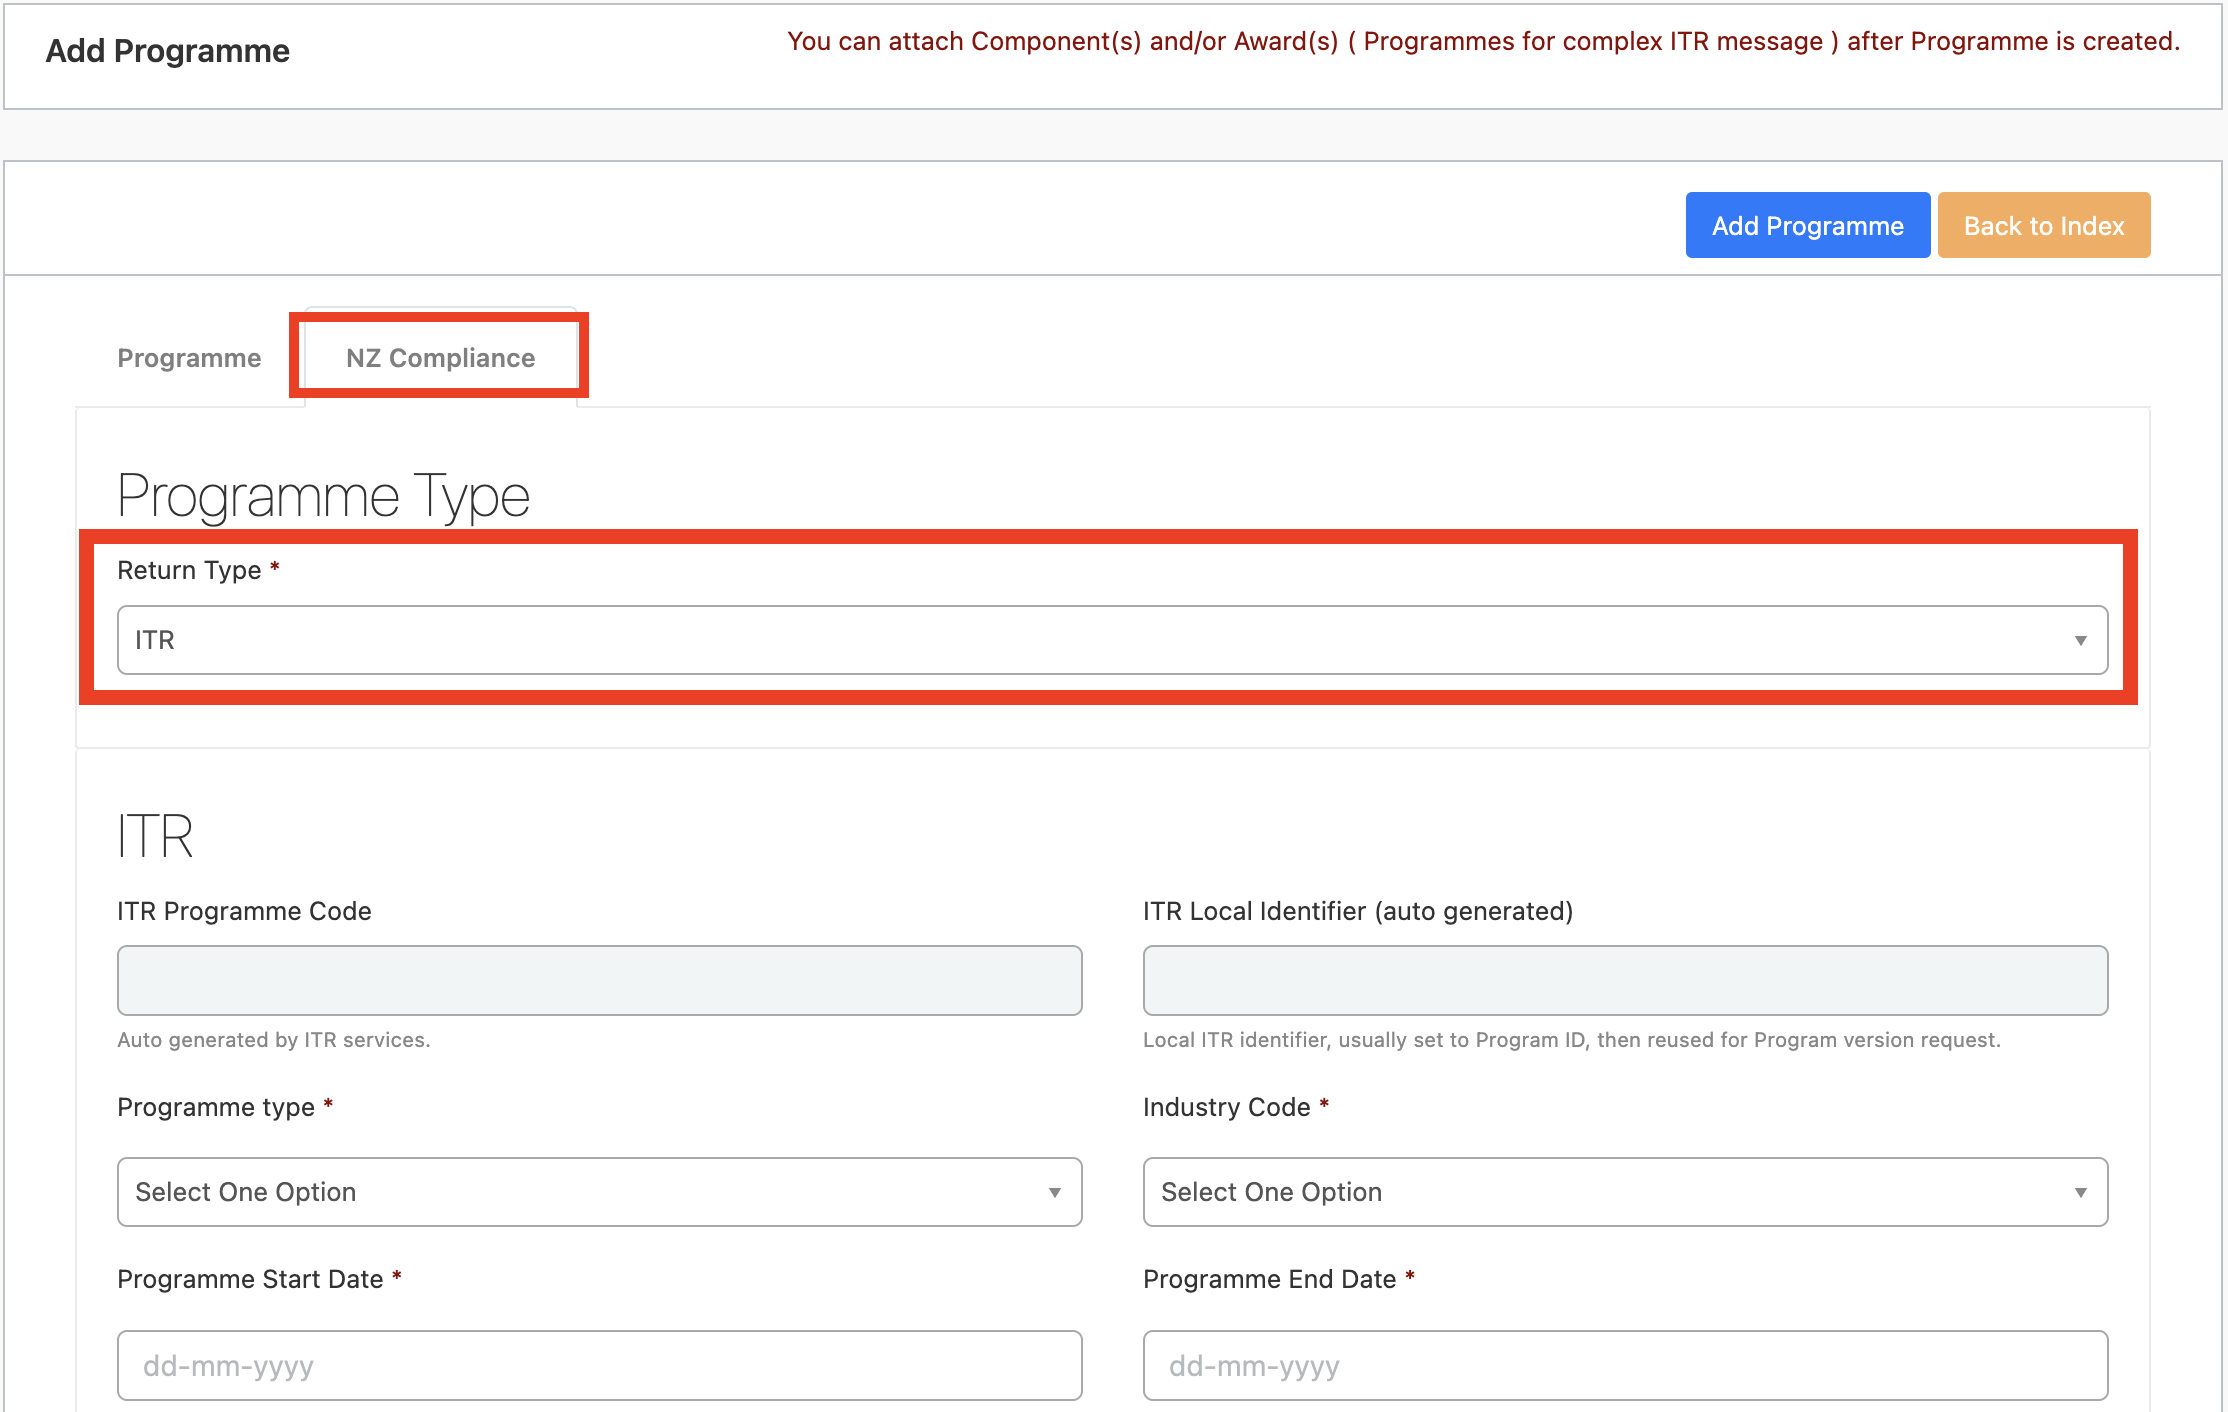
Create the programme as usual but make sure that the Return Type is set to ITR and the Programme Type and Industry code are set as seen below on the NZ Compliance tab:
Once you save your ITR Programme for the first time, the ITR Local Identifier will be set automatically and the green “Post to ITR” button will appear.
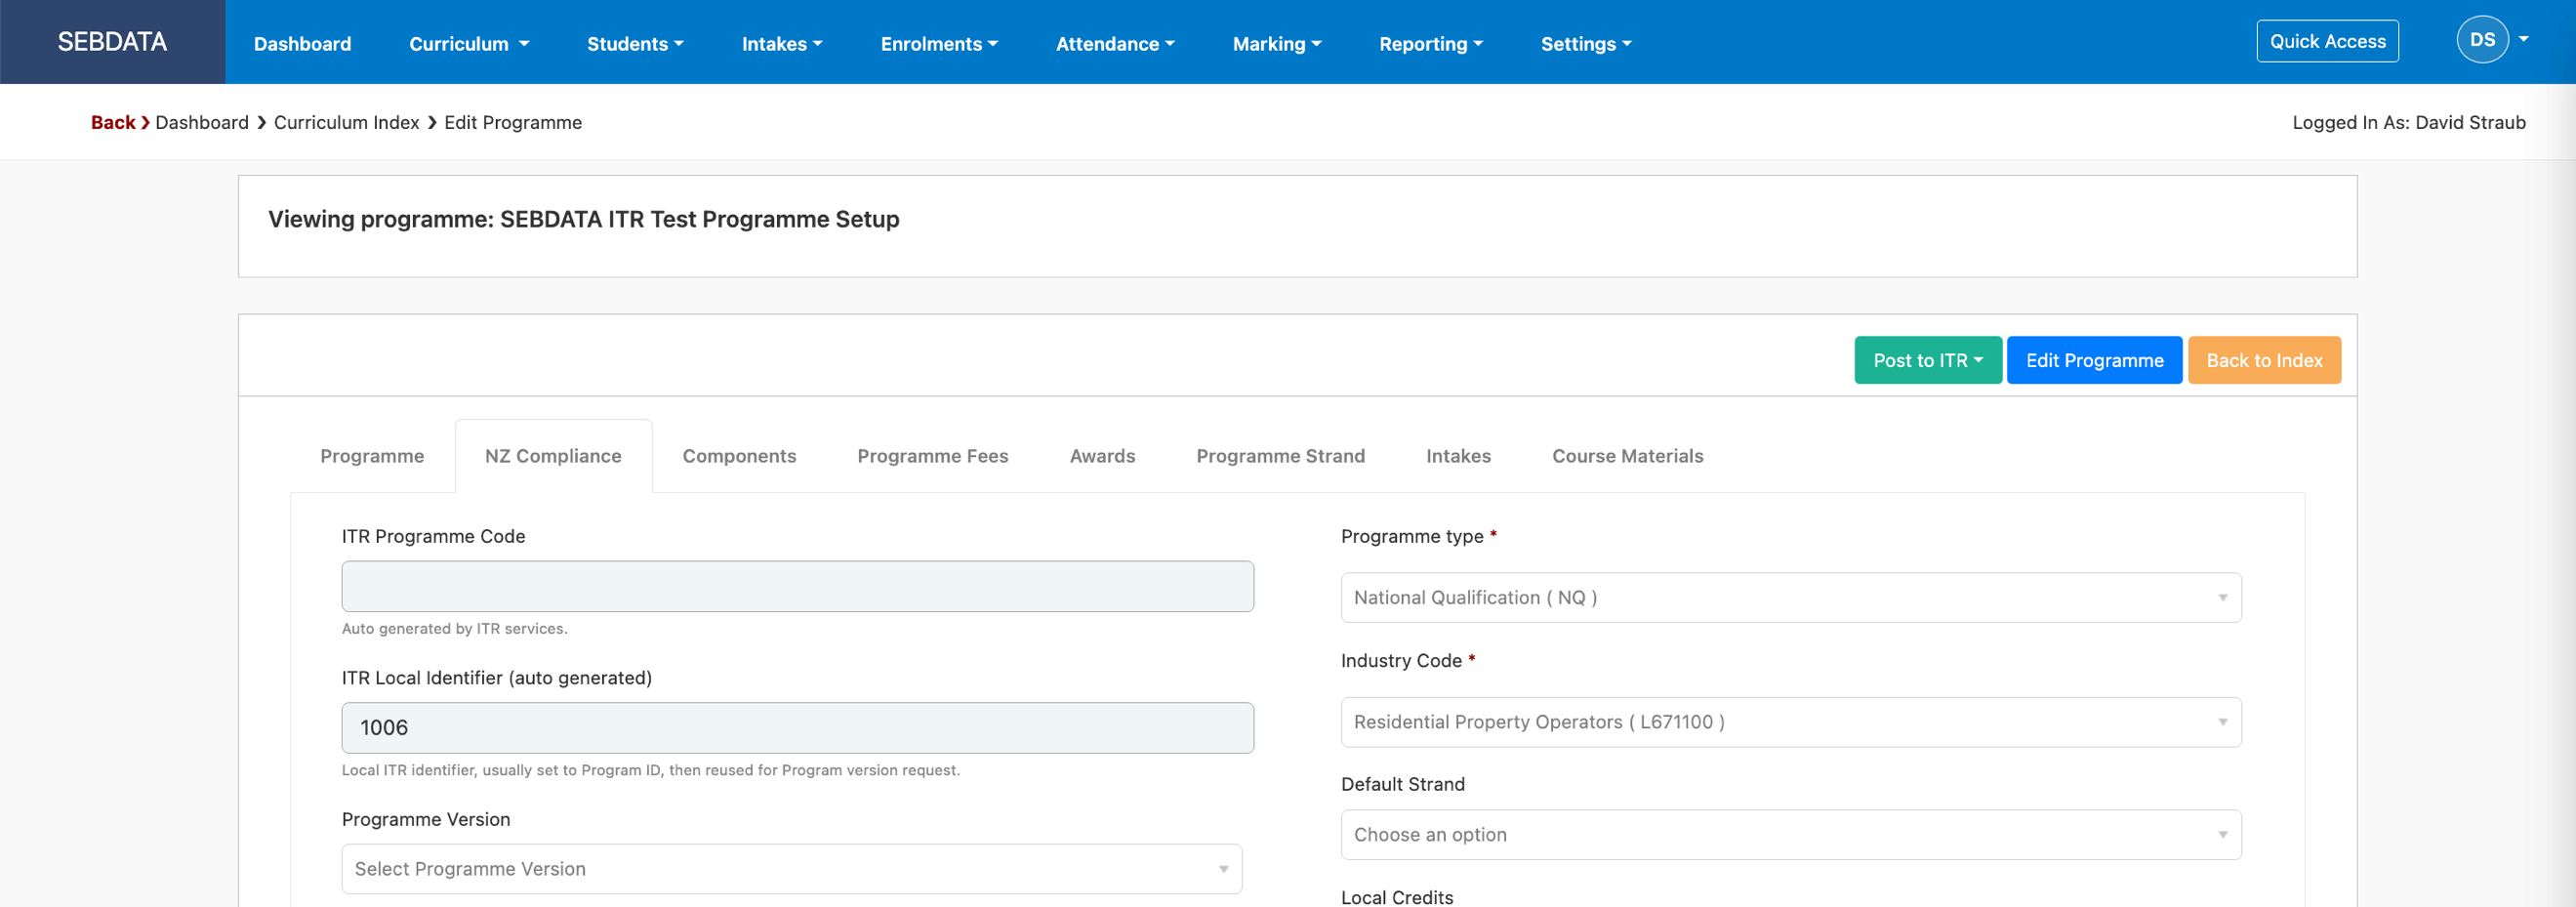
But before sending the programme to the ITR, edit the programme again by clicking “Edit Programme”. New tabs will appear to enter and set information:
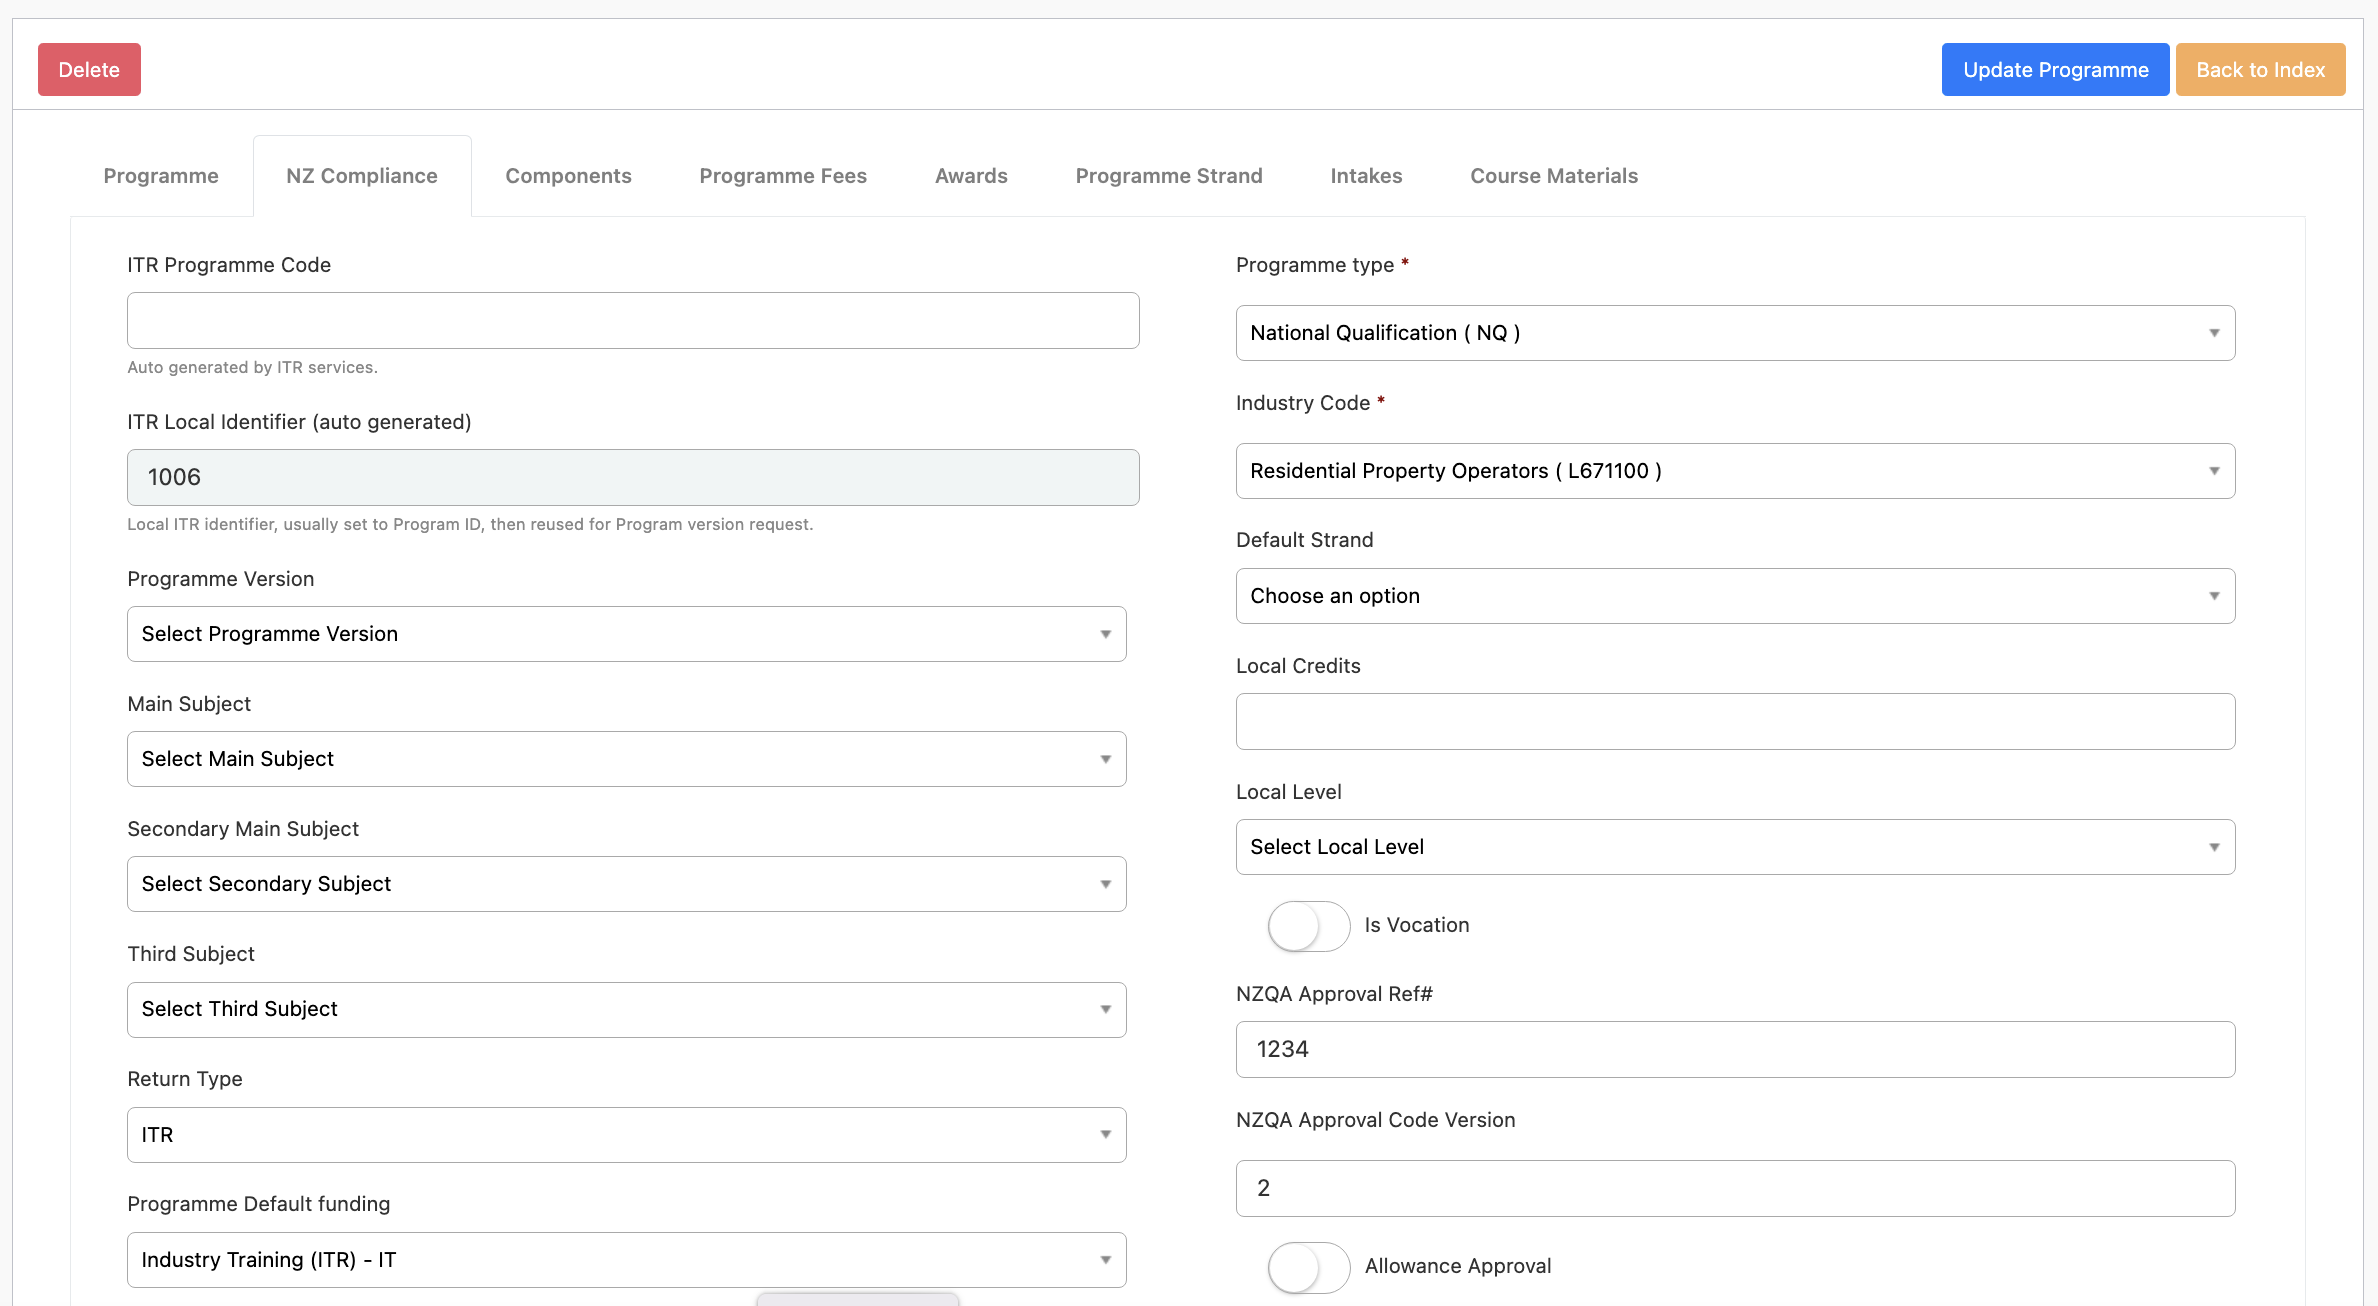
| At this stage you should set the NZQA approval reference and the qual version. These figures will come from the approved programme in NZQA. Note that the programme version below the “ITR Local Identifier” field will be set automatically but it is the ITR programme version and not the NZQA qual version. It is possible to have multiple programmes setup in SELMA linking to the same NZQA approval reference and version. |
Next, go to the Components tab and map the components (unit standards) to your new ITR programme. On the Components tab, click on “Map Components”:
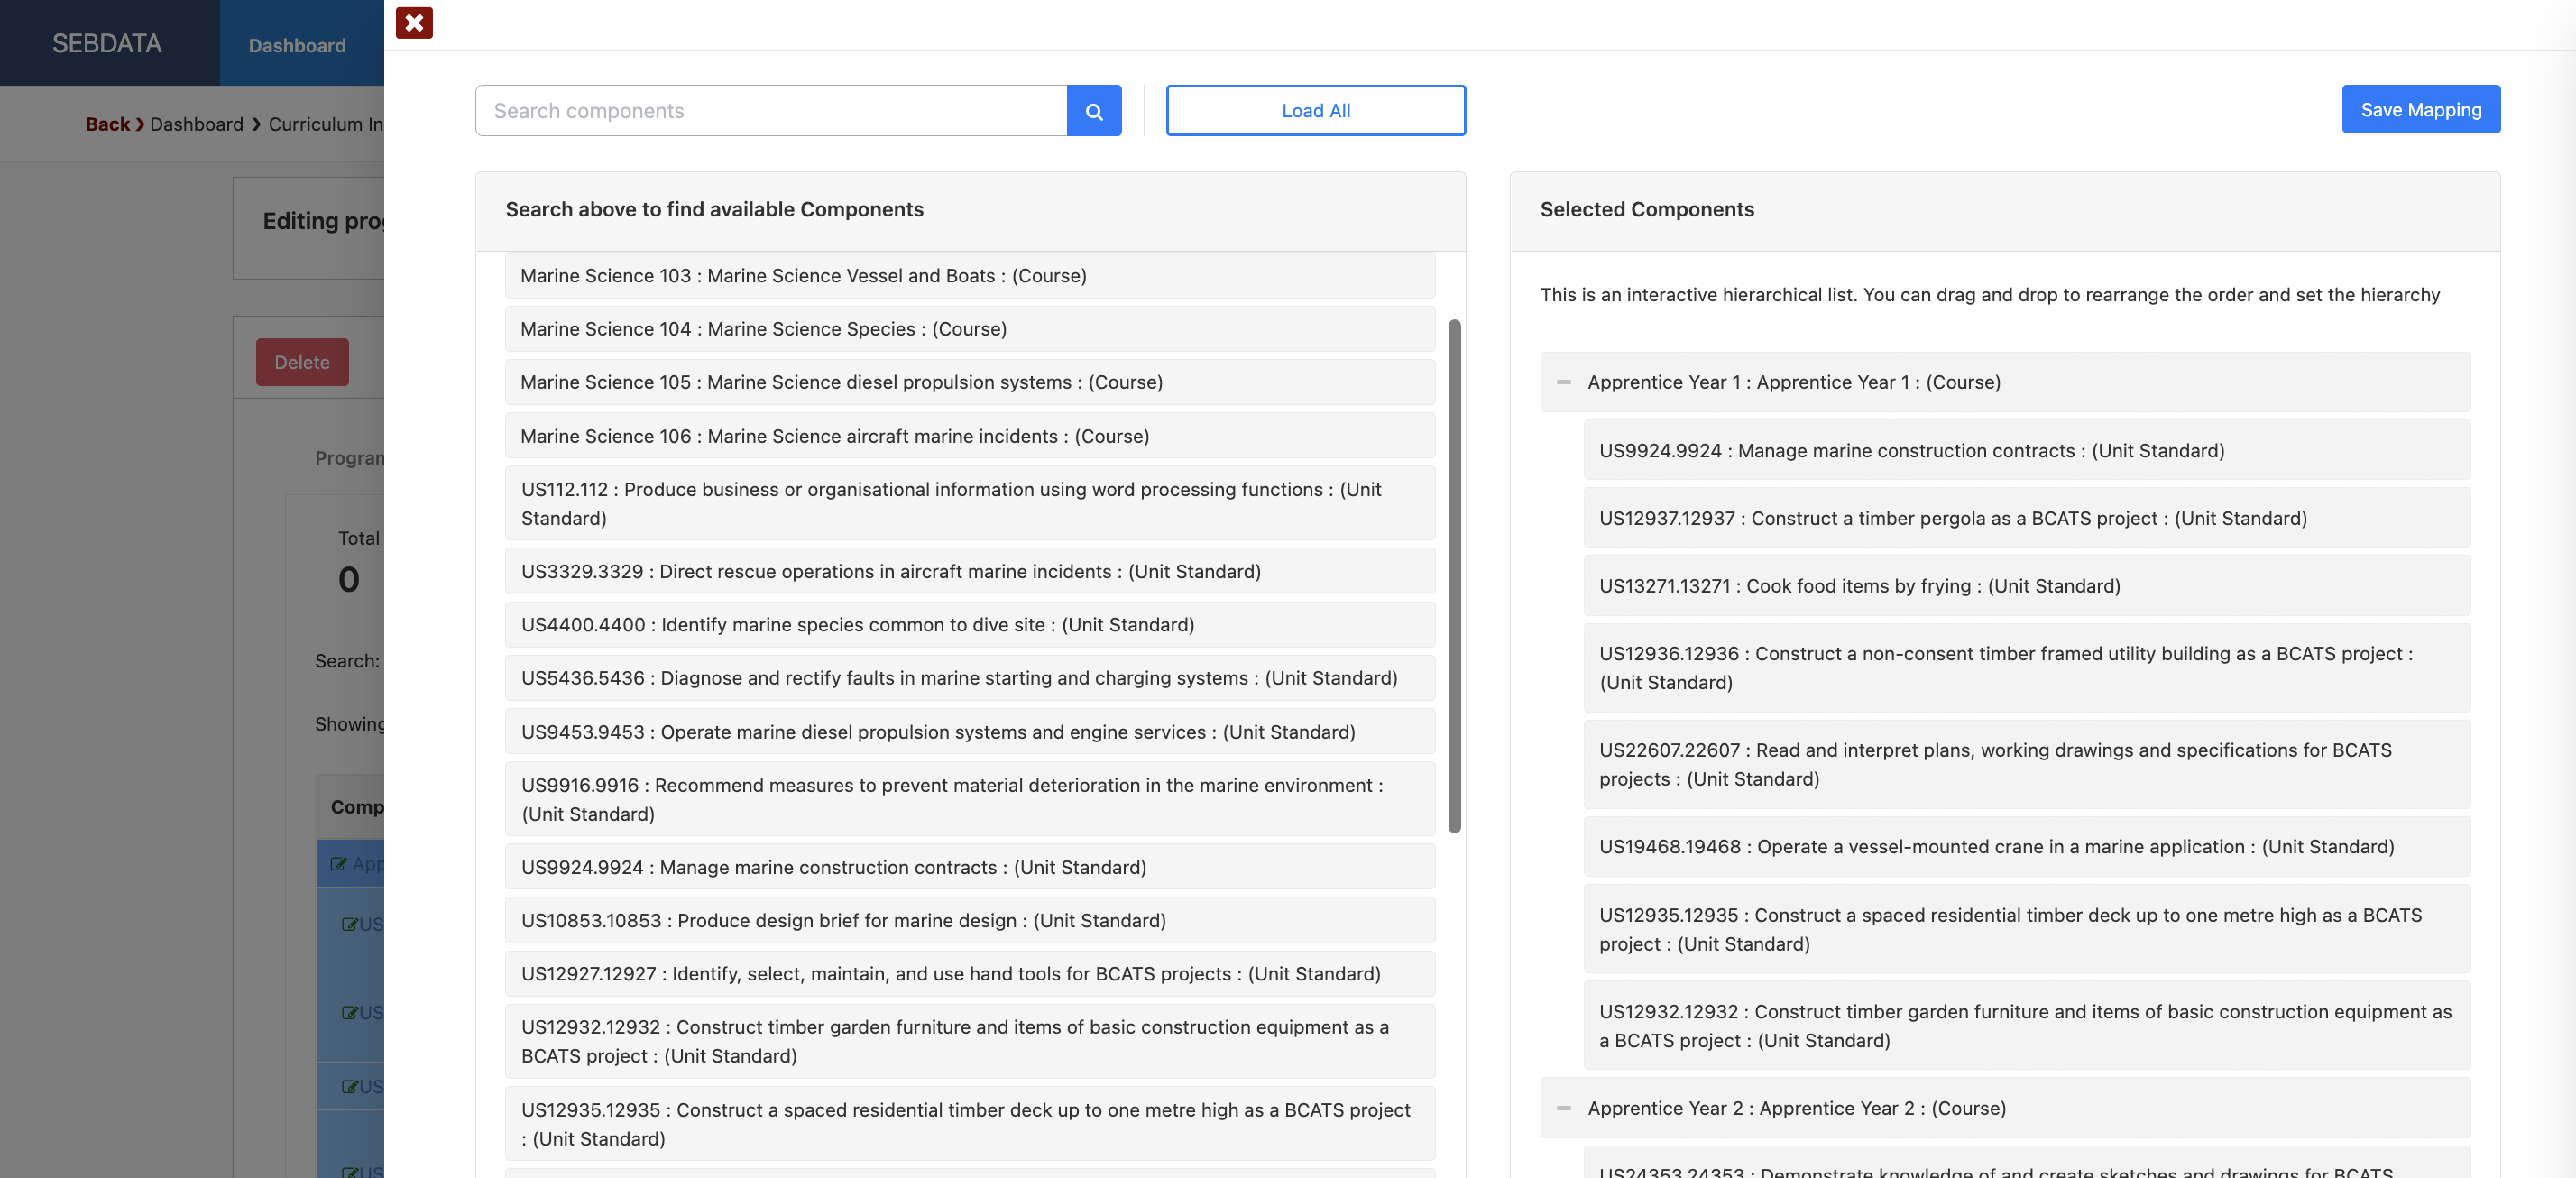
The mapping window will allow you to search your components and units and map them to the right window (drag and drop). You can also set the hierarchy by moving components left and right. The above example shows 8 units under the Parent Component “Apprentice Year 1”
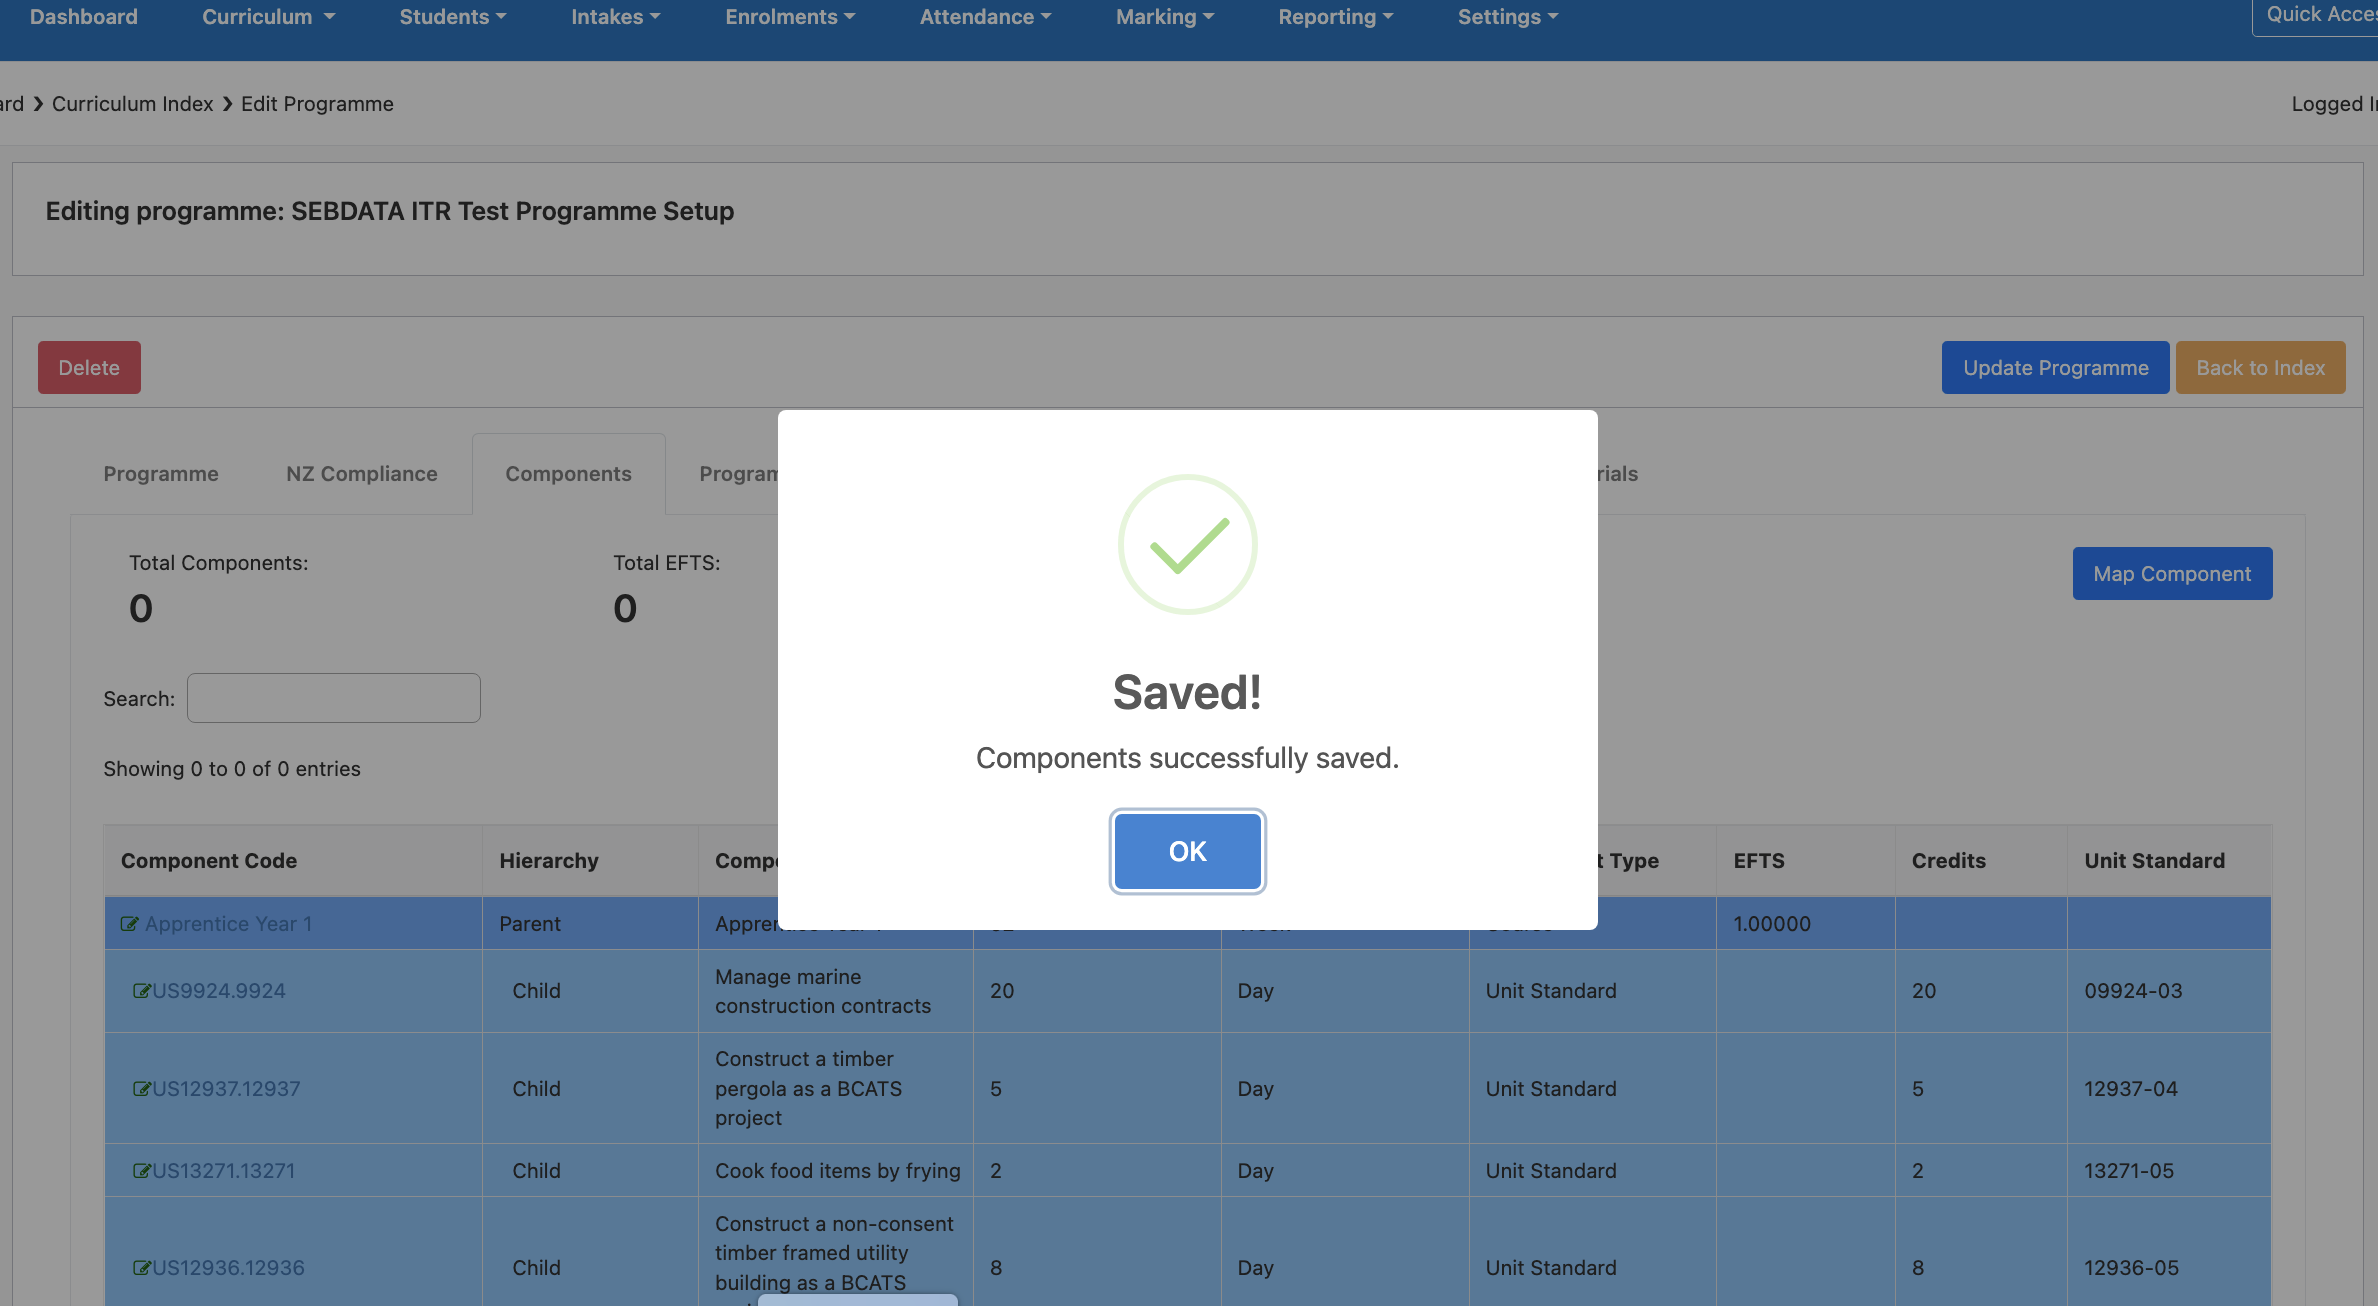
Once you have selected all components and set the hierarchy, click on “Save Mapping”. The mapping will be saved and will show colour coded on your components tab of the programme like below:
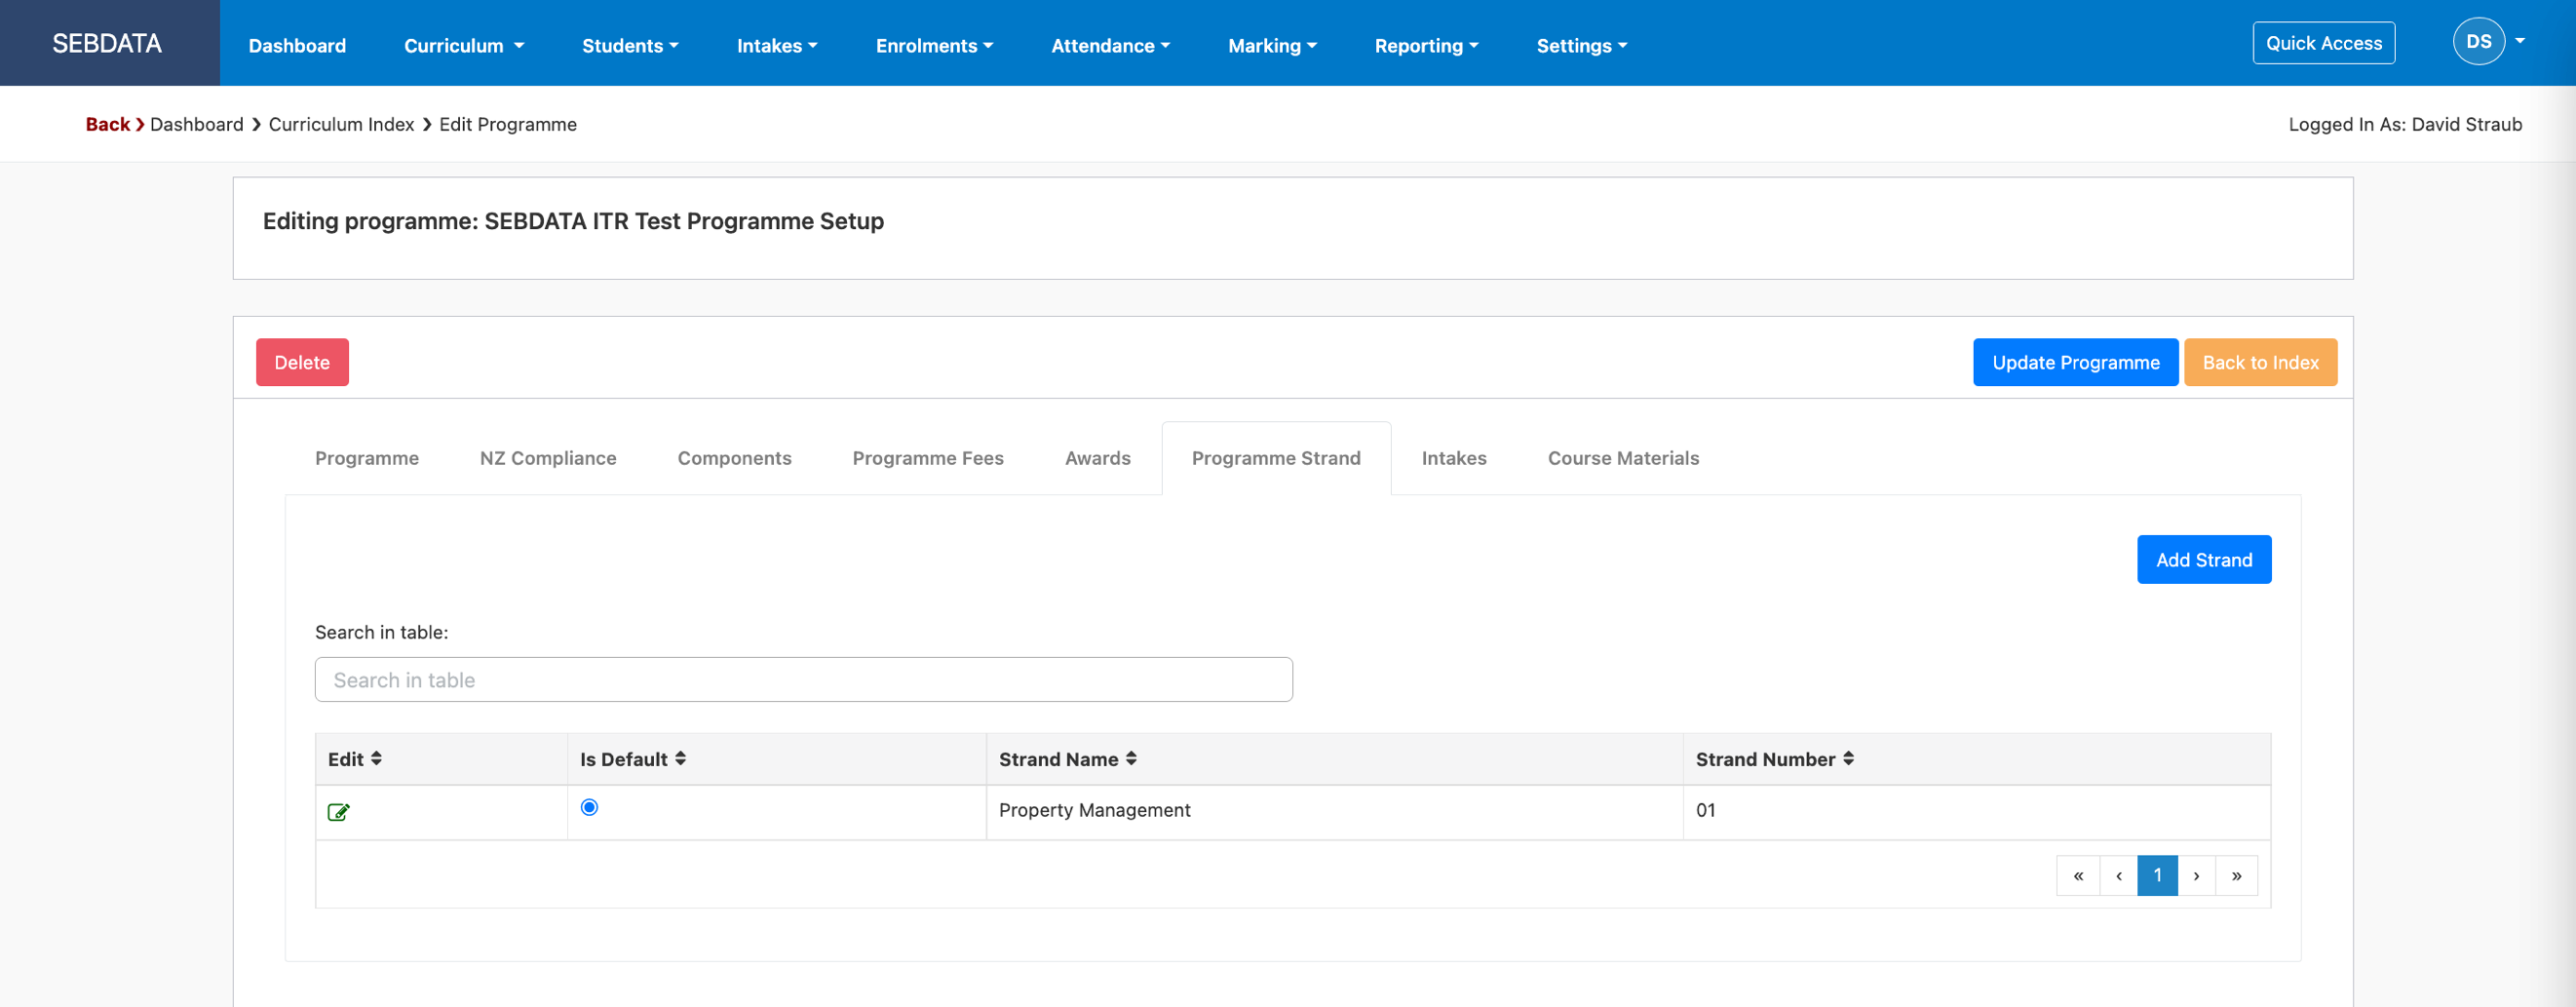
For your programme, you may need to add a strand. Do so by going on the “Programme Strand” tab and enter the new strand by using the “Add Strand” button:
Complex programmes are built by using awards. Awards allows you to build complex apprenticeships. The award needs to be a programme already setup in SELMA and approved for ITR. On the Awards tab, click on Add Award, if you have already setup a programme that will be part of a complex apprenticeship programme, you can now select it and add it to the awards:
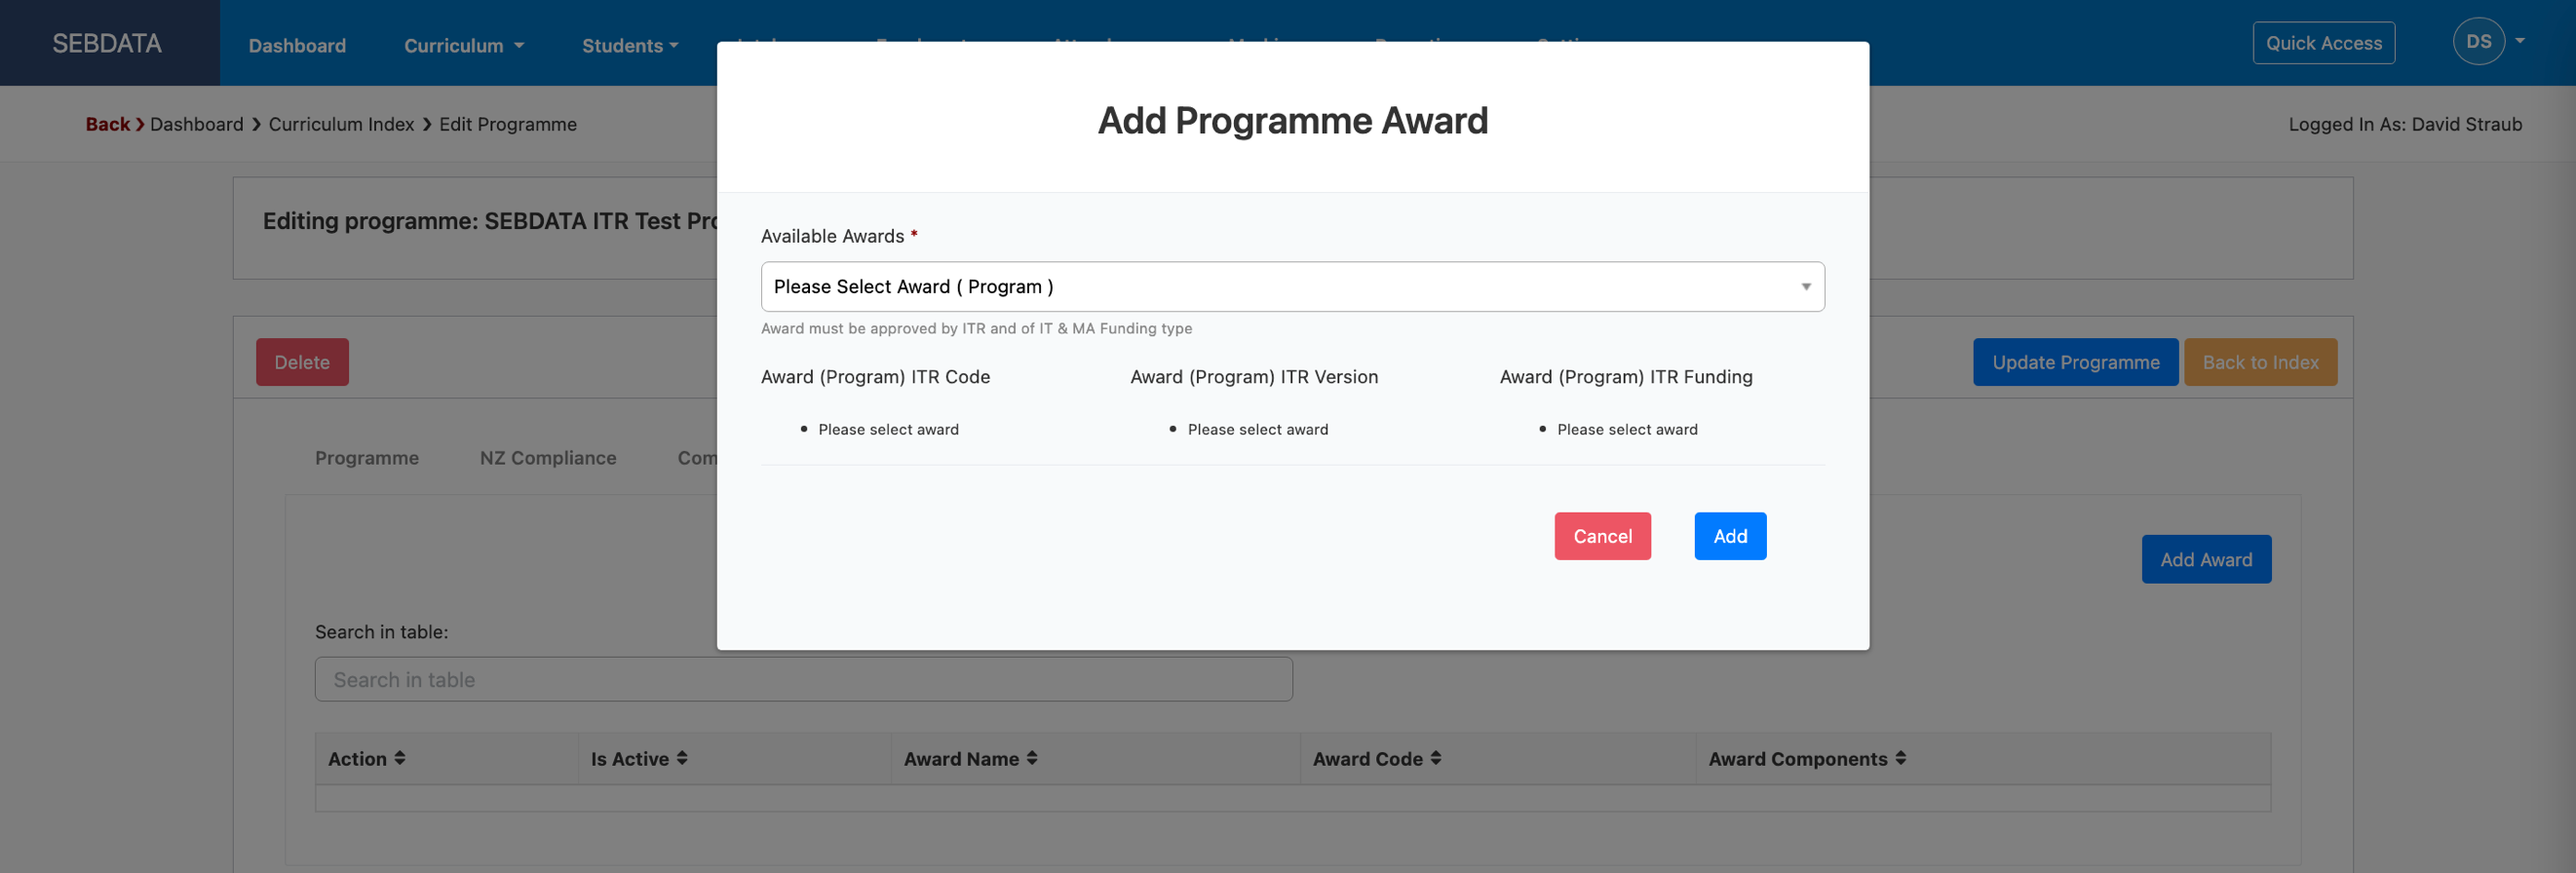
The complex programme does not have any components mapped to it but one or more awards (programmes) that contain the components.
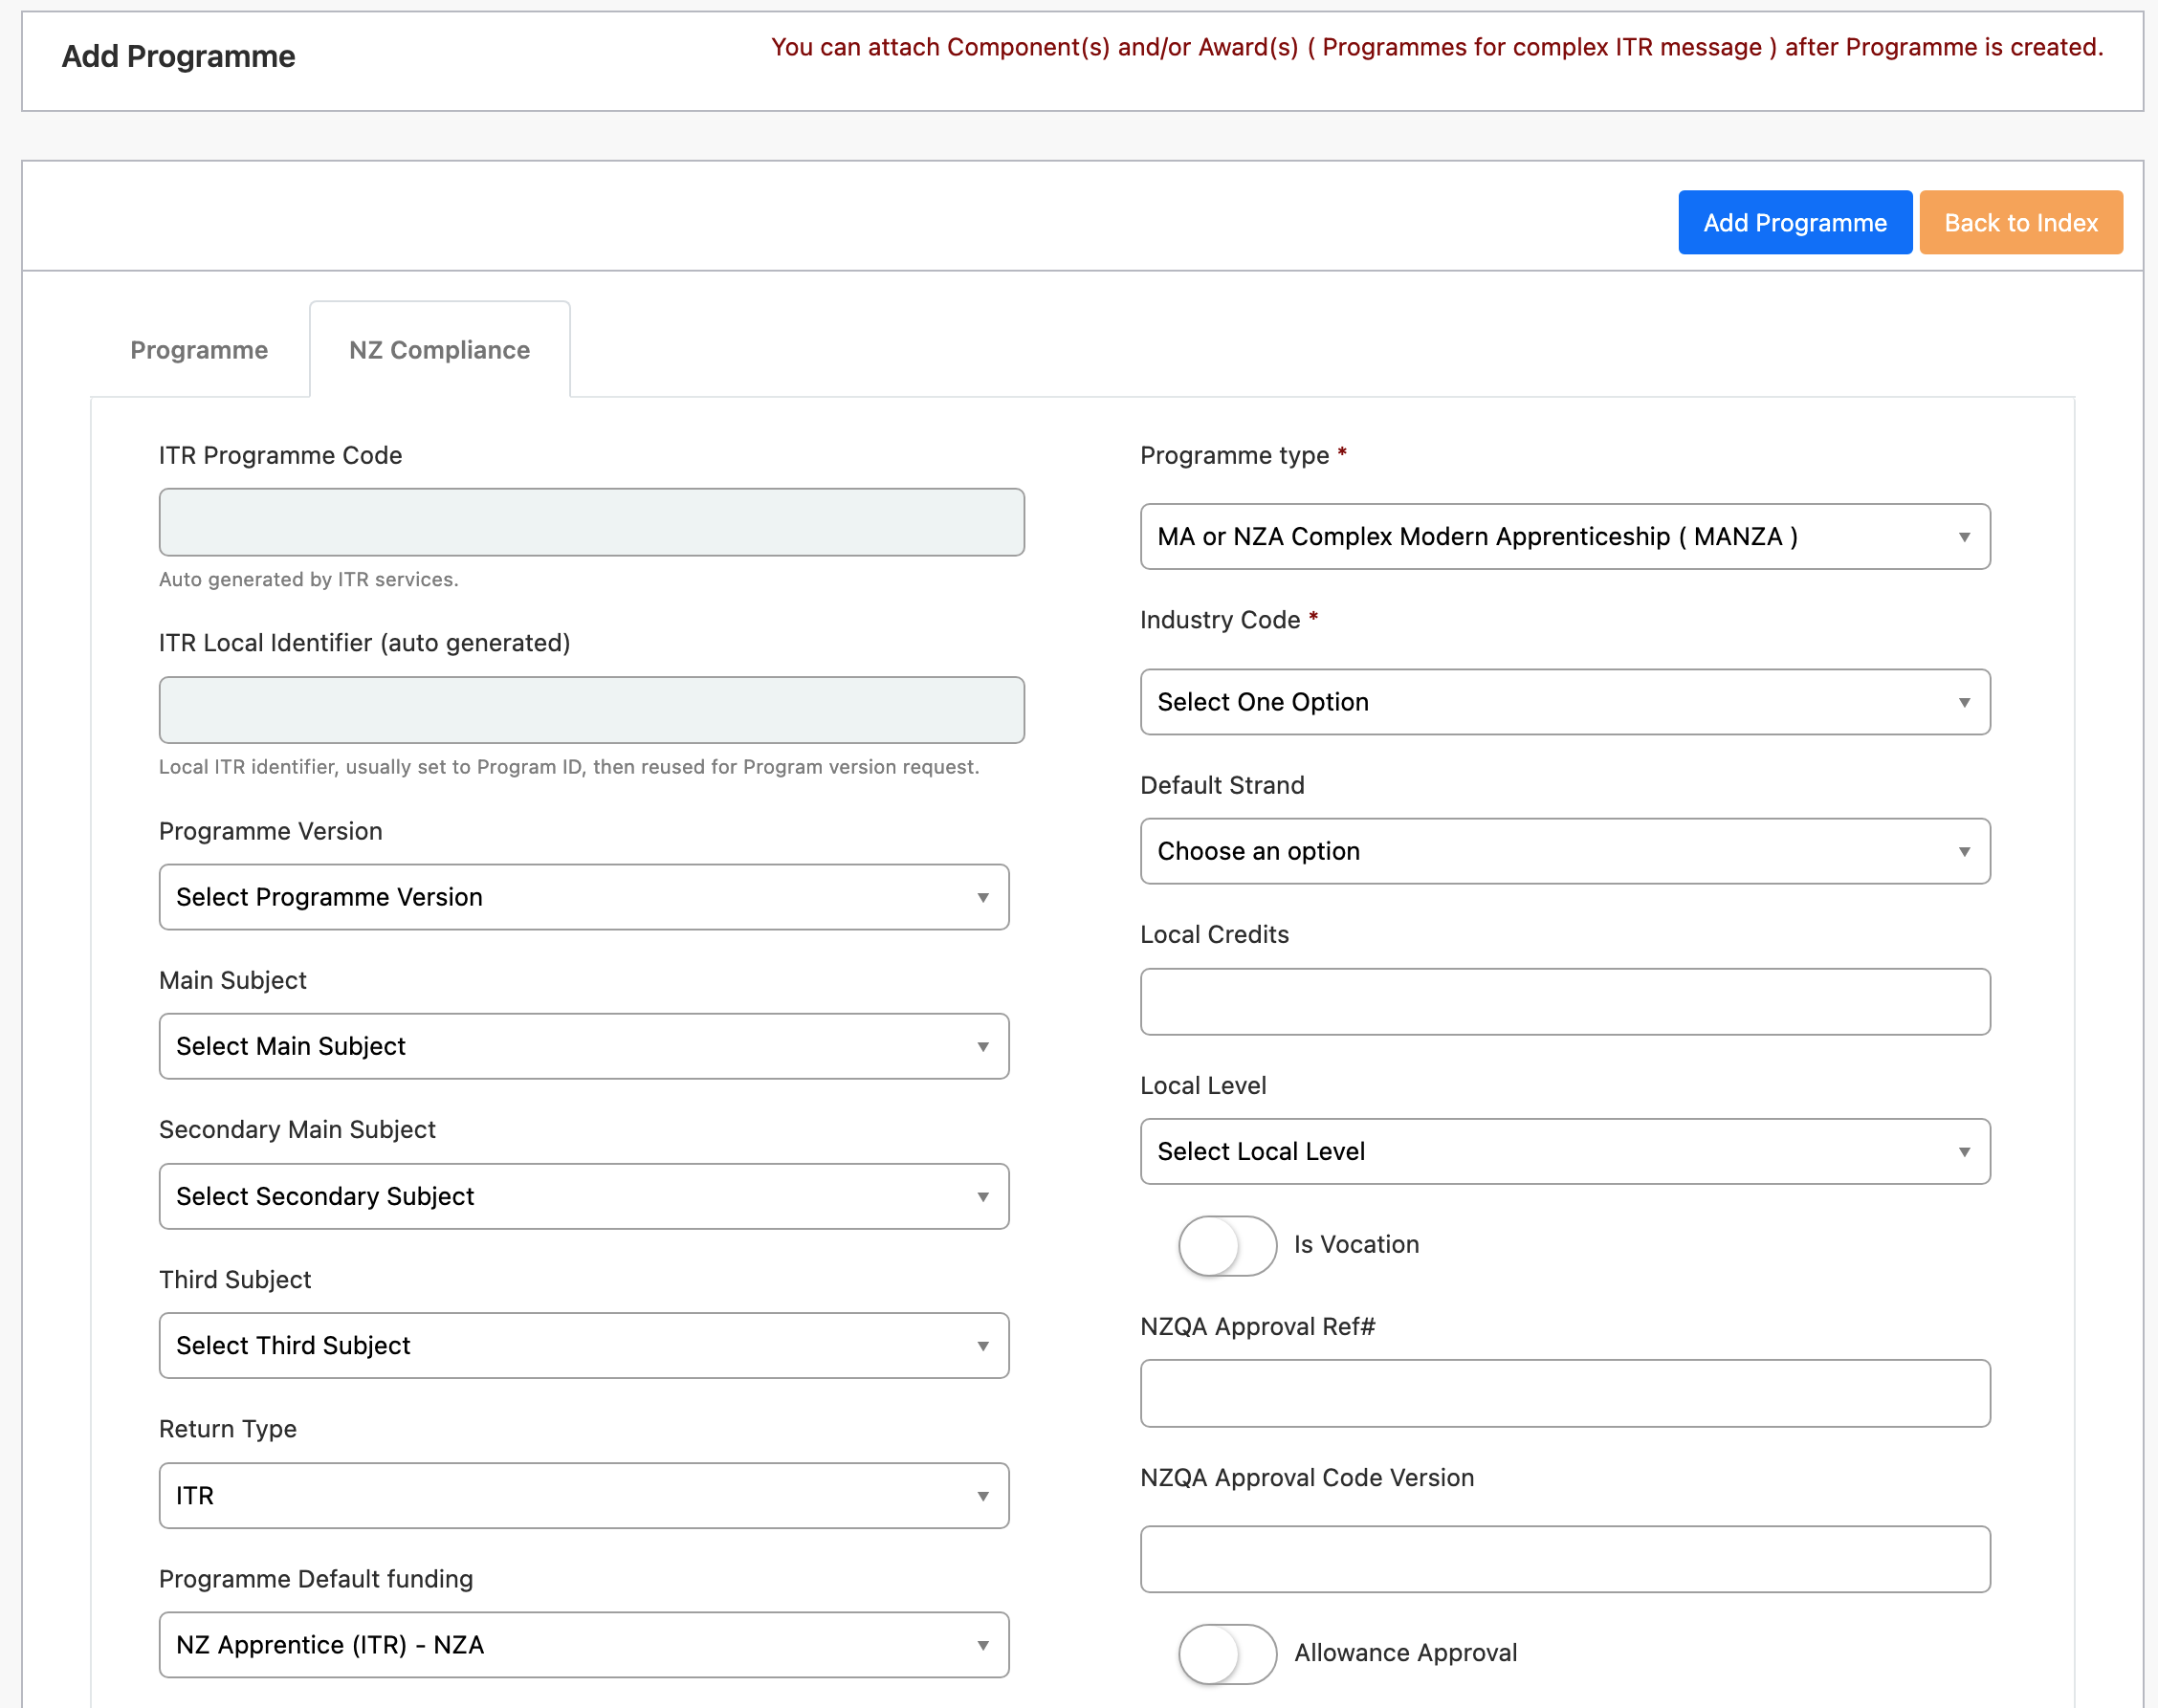
A slightly different approach needs to be taken if the Programme Type is MA/NZA and the programme default funding is NZA as shown in the example below. This programme will need to be approved manually by TEC and the programme code entered into SELMA after TEC approves it:
Once you have entered all information, save the programme. If you are in non-edit mode, you should now see the “Post to ITR” button with the function to Post the programme to the ITR:
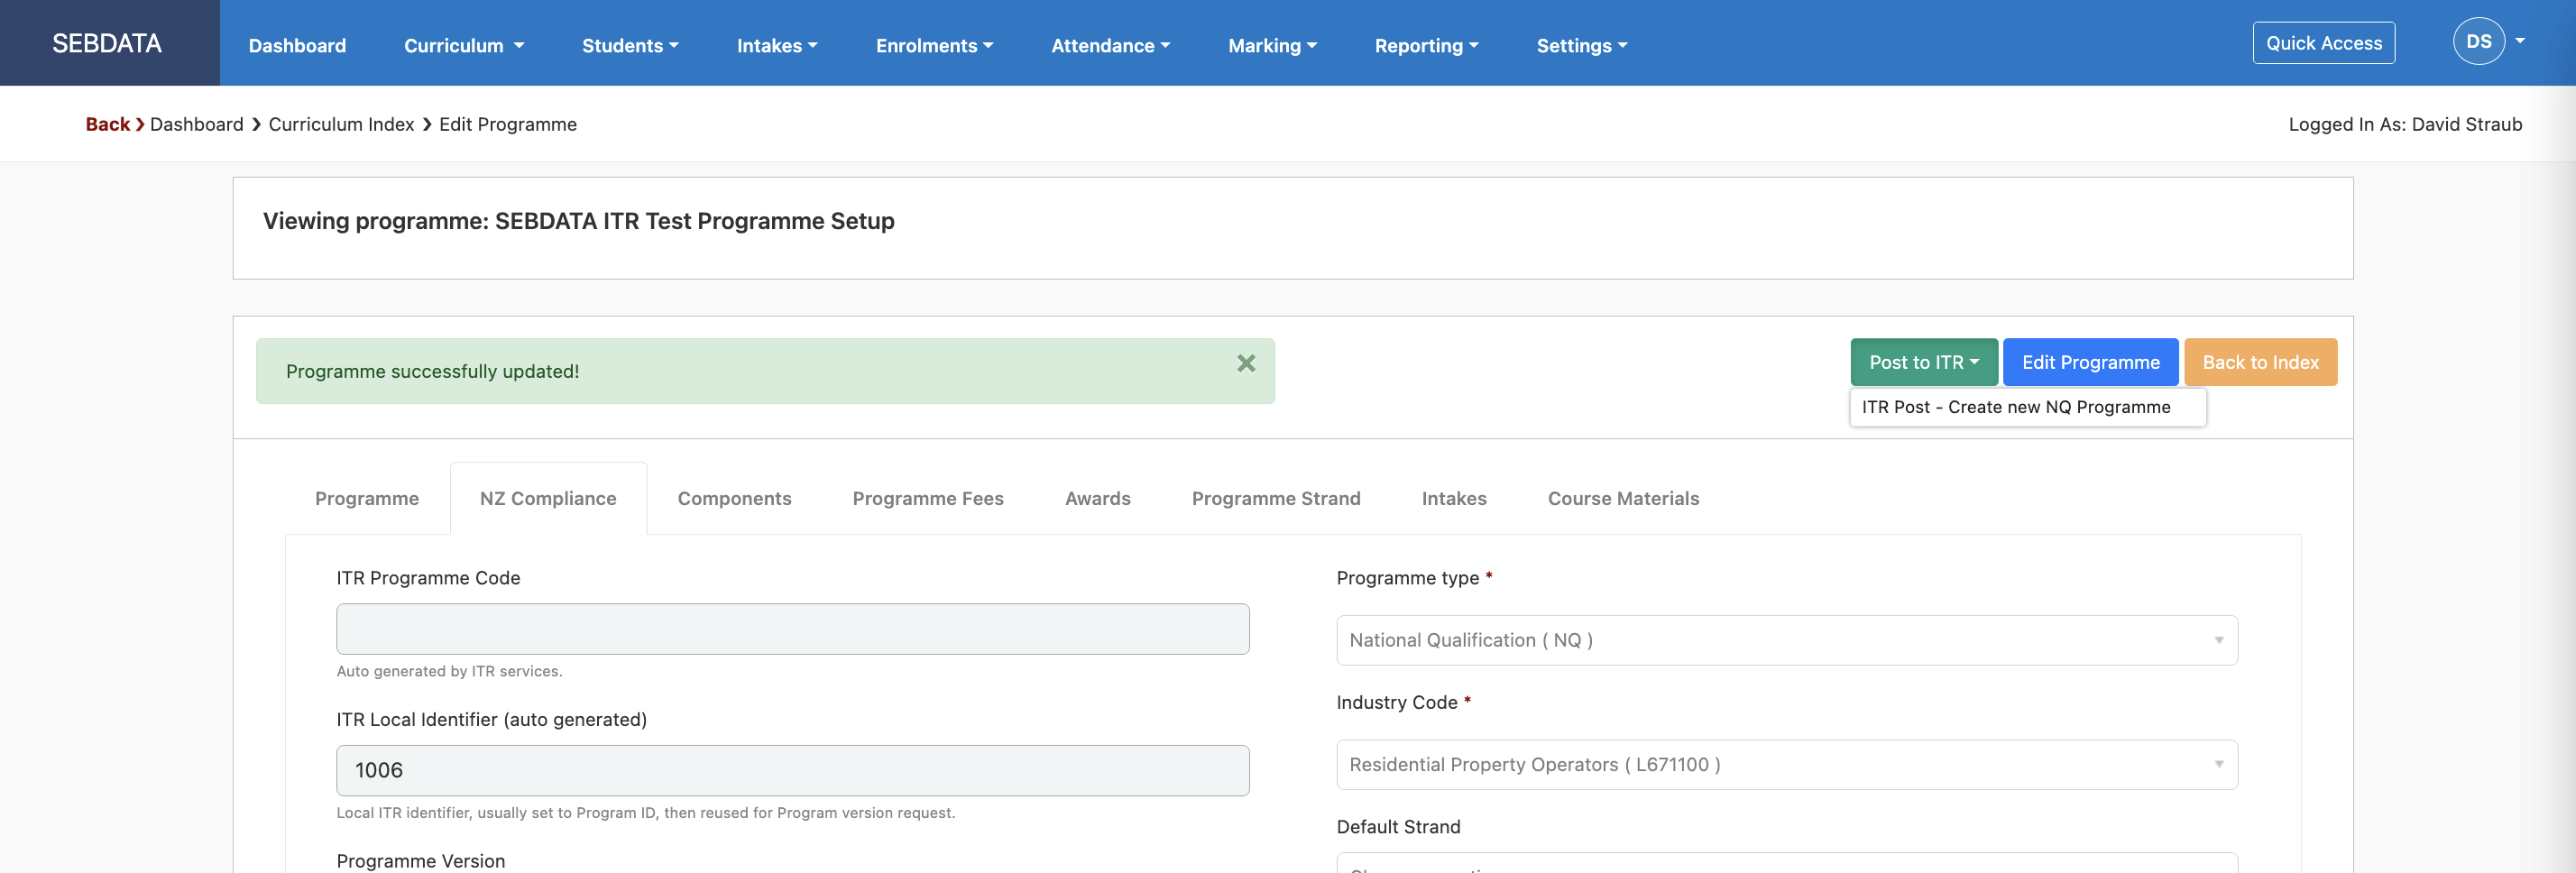
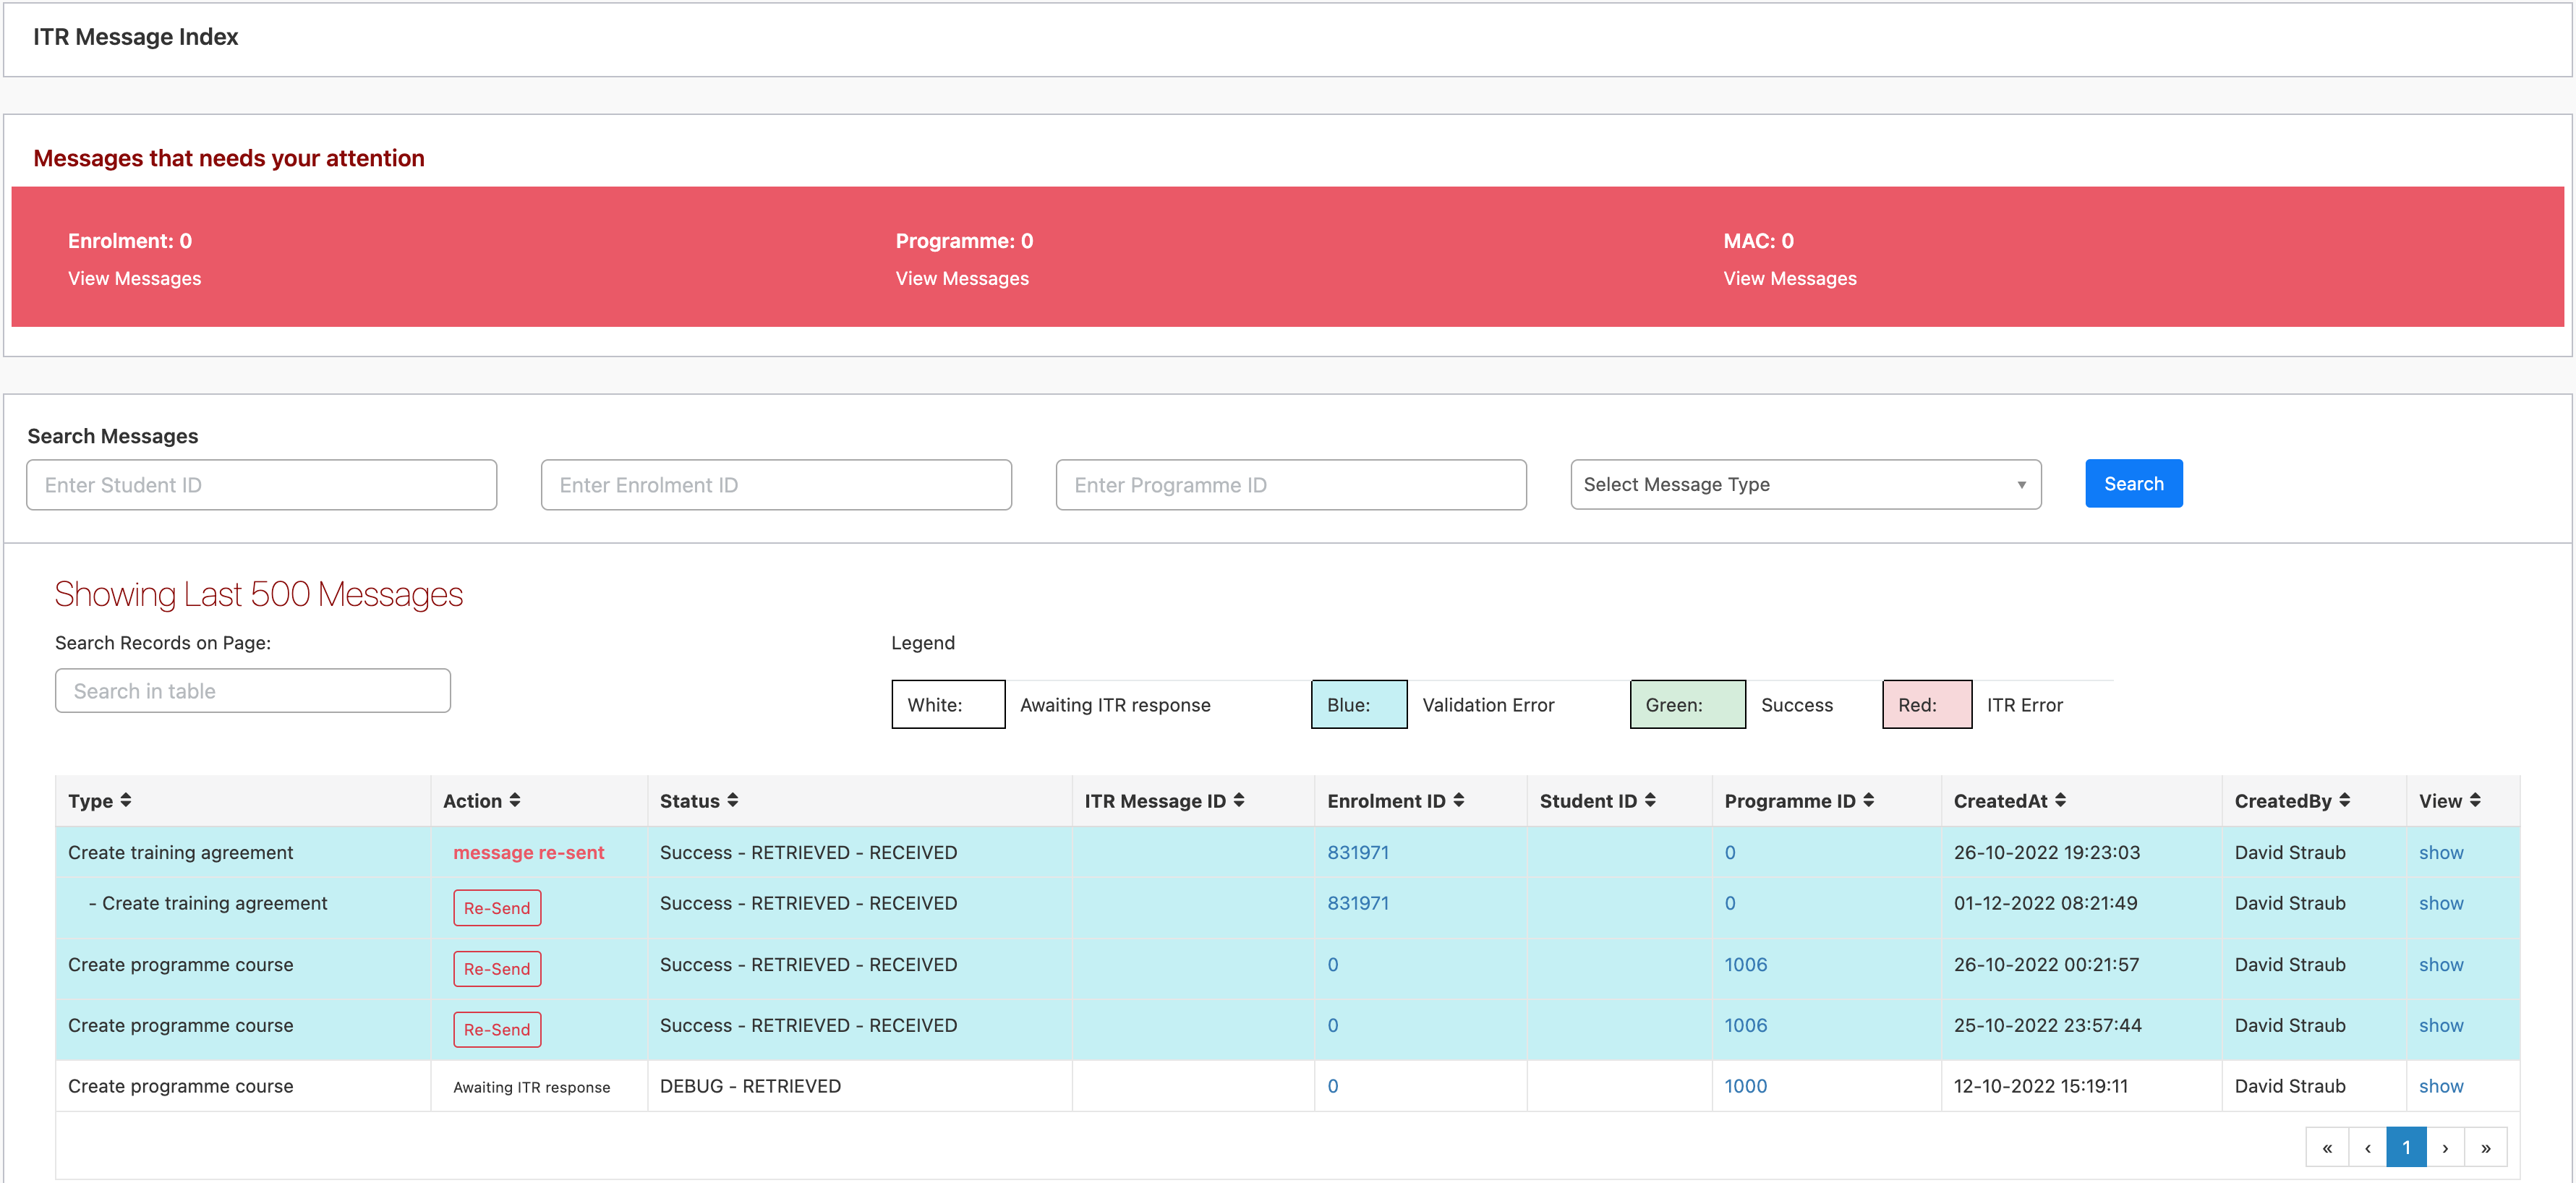
This will trigger a message to the ITR to register the programme. If you navigate to “Reporting” -> “ITR”, you should see the “Create programme course” message sent on top and awaiting a response:
Once the programme is successfully created, the ITR Programme code and the version below will be set automatically on the programme:
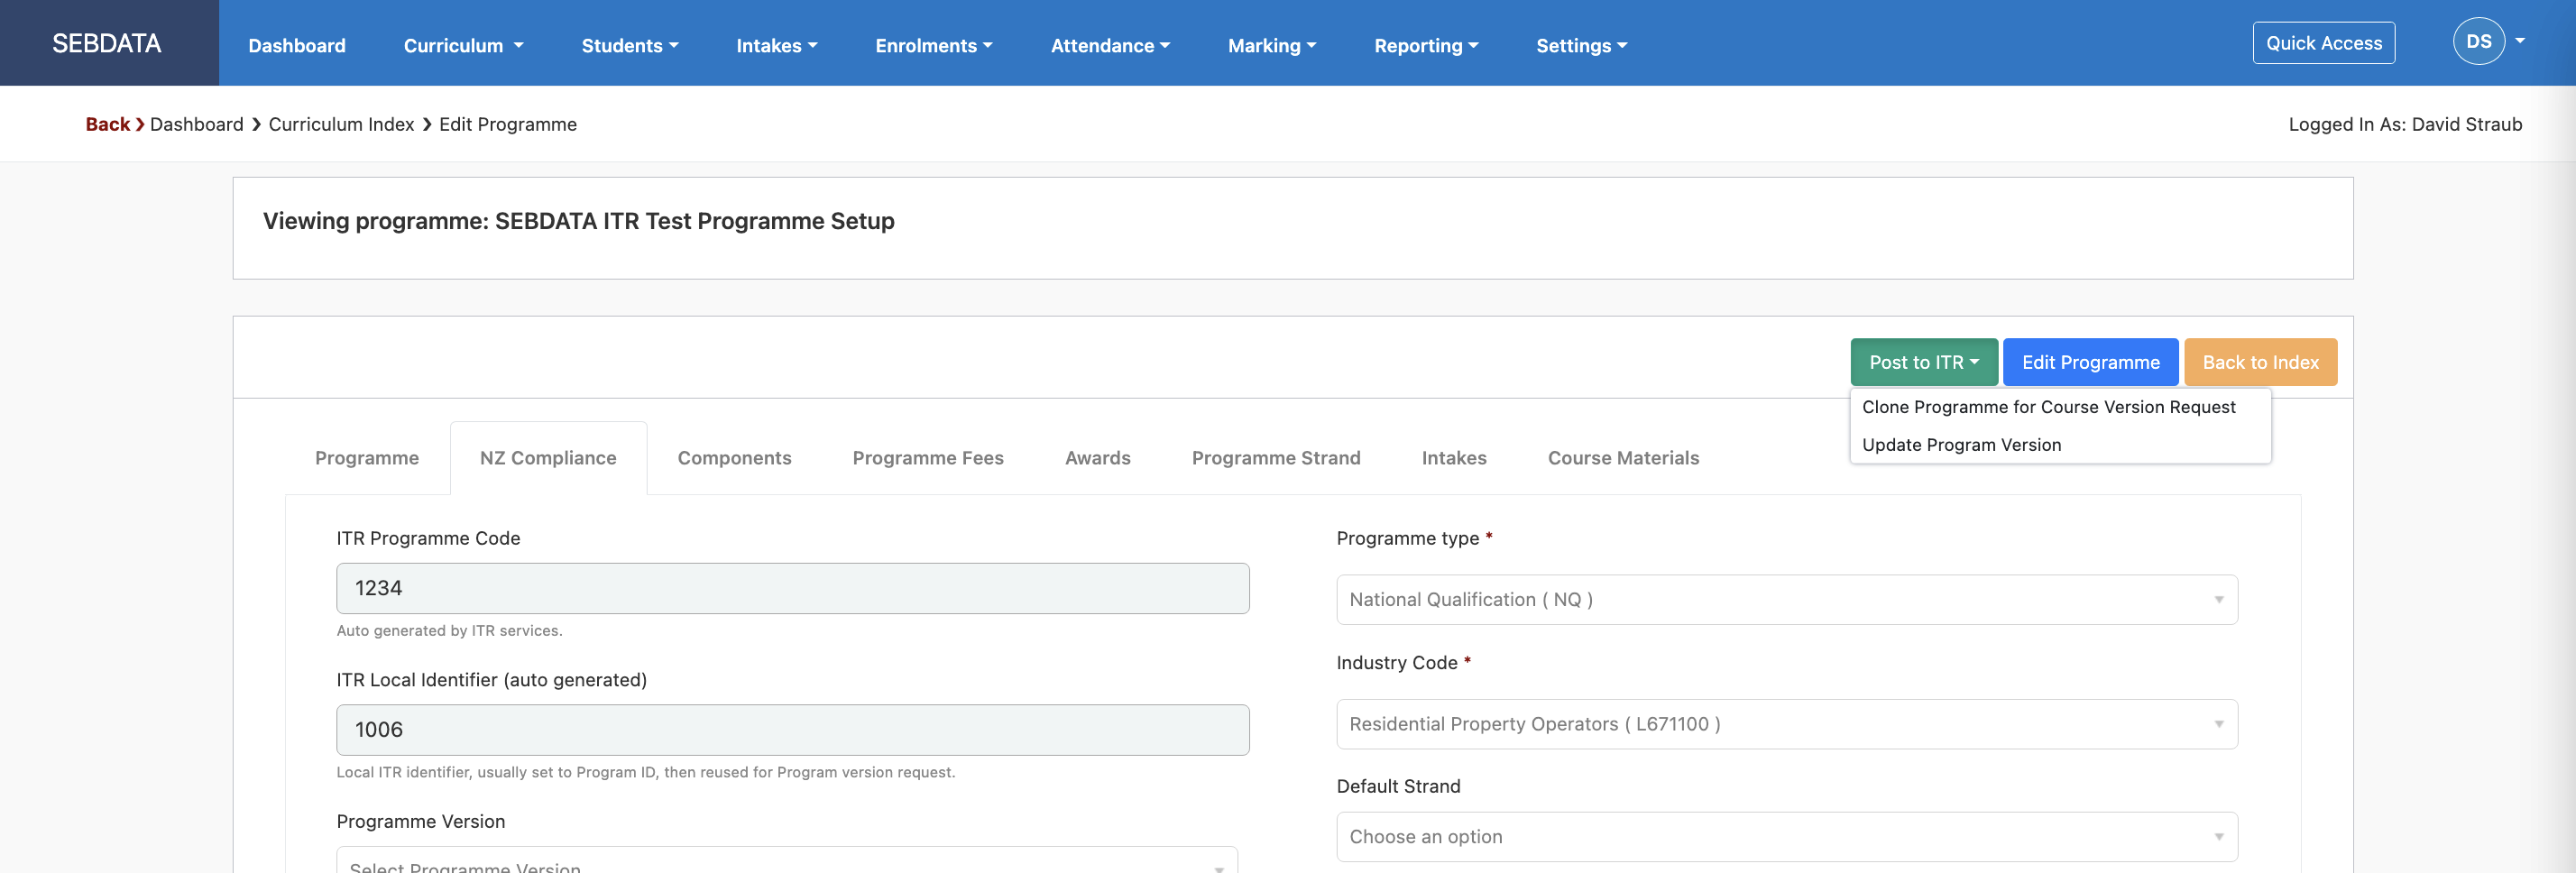
Once the programme is created and registered, you will have two new functions under the Post to ITR button:
- Clone Programme for course version request
This clones the programme and allows you to create a new programme of the same NZQA type with slightly different parameters e.g. the duration of the programme.
- Update Programme Version
New programme versions are required when the credit value, the nominal duration or the target qualification number, strand or version changes. In registering a new version of a complex programme, the sub-programmes must have the same programme number as previous versions. The sub-programme versions may differ. The only field that can be changed on a programme registration without creating a new version of the programme is the start date of the programme. A new programme must be registered if the NZQF level or programme type change.
Create Employer and Contacts
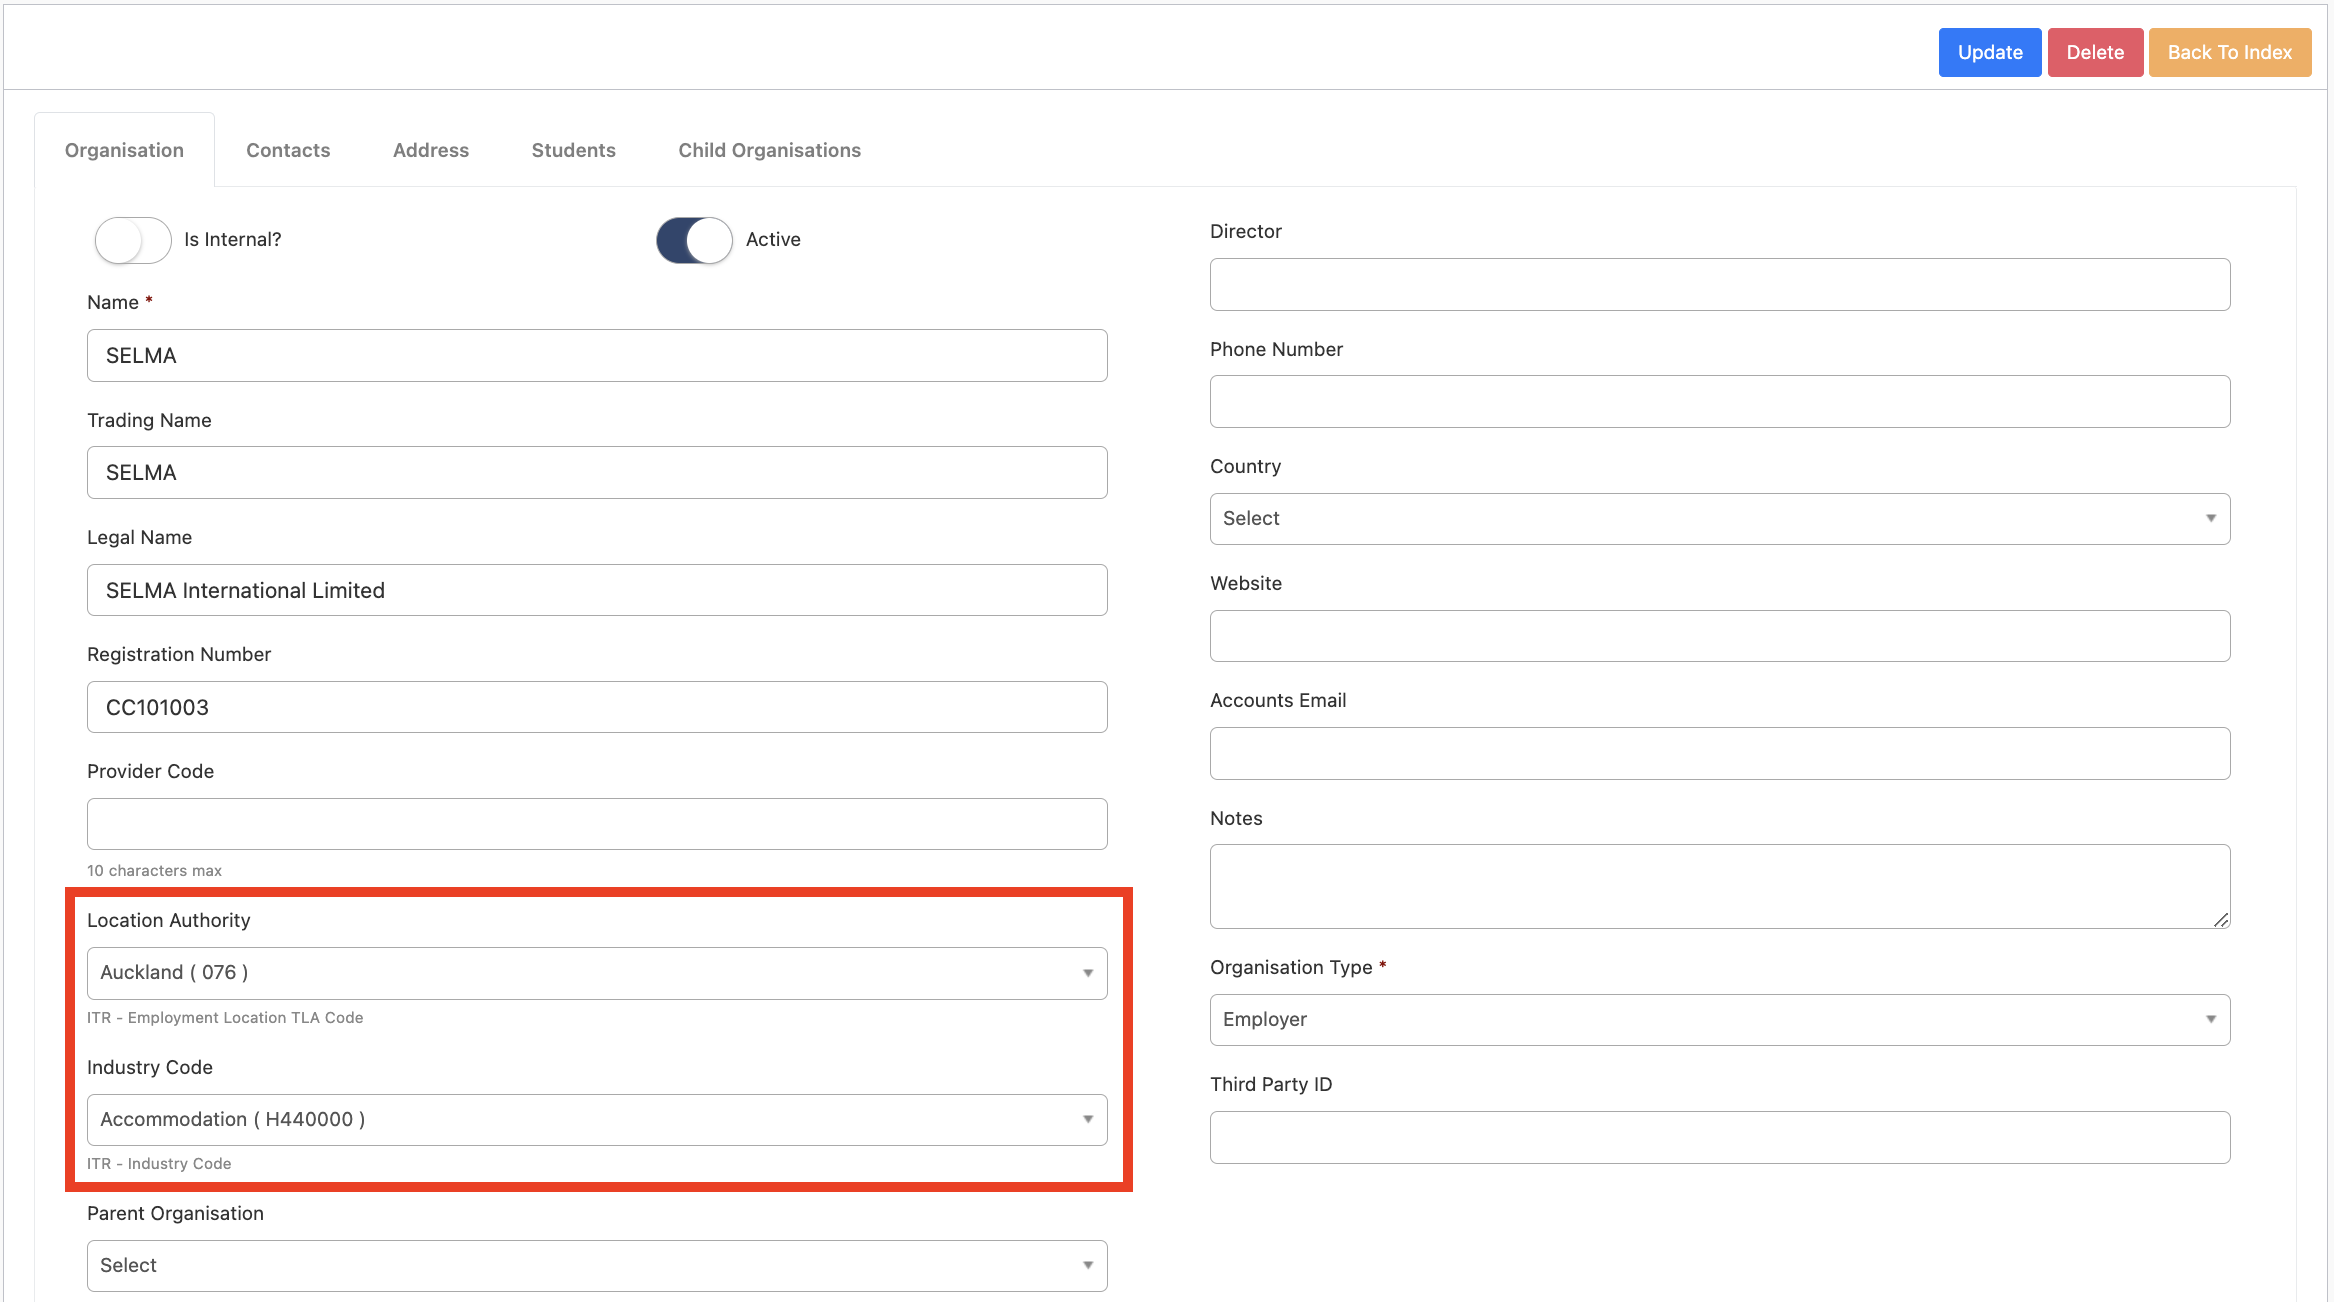
Before creating students and validating them for the ITR, the organization (employer) and the contact within the organization should be setup. For this, create an organization as usual under Settings -> Organisations and make sure that the Location Authority and the Industry Code are set for the organisation:
After that, make sure that there is at least one contact created and linked to the organisation:
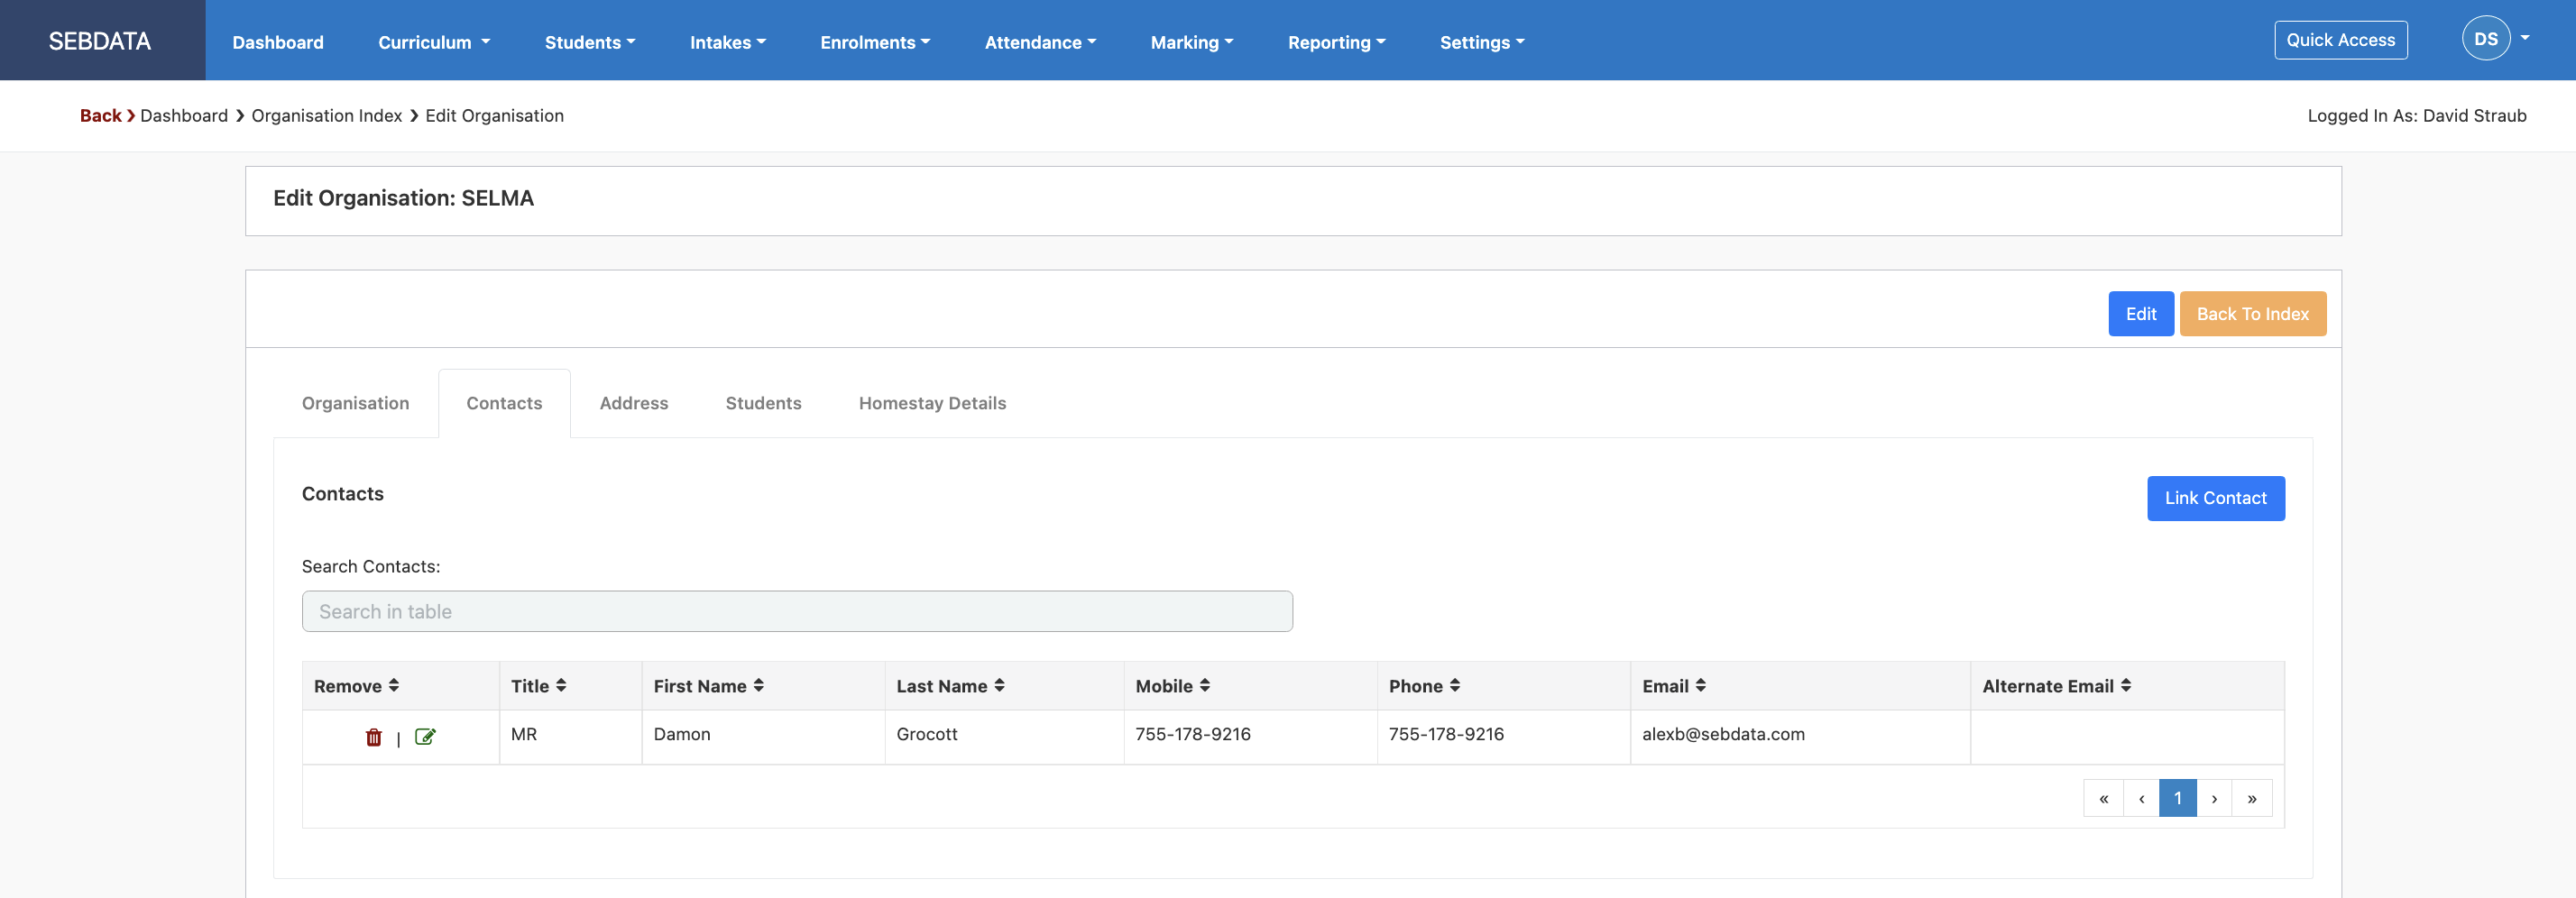
The organisation and the contact will later be used to link against the student as the Employer for the students’ studies.
Validate students for ITR
You can either create a new student or open an existing student and set the “Validate data for” option to ITR. With this validation on, SELMA will check if all required data on the student is recorded before saving the record. Below screenshot shows the error message with detailed instructions of which fields need to be set to successfully validate the record for the ITR:
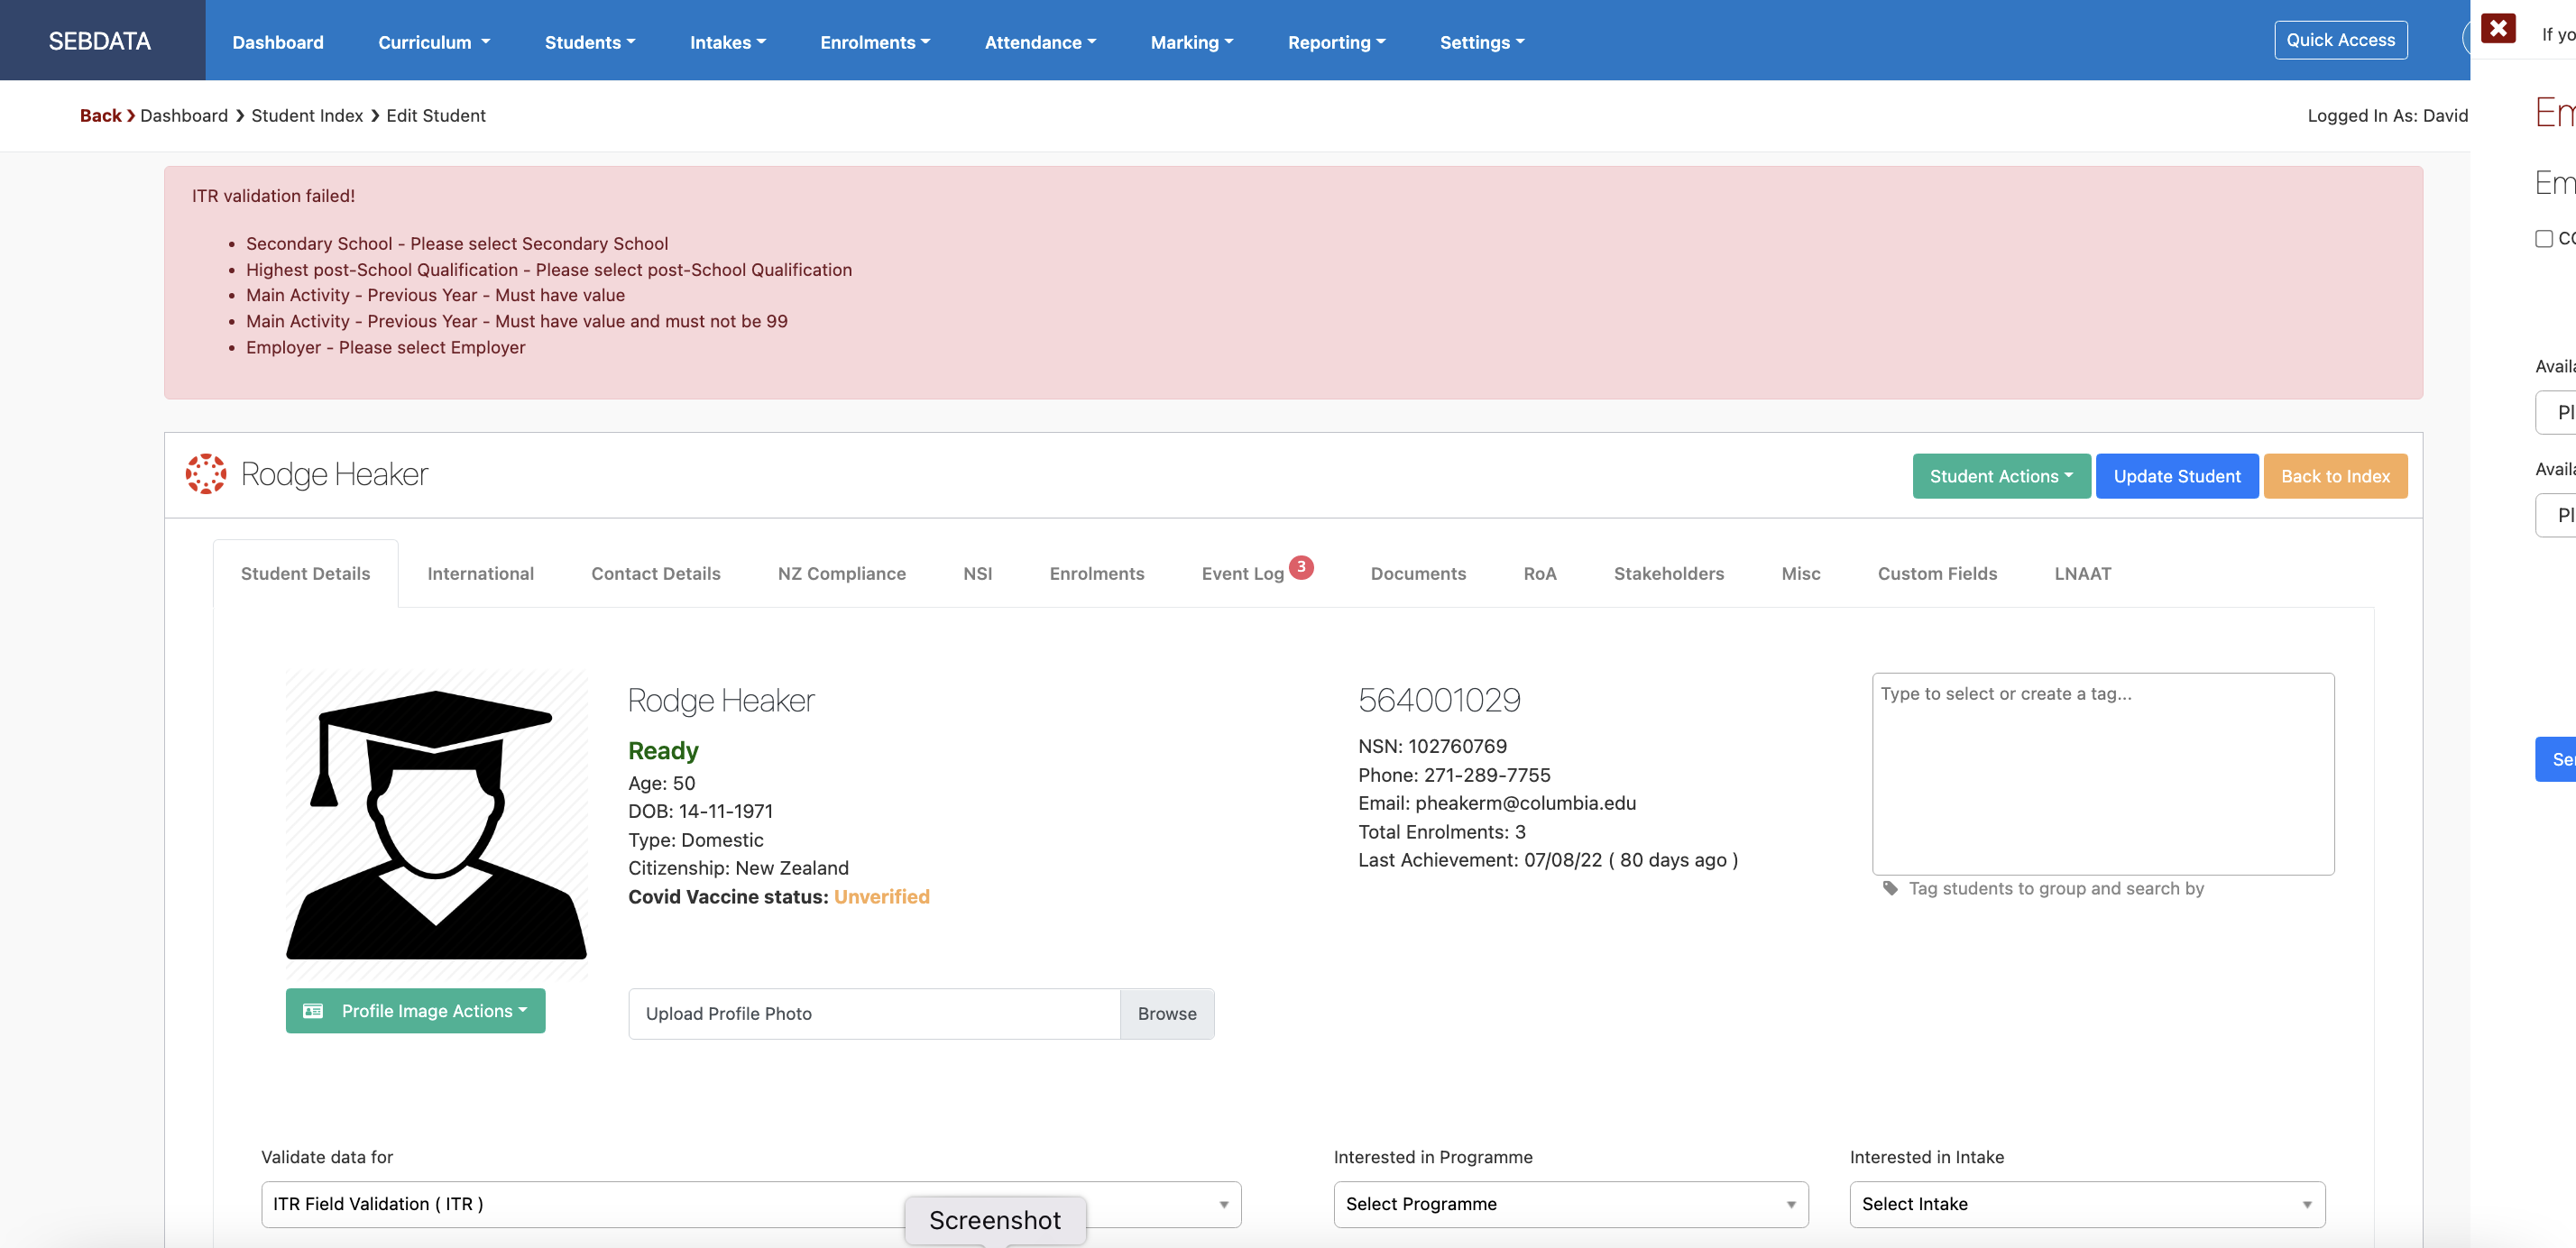
Once all data is entered and the record saved, the student is ready to be enrolled into an ITR programme.
Change Employer
In the event of the student changing employment during their studies, the employer on the student record can simply be changed. Make sure you also select a contact for the new employer. To do so navigate to Students -> Manage Students -> Select desired student and under the “Student Details” tab you can change the employer – note: you must be in edit mode to make changes
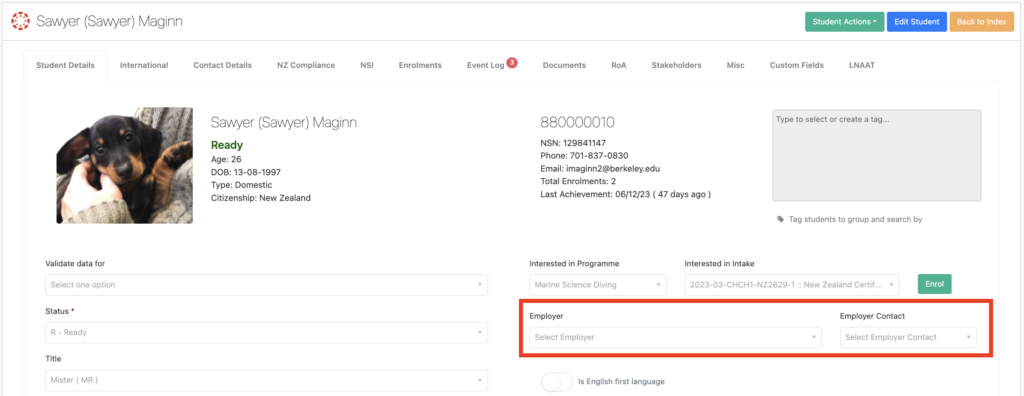
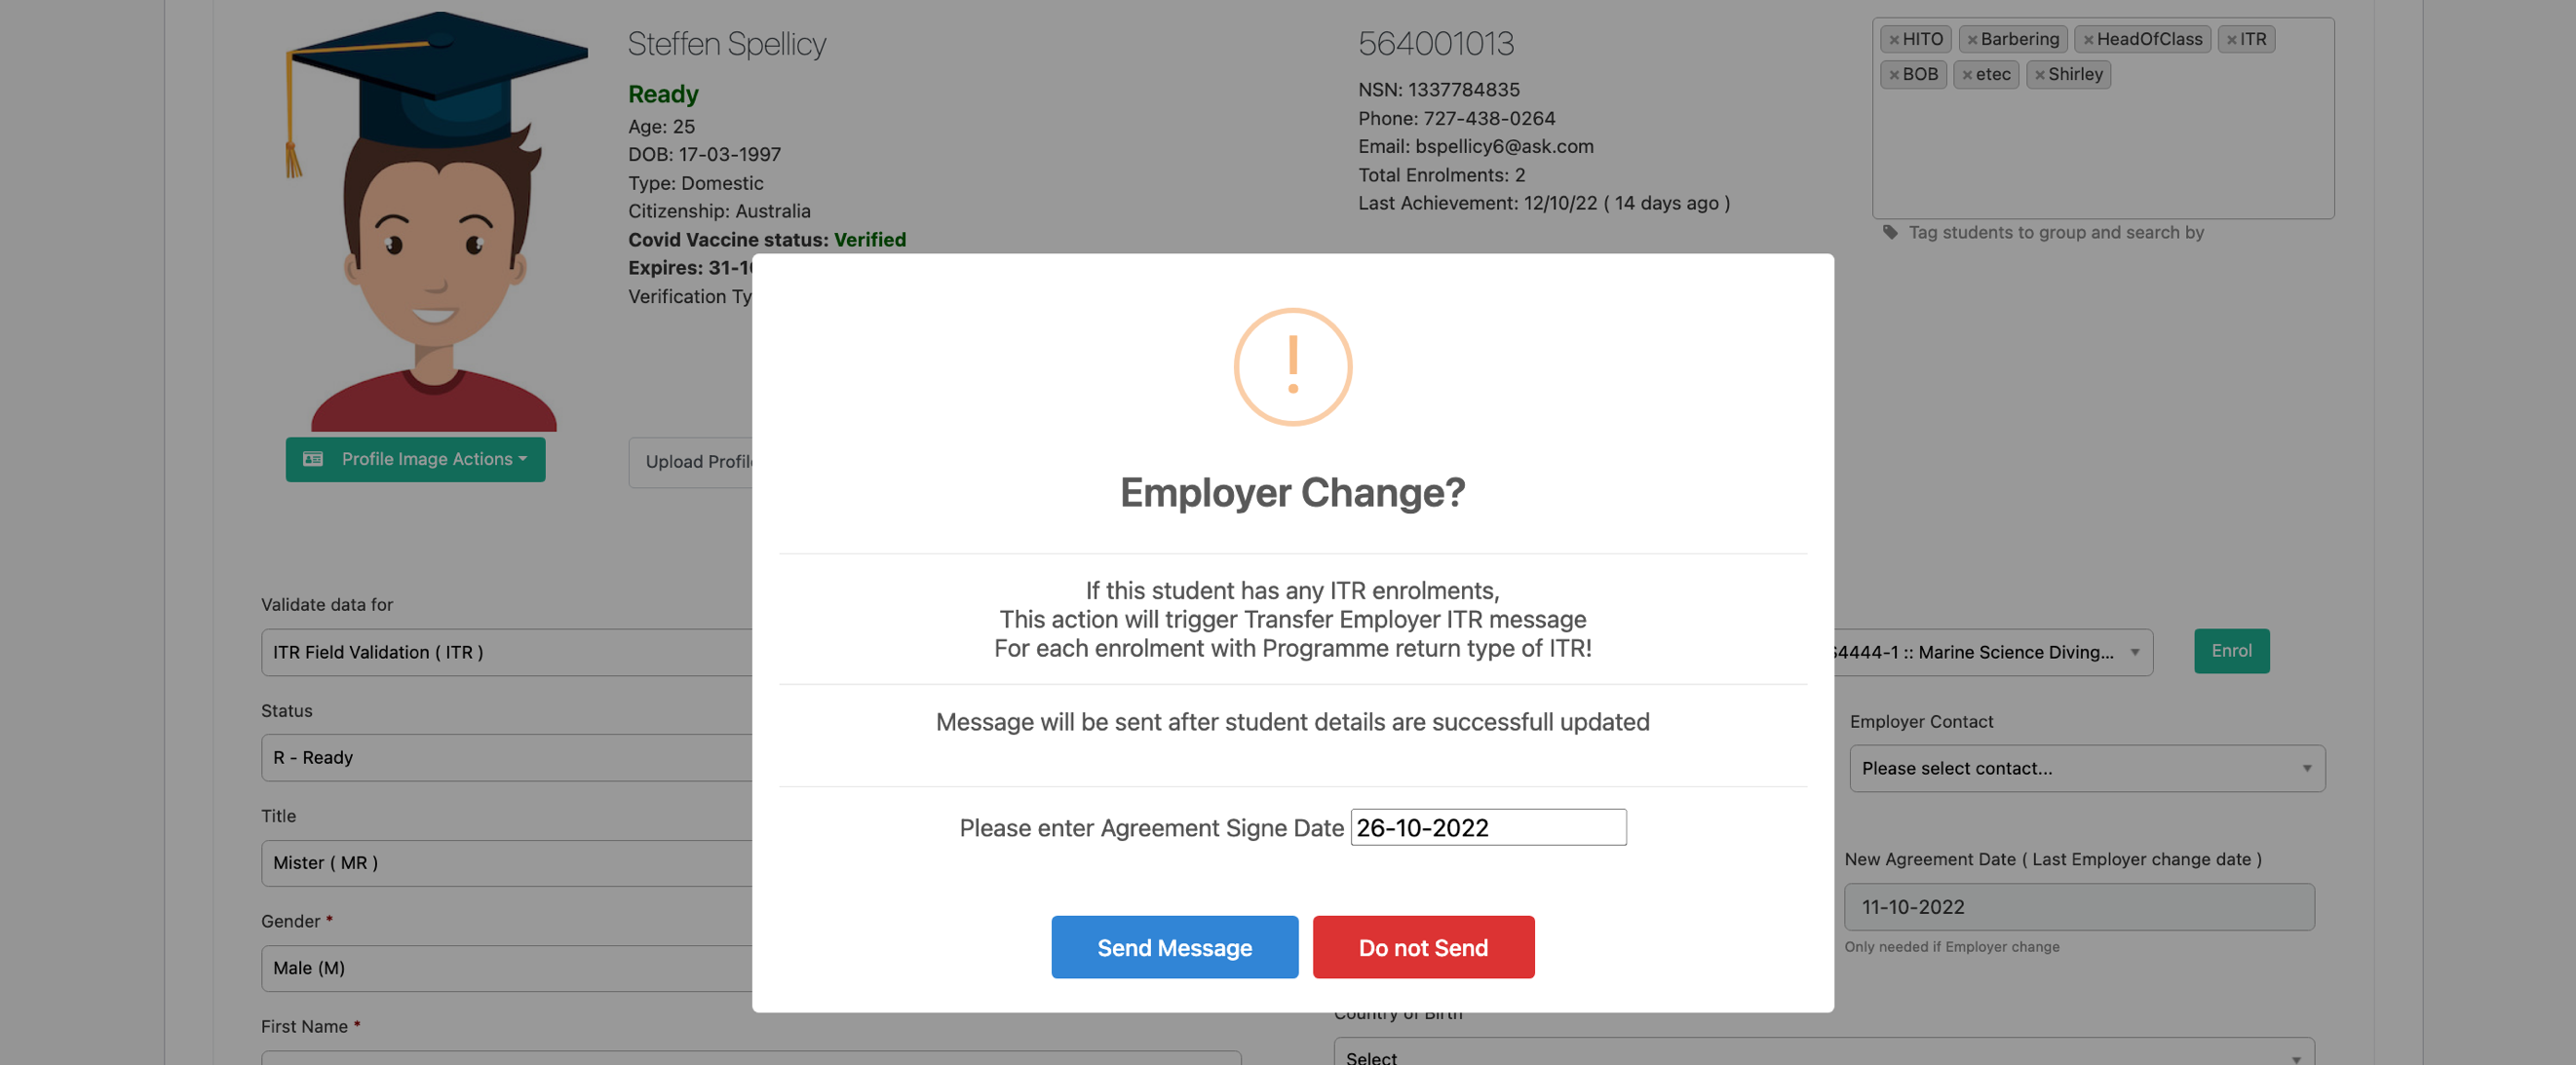
Upon changing, the “Employer Change” window will ask for the new agreement signed date. Once entered, you can use “Send Message”. Note that the message will only be sent once the record is saved:
If the new organization that is selected as the employer is not properly setup, you might experience below error. Go to the organisation and set the Location Authority and the Industry code first before you can use the organization as a new employer for an ITR validated student:

Create an ITR Intake
Before you can enrol a student, an intake for the ITR programme needs to be created and “Opened”. There is nothing different from an ITR intake compared to other intakes in SELMA. However, you cannot use an ITR intake for non ITR students.
You may need to set the funding type on the intake to match how the students are funded. If it is set to NZA & IT, the enrolment screen will later ask which of the two funds is used. See next chapter.
Enrol a student into an ITR Programme
In SELMA navigate to Enrolments -> Enrol Student(s)
On the enrolment screen, select the intake you would like to enrol learners into. If the intake funding is set to NZA & IT, an extra drop down will show you for you to set the fund for the specific student you are enrolling (Please select Enrolment Funding).
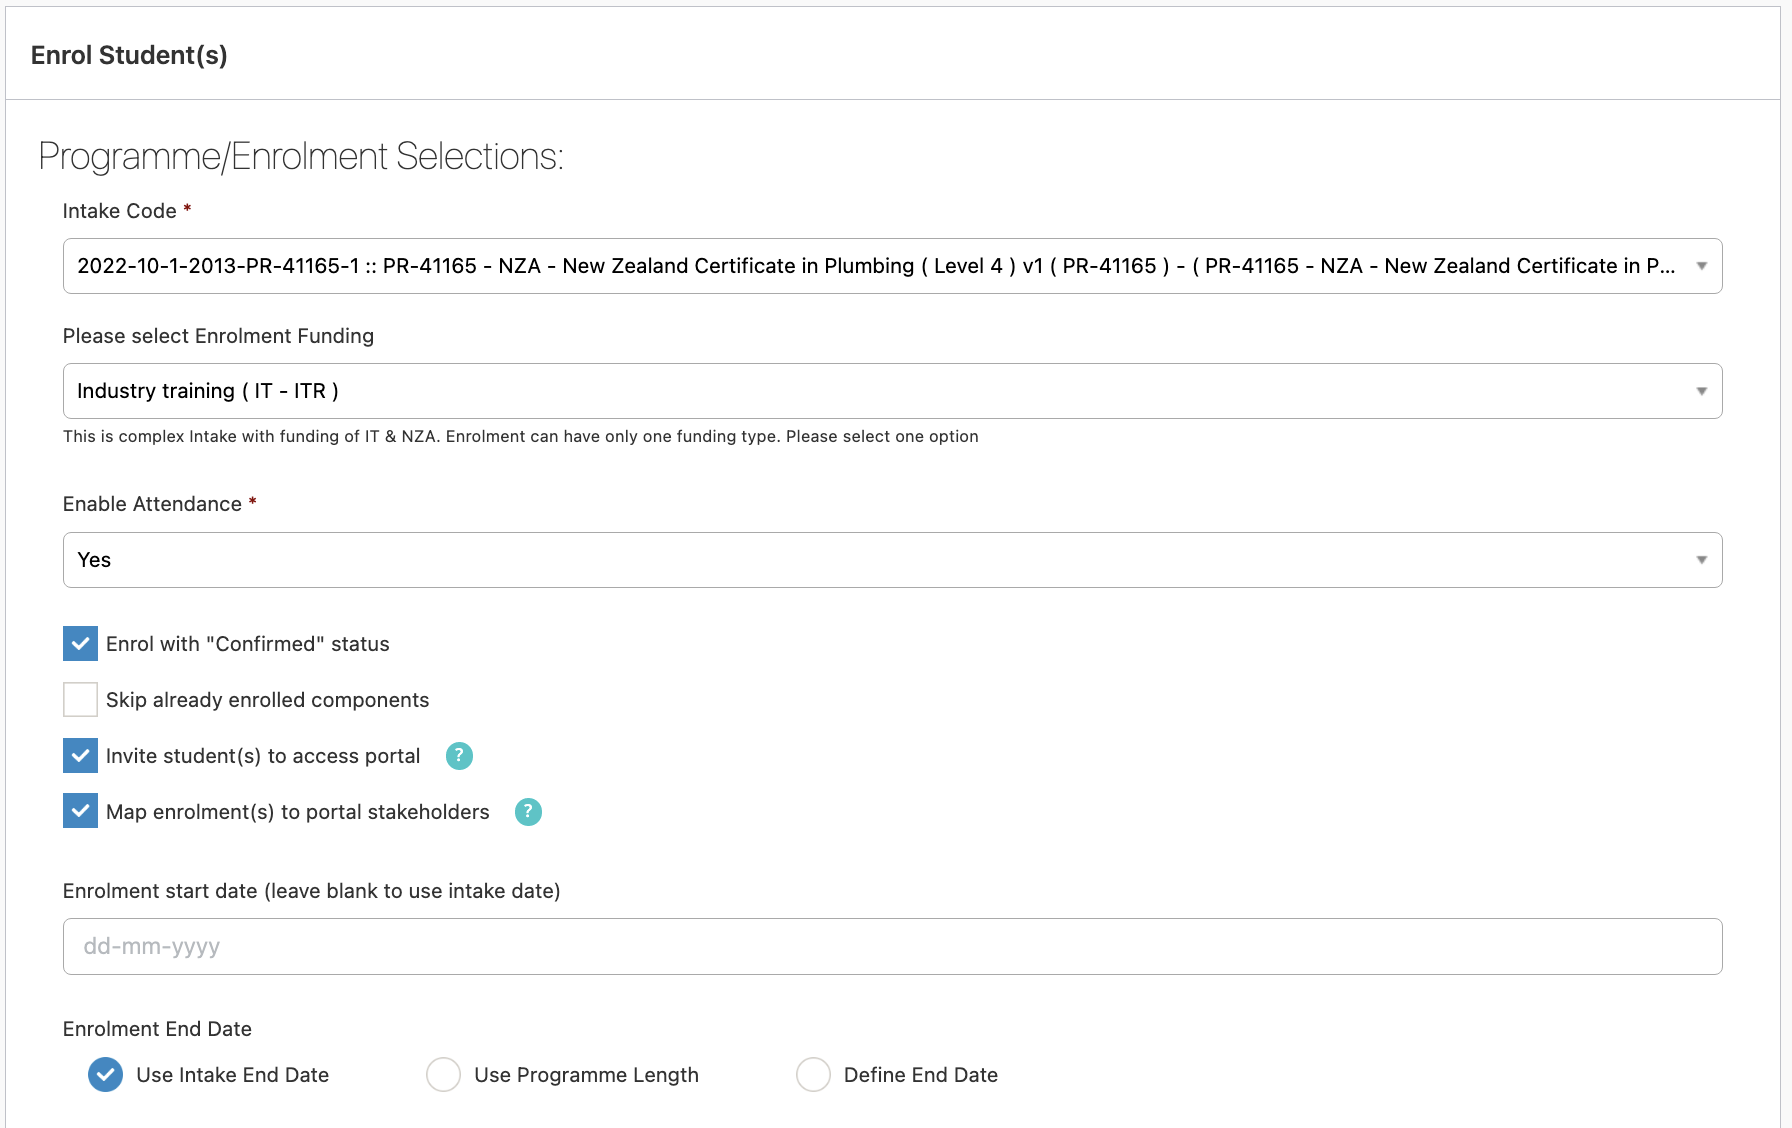
Set all other parameters as usual when enrolling a student.
A little further down, you can choose the students you would like to enrol. If the “Intake interested in” is set on the student record, you will find the students by choosing the intake and hit “Search”:

Once the student(s) is/are selected, you can click the “Enrol Students from the List” button.
If one or many of the students you have selected are not ITR validated, SELMA will show an error like below. Go back to the student record and validate the student for the ITR

If everything is correct, the enrolment will process and SELMA will show the result screen as shown below:
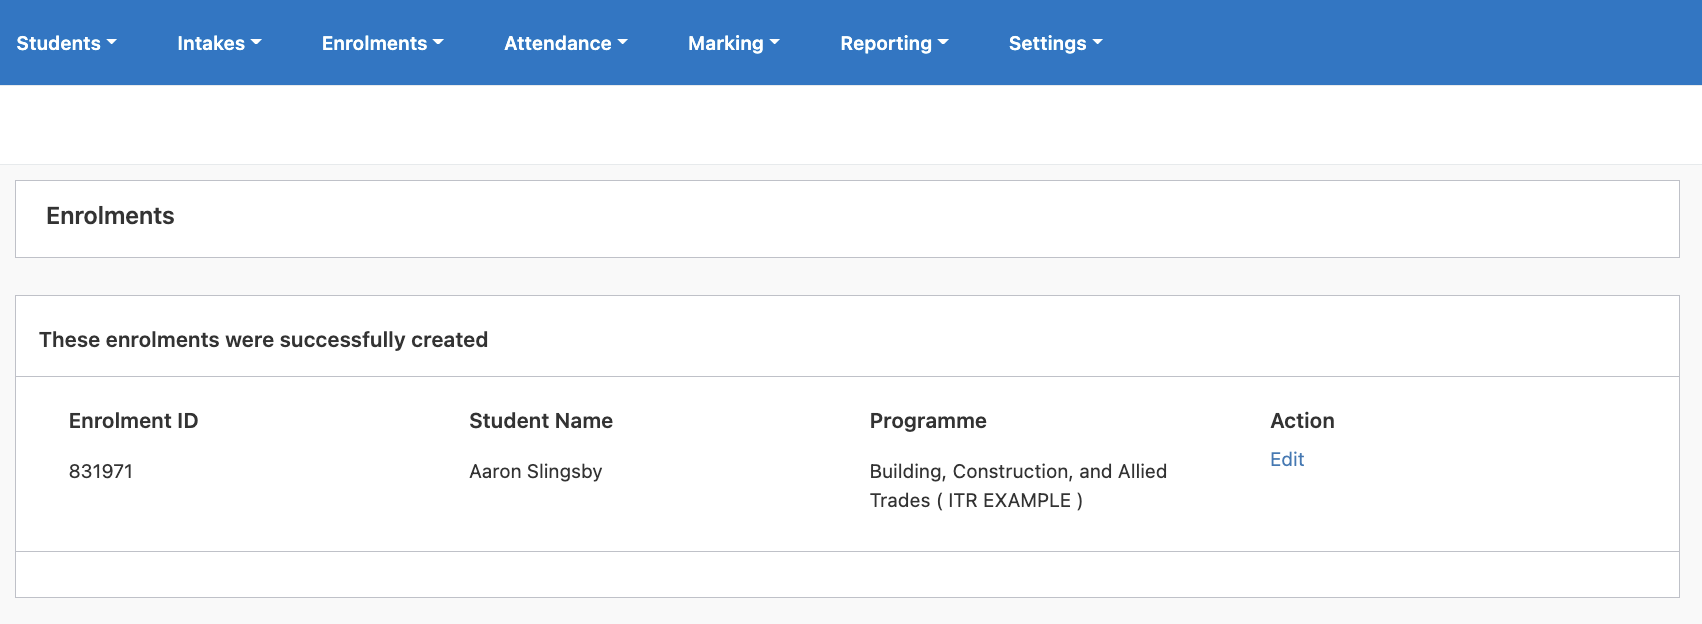
Simultaneously, the create training agreement message will be sent and will be visible under Reporting -> ITR:

Looking at the enrolment, the status will show “Awaiting ITR Response” until the ITR confirms the message as successful. This can take up to 15 minutes:
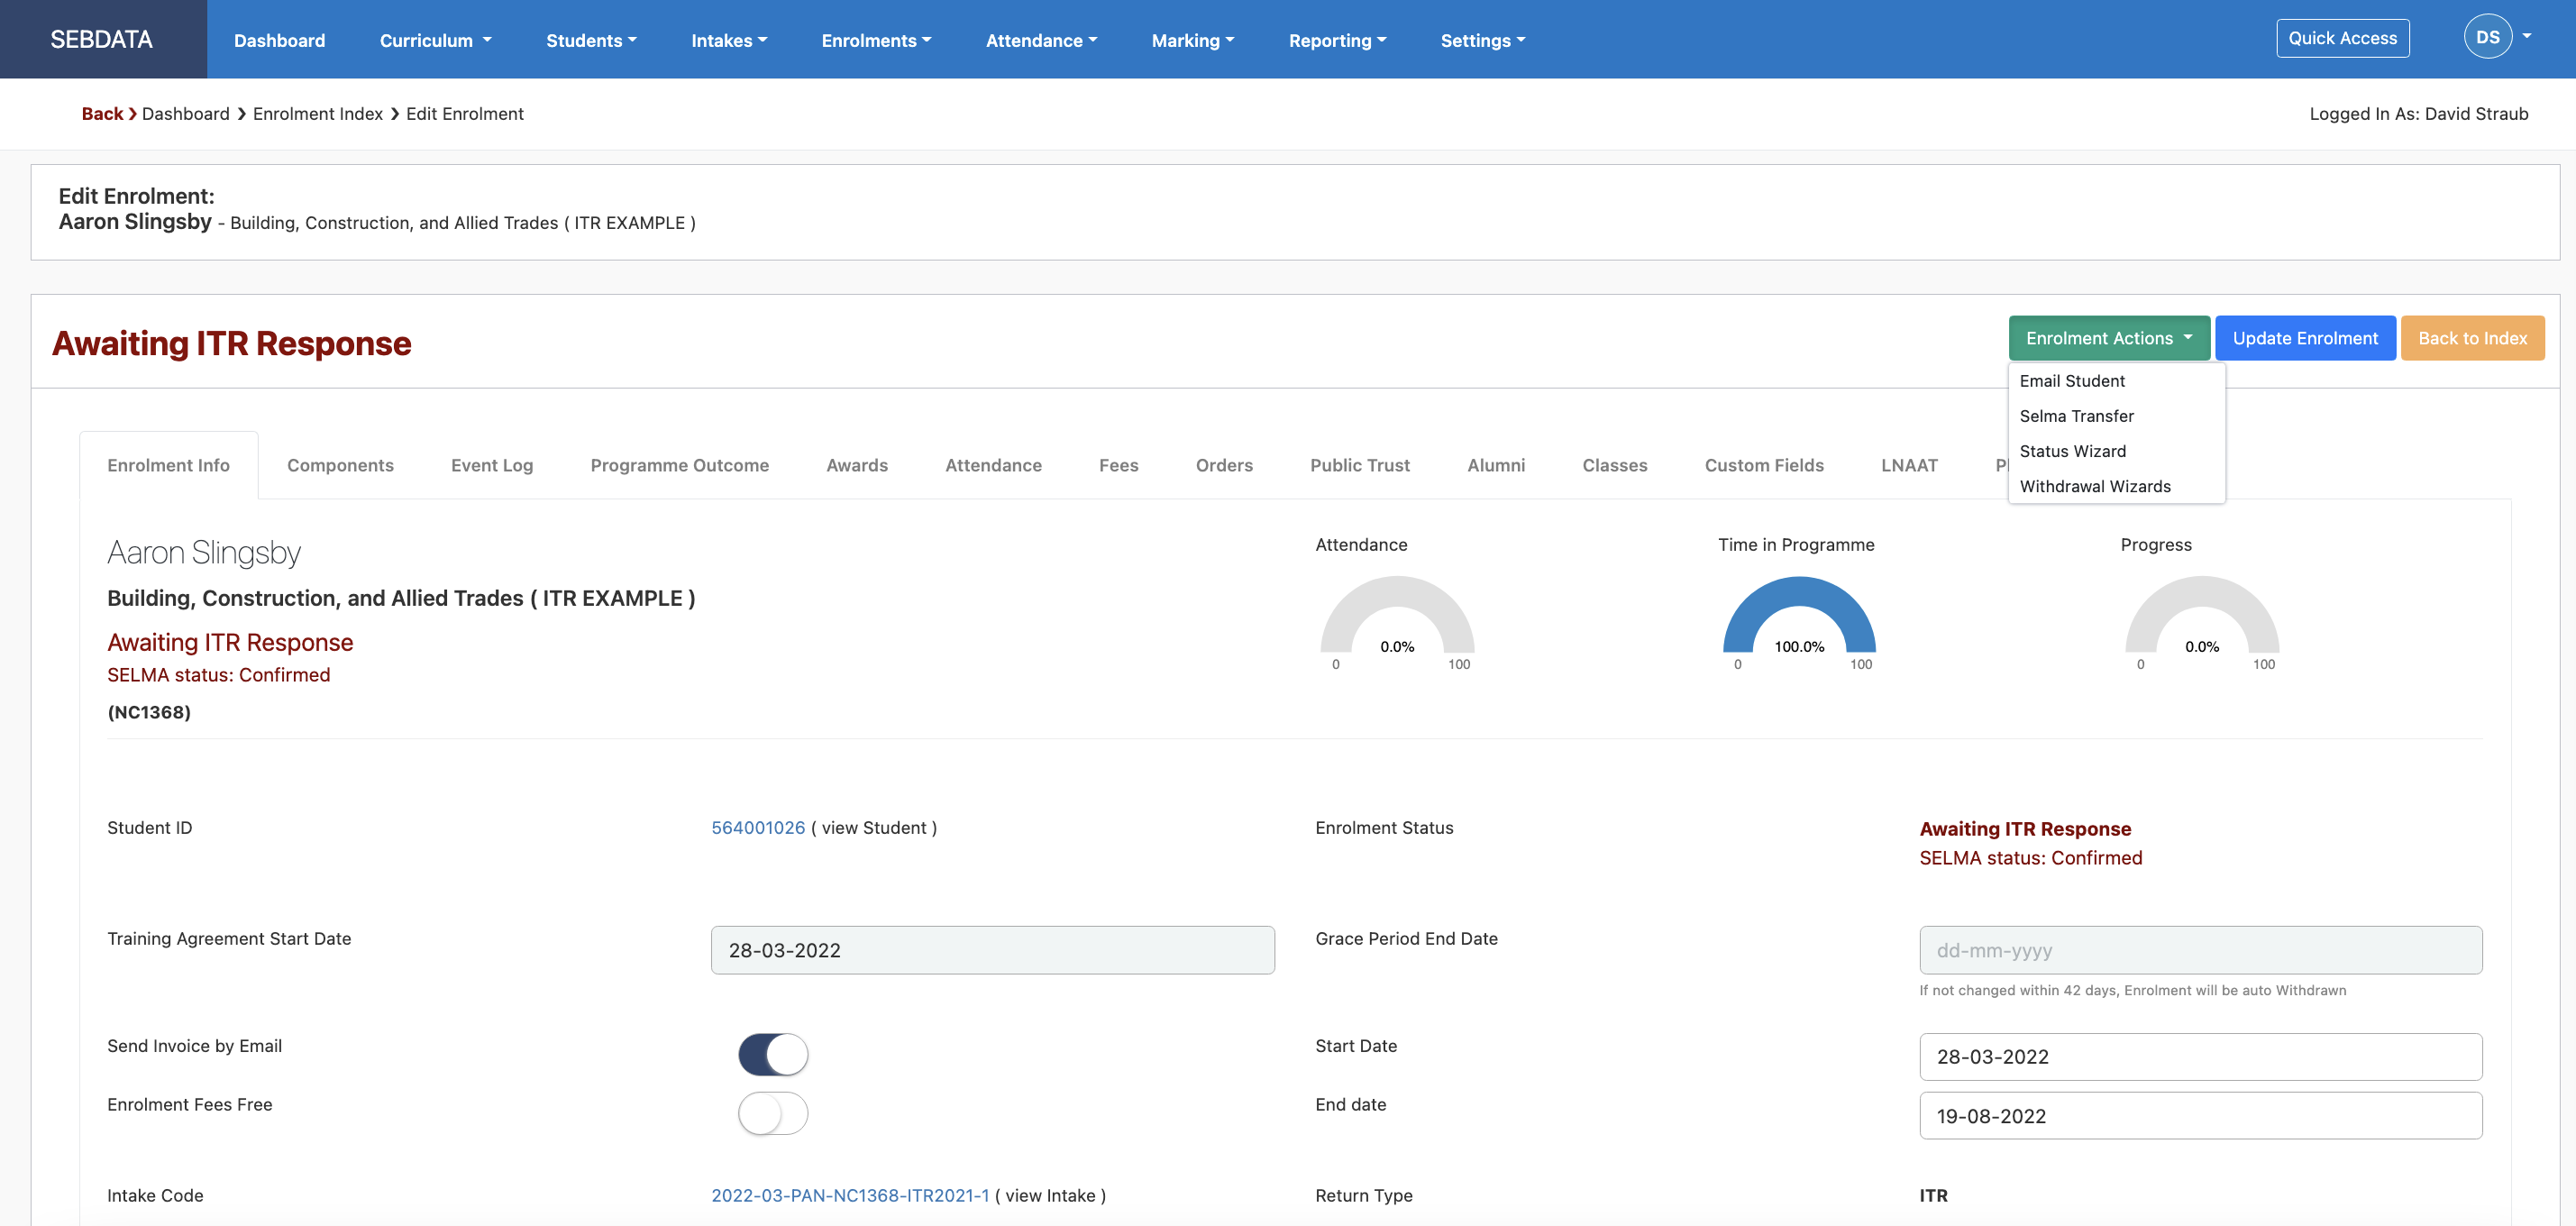
Note that the “SELMA Status” shows as “Confirmed”. The SELMA status and the ITR status may not be the same depending on the stage of the enrolment and the potential message confirmations SELMA is waiting for.
Update an ITR Enrolment
Once the enrolment is confirmed by the ITR. The ITR Status will show “ITR Active” and when in Edit mode, the green Enrolment Actions button will have multiple more functions highlighted in red:
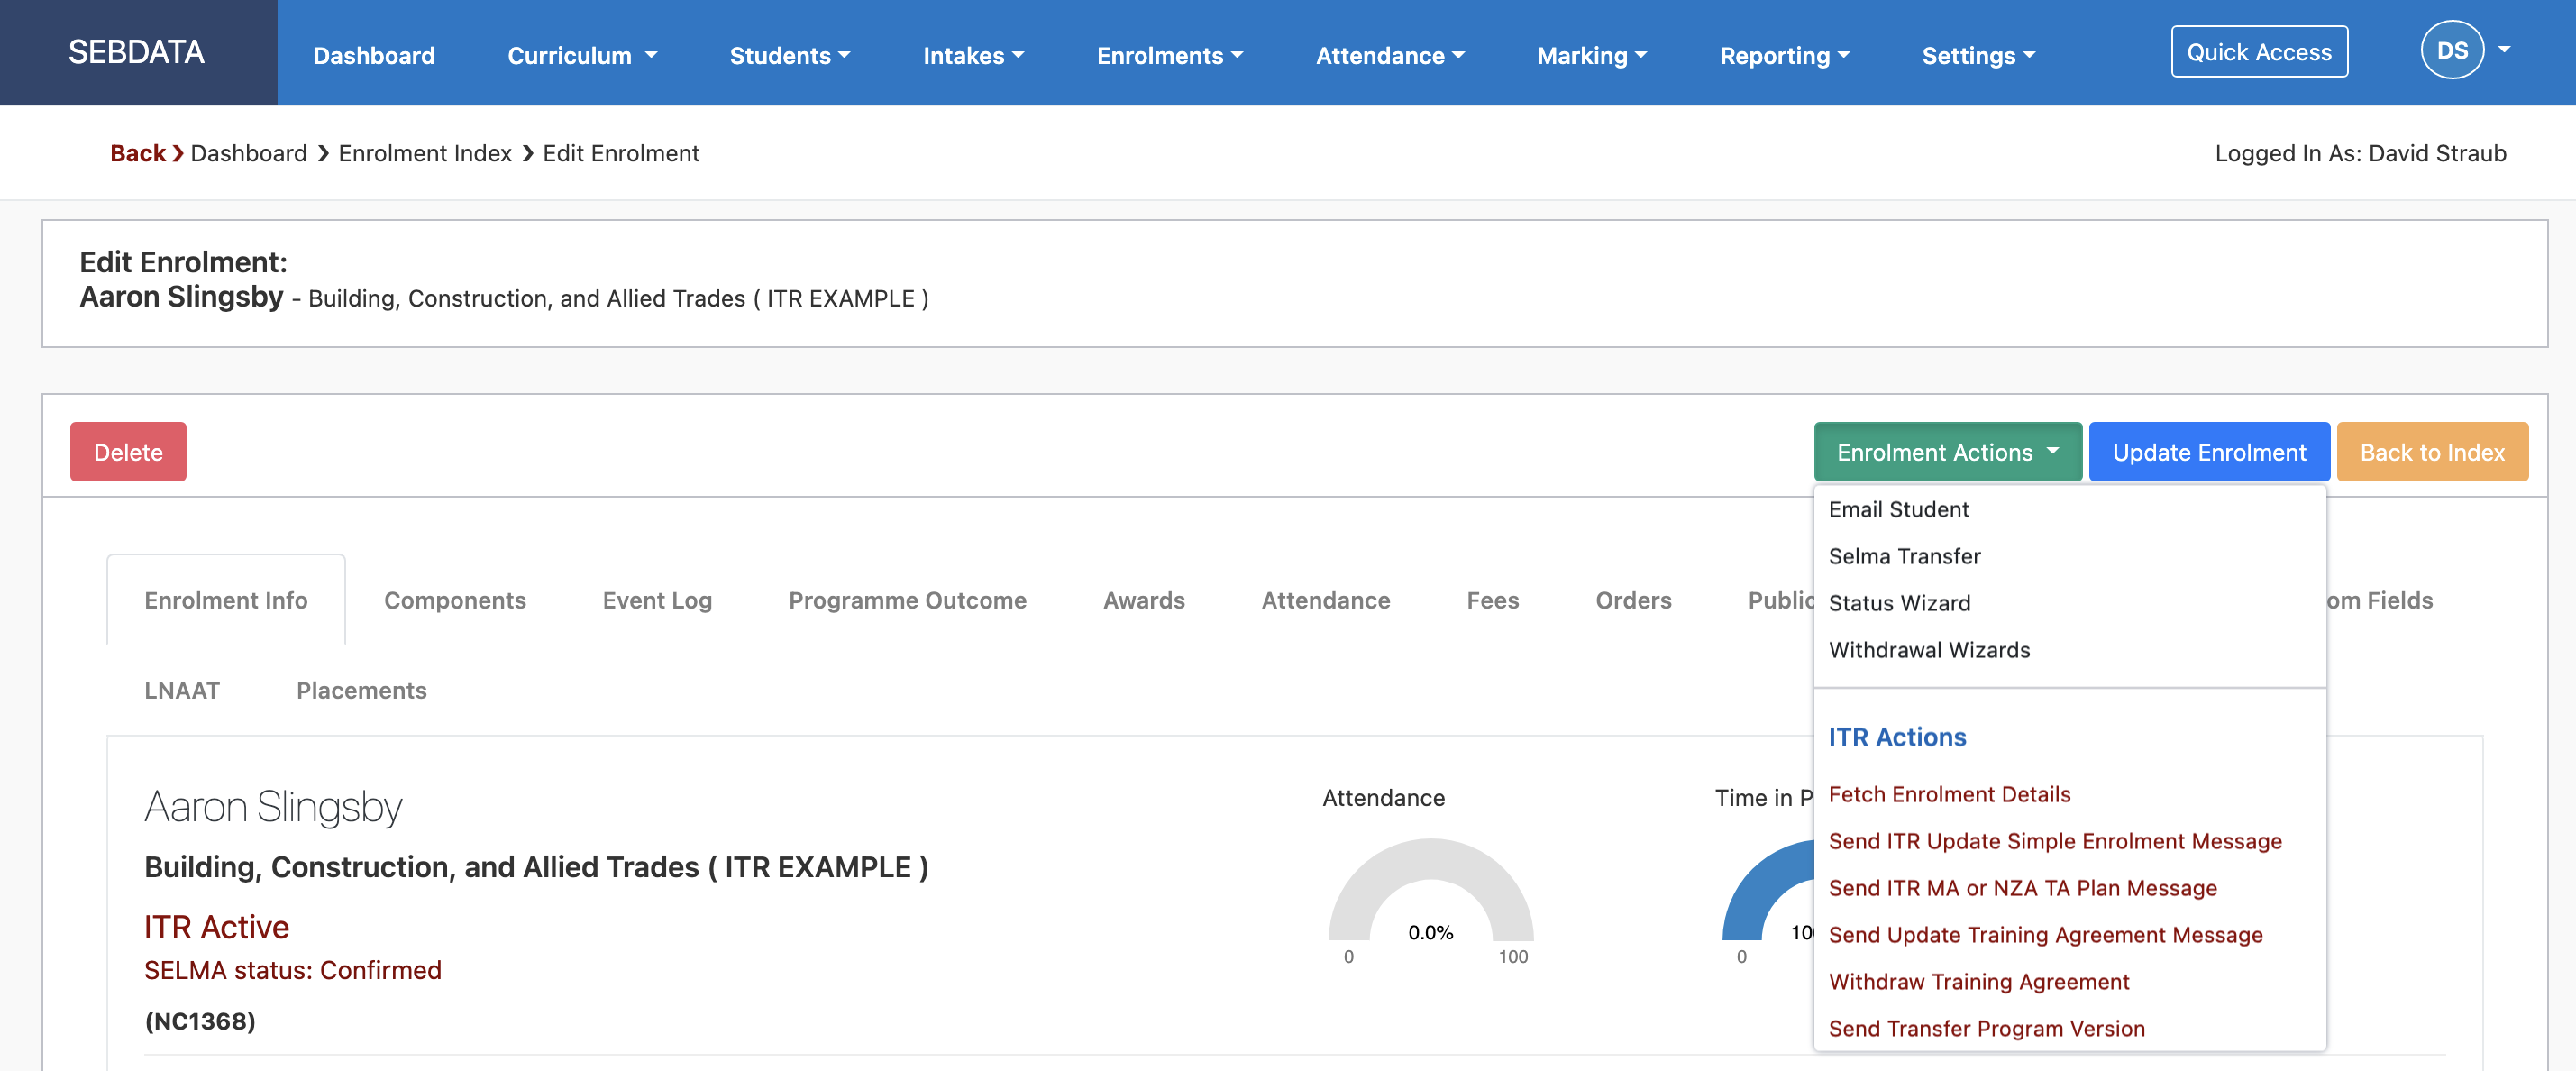
The functions are used as below:
- Send ITR Update Simple Enrolment
Enrolments can be updated through the update simple and complex programme functions in ITR. The only information that can be changed when updating an enrolment is the learner enrolment date in the programme. You can also add unit standards or remove nonmandatory unit standards from the enrolment. This includes additional unit standards for complex apprenticeships and unit standards associated with sub-programmes. If there is a need to change other information associated with the enrolment, you will need to either withdraw and re-enter the programme enrolment or delete the entire enrolment.
- Send ITR MA NZA TA or Update Training Agreement message
Update a training agreement Provided the training agreement is not FINISHED, the elements in list below are updatable on the Update Training Agreement message: Where a learner has changed employer, use the transfer employer message to report the new employer details. This enables accurate reporting and analysis of learner history. Alternatively, the enrolment can be withdrawn and re-created; however, this is not the recommended method.
- Elements:
- Employer Head Office Name
- Employer Sub Division Name
- Employment Location TLA Code
- Industry Code
- MoE Exemption Code
- Employment Type Code
- Prior Activity Code
- Training Agreement Signed Date
- Transfer Programme
When a new programme version was created, manually transfer the enrolment to a new programme version with this message.
Complete an ITR Enrolment (successfully)
Once a student has achieved all components in an enrolment, you can use the Fetch enrolment details function to get the information sitting in the ITR:
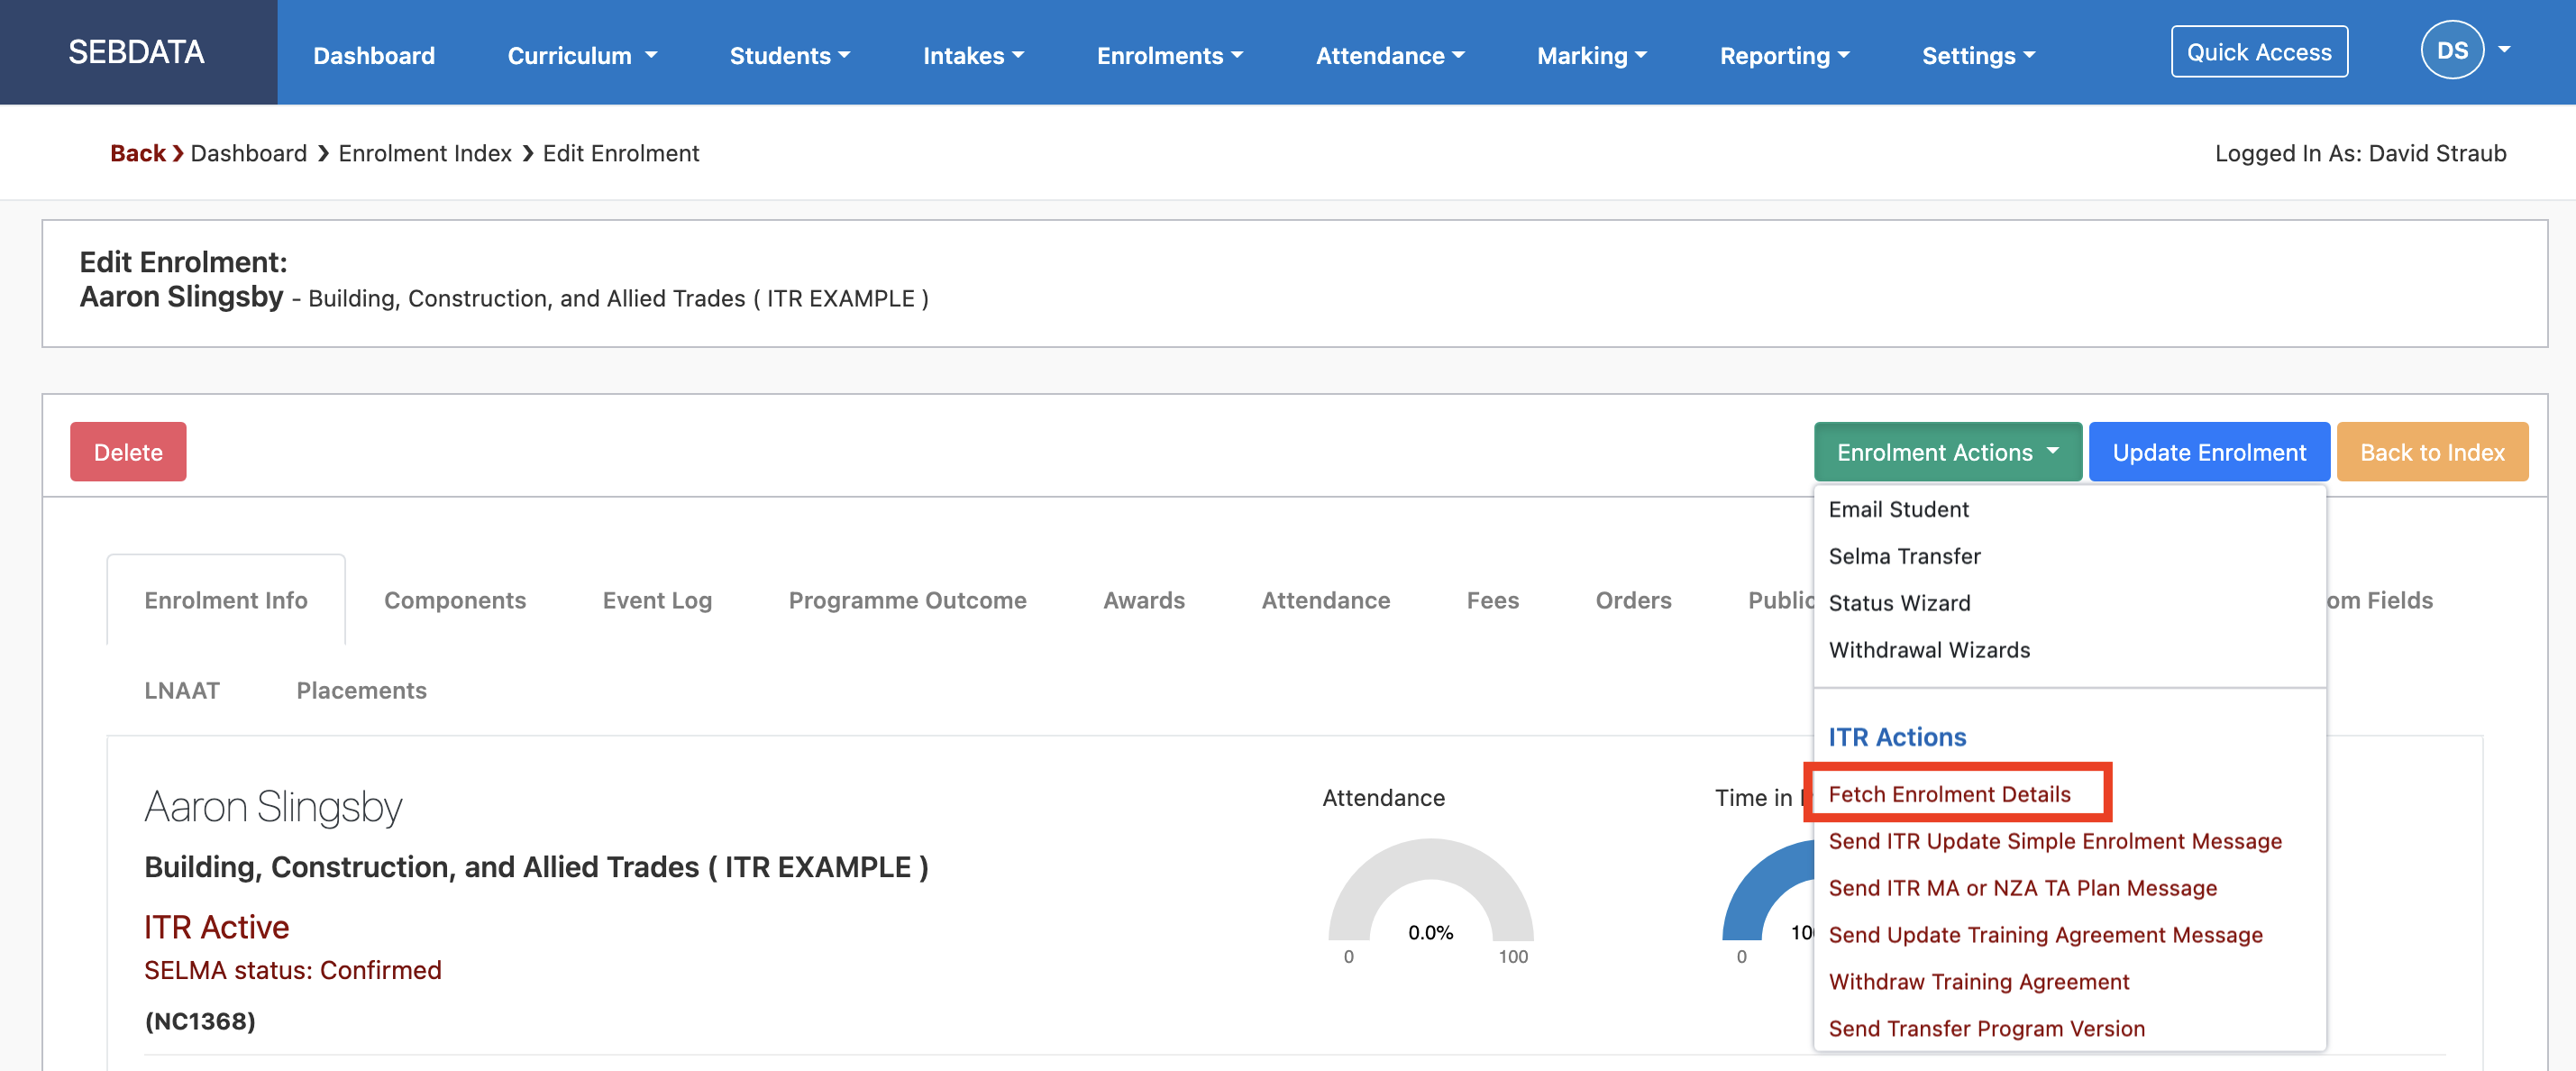
A pop up will open and you can trigger the fetch by clicking “Fetch enrolment details”, the button will then change to “Refresh ITR Enrolment Status”. It can take up to 15 minutes for the data to come through, you can check later on by clicking the “Refresh ITR Enrolment Status” button:
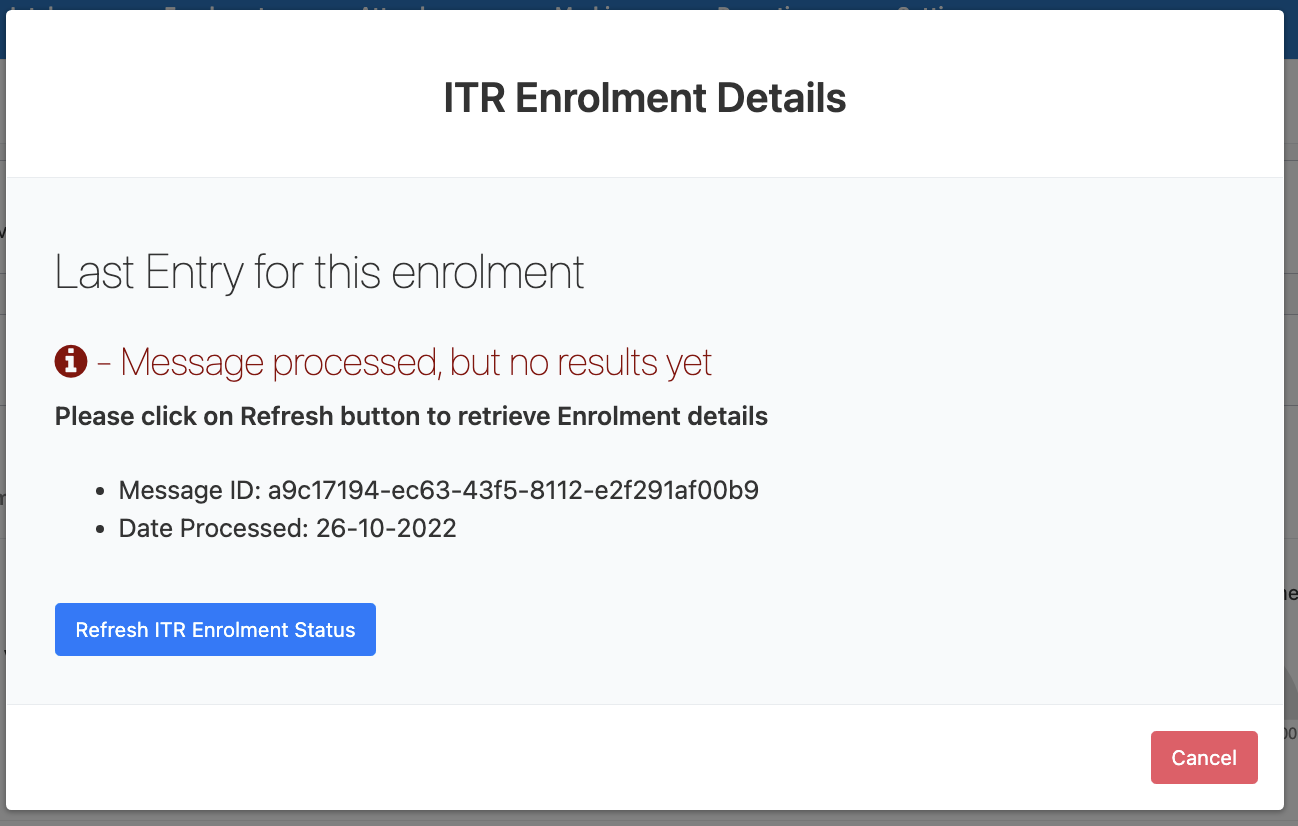
If not all components are complete, it will show the status of the enrolment and all components.
If the enrolment is in fact complete, you can now update the enrolment and SELMA will complete everything correctly. No further reporting is required, and the enrolment is concluded.
Withdraw a Student from an ITR Enrolment
You may also have to withdraw an enrolment. To do so use the “Withdraw Training Agreement” function. This will withdraw the student from the TA and all underlying enrolments in the ITR.
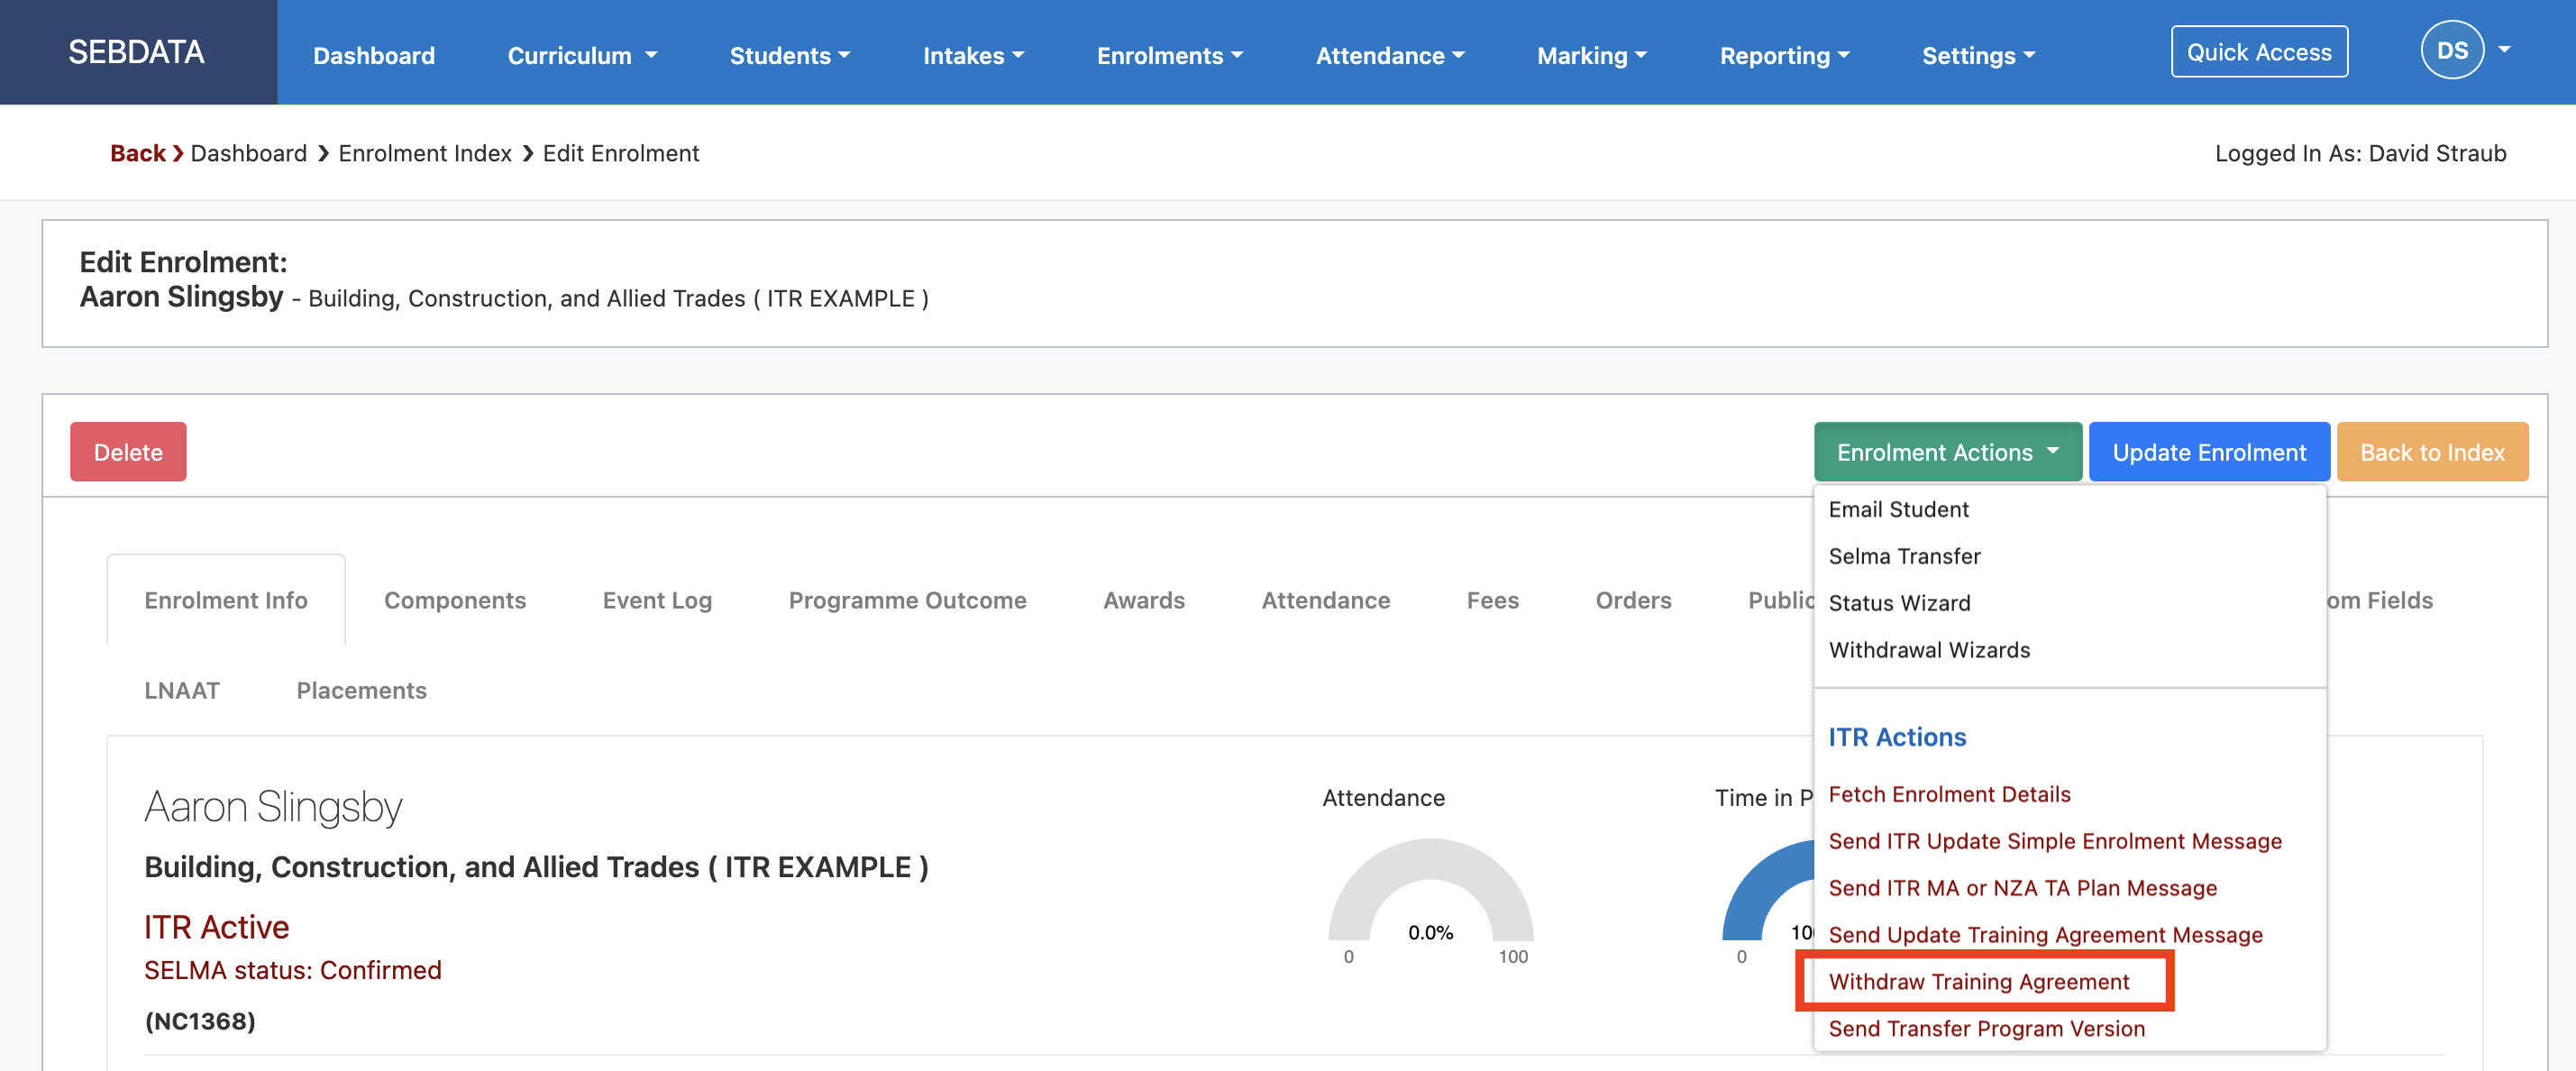
Please note, SELMA does not withdraw student internally – use the Withdrawal Wizard afterwards to withdraw the enrolment in SELMA as well.
Delete an ITR Enrolment
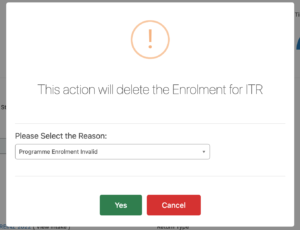
In an ITR enrolment, click on Edit then click on the red Delete button on top right. A dialog window will pop up to choose the reason for the deletion. Once the message is confirmed, the enrolment will be deleted both from SELMA and the ITR:
Record a MAC Visit
MAC visits can only be recorded and sent from the students’ enrolment. Go to the Event Log tab and create a new note of type MAC Visit as shown below. This will send a MAC visit message to the ITR upon clicking the “Add Event” button.
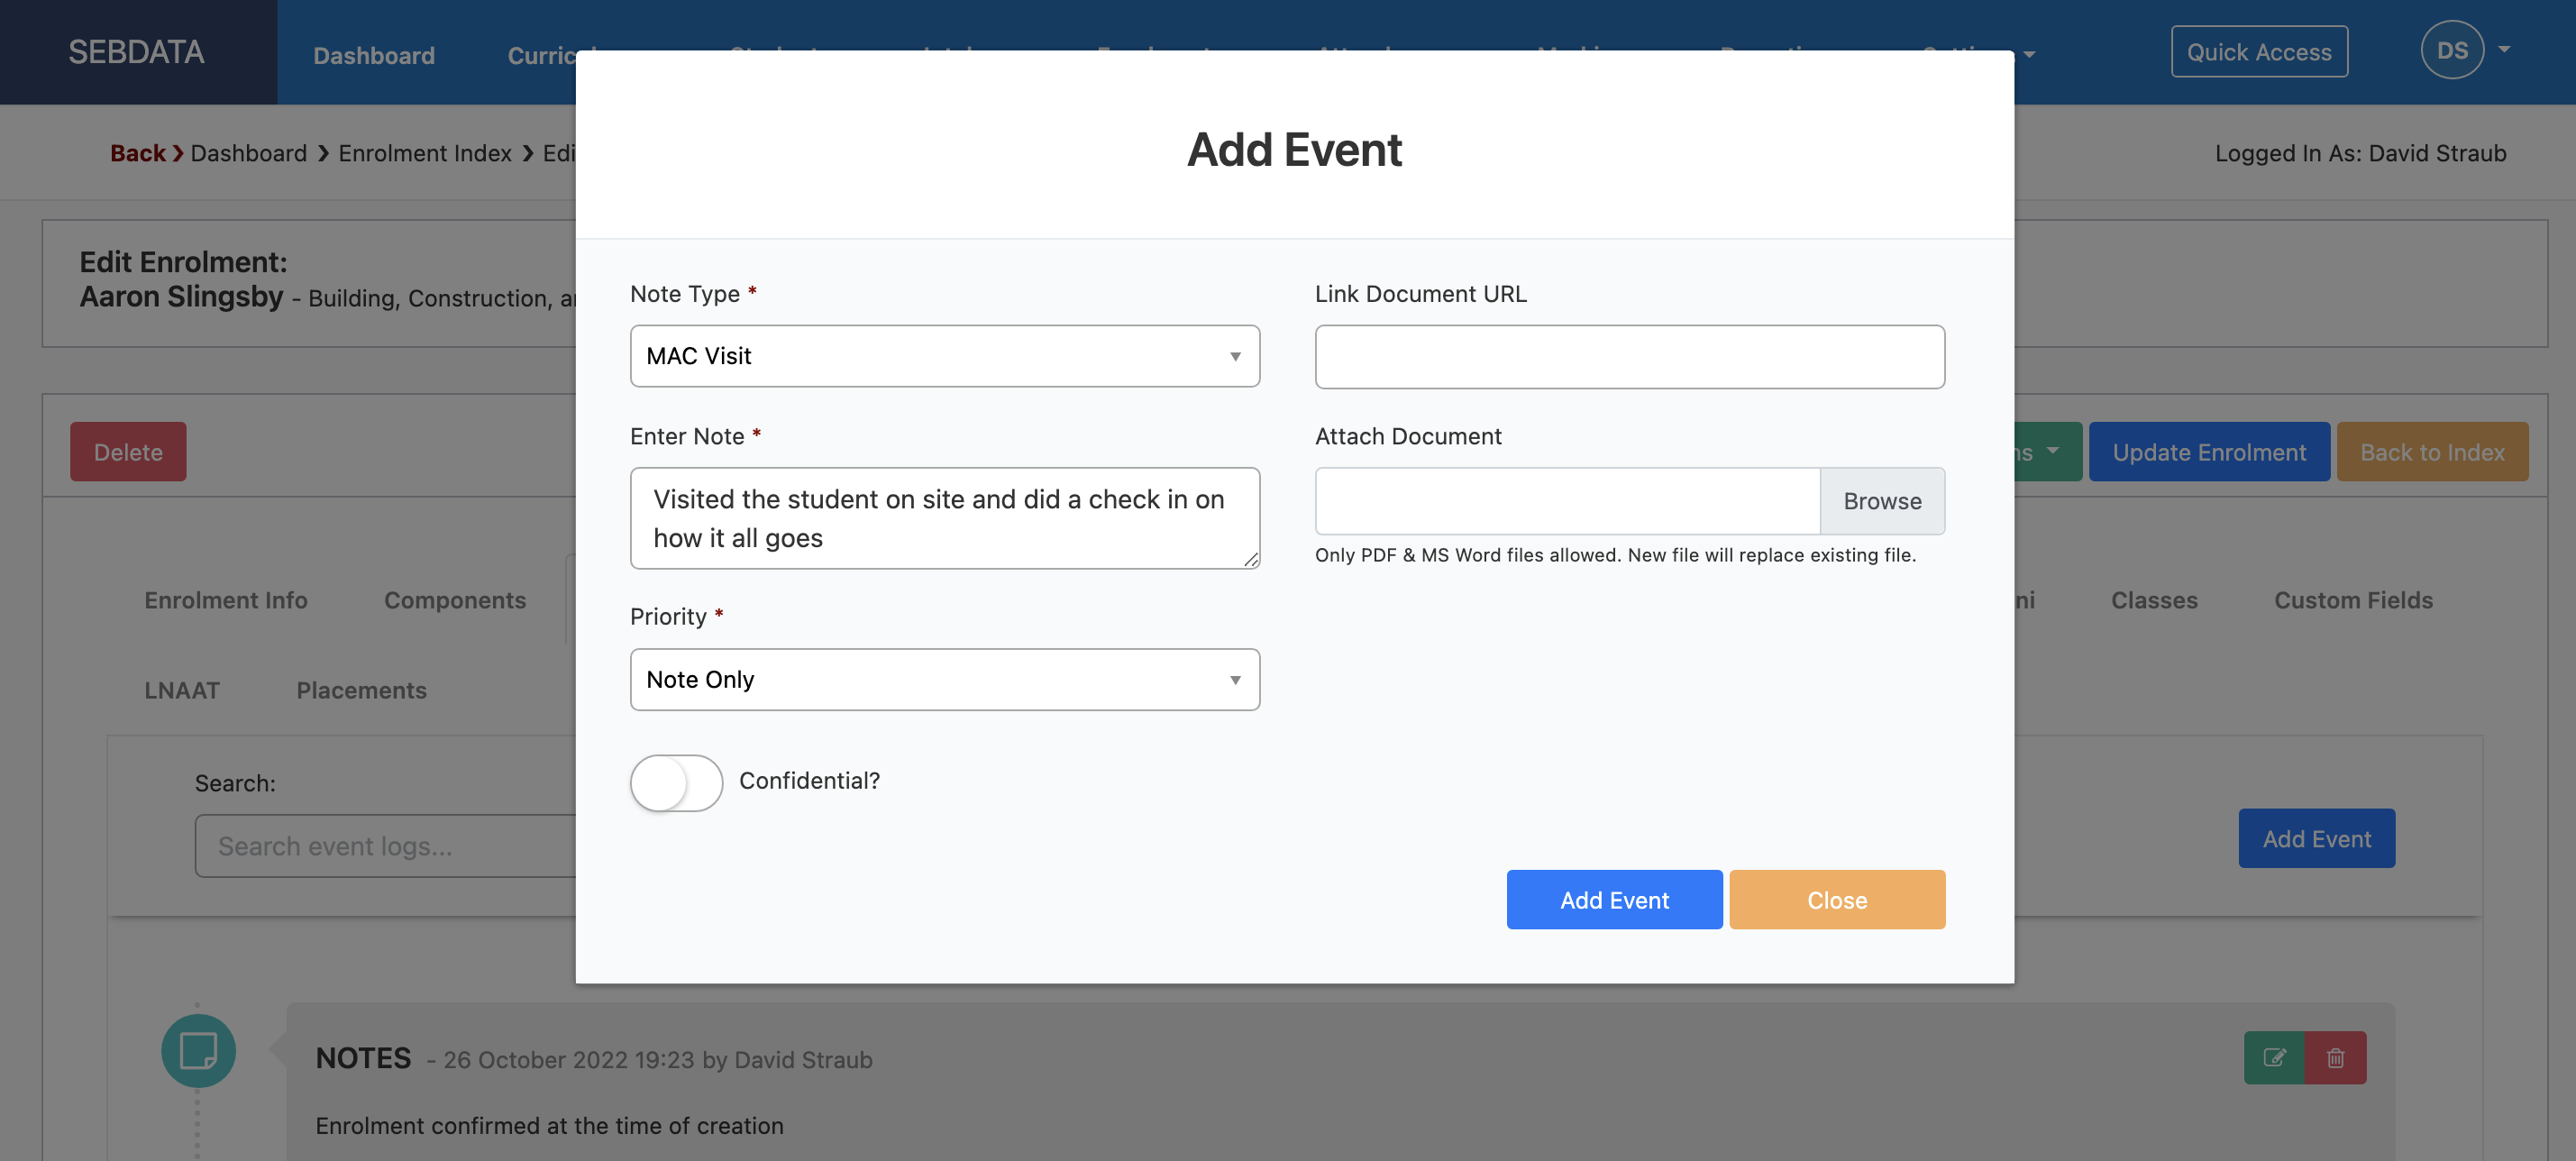
If you delete the event later on. It will send a delete MAC visit message to the ITR.
Manage Messages in the ITR Reporting Screen
To navigate to the screen below, go to Reporting -> ITR.
This is the central screen that shows all the messages going to the ITR and their responses. It is an extremely helpful screen to see what is awaiting a response, has validation errors or was processed successfully:

All messages in RED will need your attention, click on show to see the details of the message. You can see both the message sent on the left and the response on the right. SELMA will show the error in red, in below example a unit standard is not registered for the provider with NZQA.
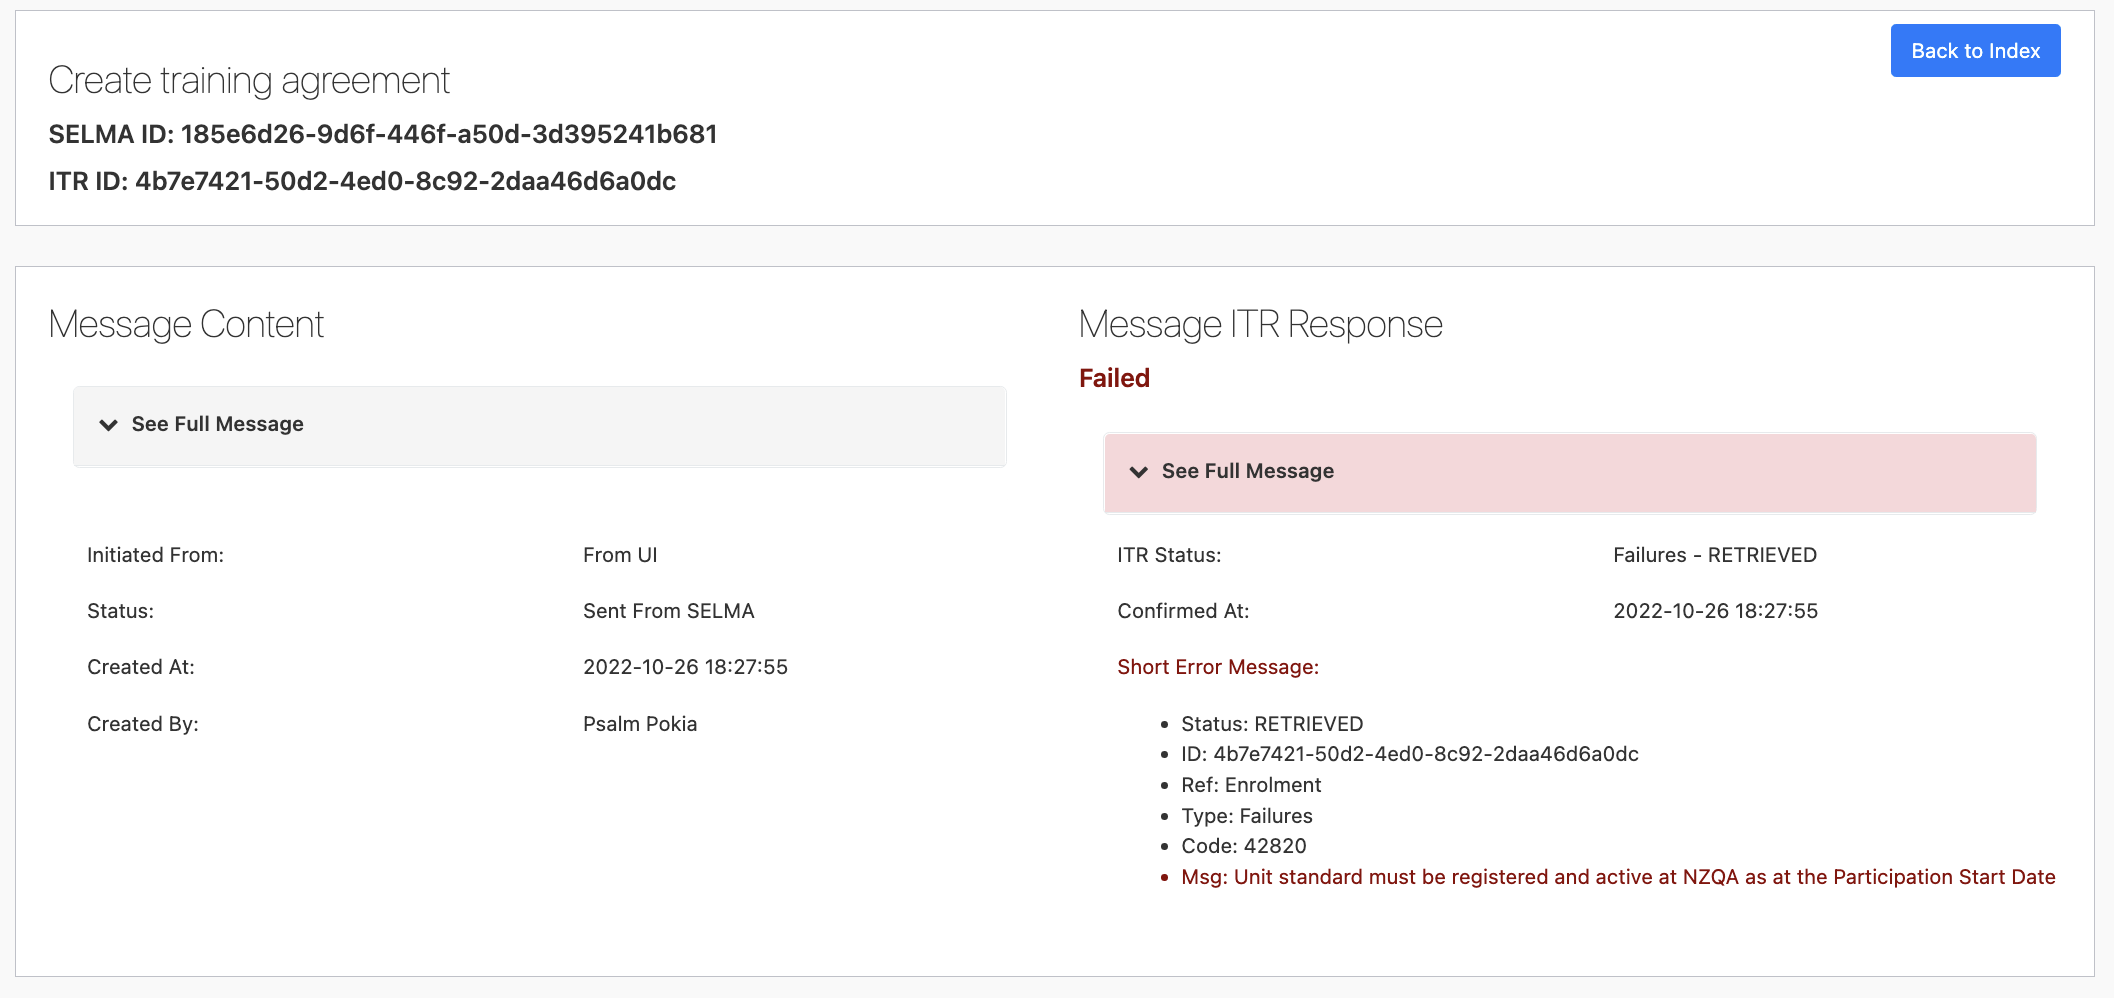
You can use the “See Full Message” button to extend the message and to see the full XML code that was sent or retrieved from the ITR.
