
Installation
To use the SELMA Plugin, you need to install it on your WordPress site. Follow the steps below to install the plugin:
- Log in to your WordPress dashboard.
- Click on ‘Plugins’ in the left-hand menu.
- Click on the ‘Add New’ button.
- Click on the ‘Upload Plugin’ button.
- Upload the Zip file provided.
- Click on ‘Activate’ button.
Using the Plugin
After activating the plugin, you can access its settings page by following the steps below:
- Click on ‘Settings’ in the left-hand menu.
- Click on ‘SELMA Plugin Settings’.
On this page, you can customise the plugin settings to meet your needs.
Settings
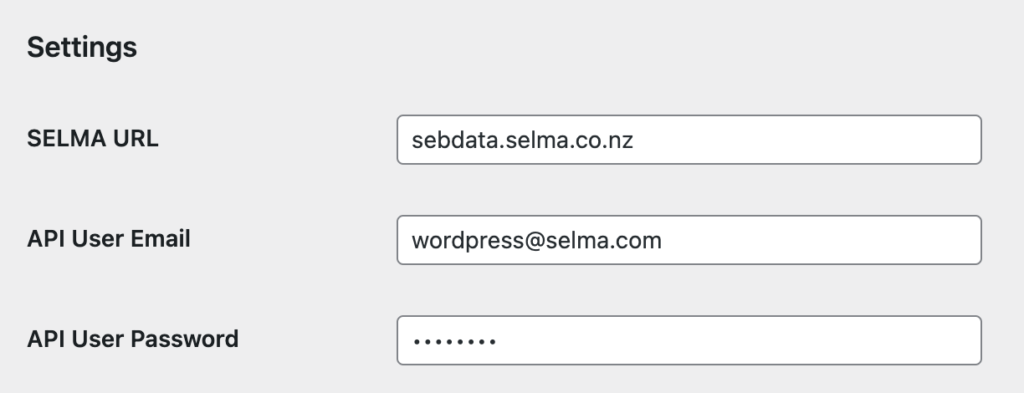
In this section, you can specify the following settings:
- SELMA URL: Enter the URL of your SELMA integration.
- API User Email: Enter the email address of your API user.
- API User Password: Enter the password for your API user.
- Headers Enabled: Enable or disable headers.
- Filters Enabled: Enable or disable filters.
- Card Layout: Specify the layout for the cards.
- Custom CSS: CSS to customise the look and feel of the plugin.
- Loader GIF: Specify the URL of the loader GIF.
For the default layout please use the following:
Card Layout:
<div class="card">
        <img class="card__image"
             src="[#progimage#]"
             alt="">
        <div class="card__content">
            <p class="card__progtitle"><b>[#progtitle#]</b></p>
            <p class="card__intakedate">
                Date:[#intakestartdate#]
            </p>
            <p class="card__intakecampus"> Location:[#campus#]</p>
        </div>
        <div class="card__hoverable">
            <span class="card__hoverable__main">Entry Requirements</span>
            <span class="card__hoverable__tooltip">[#entryrequirements#]</span>
        </div>
        <div class="card__info">
            <div style="text-align: left;">
                <p>Available spaces:[#availablespaces#]</p>
                <p>
                    <a target="_blank" style="text-align: right;" class="card__link"
                       href="[#enrollink#]">
                        <span>Register</span>
                    </a>
                    <br>
                    Cost: [#fees#]
                </p>
            </div>
        </div>
    </div>
Custom CSS:
/* Style the counter cards */
.cards {
    margin: 0 auto;
    max-width: 1000px;
    display: grid;
    grid-template-columns: repeat(auto-fill, minmax(250px, 1fr));
    grid-auto-rows: auto;
    gap: 20px;
    font-family: sans-serif;
    padding-top: 20px;
}

.cards * {
    box-sizing: border-box;
}

.card {
/*     box-shadow: 0 0 3px rgba(0, 0, 0, 0.1); */
}

.card__image {
    width: 100%;
    height: 150px;
    object-fit: cover;
    display: block;
    border-top: 2px solid #333333;
    border-right: 2px solid #333333;
    border-left: 2px solid #333333;
	border-top-left-radius: 10px;
	border-top-right-radius: 10px;
}

.card__content {
    line-height: 1.5;
    font-size: 1em;
    padding: 15px;
    background: #fafafa;
    border-right: 2px solid #333333;
    border-left: 2px solid #333333;
    min-block-size: 200px;
}

.card__content > p:first-of-type {
    margin-top: 0;
}

.card__content > p:last-of-type {
    margin-bottom: 0;
}

.card__info {
    padding: 15px;
    display: flex;
    justify-content: space-between;
    align-items: center;
    color: #555555;
    background: #eeeeee;
    font-size: 1.1em;
    border-bottom: 2px solid #333333;
    border-right: 2px solid #333333;
    border-left: 2px solid #333333;
	border-bottom-right-radius: 10px;
	border-bottom-left-radius: 10px;
}

.card__info i {
    font-size: 1.2em;
    margin-right: 8px;
}

.card__link {
    color: #64968c;
    text-decoration: none;
}

.card__link:hover {
    text-decoration: underline;
}


.filters {
    margin: 0 auto;
    display: grid;
    grid-template-columns: repeat(auto-fit, minmax(min(100% / 3, max(100px, 100% / 5)), 1fr));
    grid-auto-rows: auto;
    gap: 20px;
    font-family: sans-serif;
}


.selma-select {
    width: 250px;
    padding: 12px;
    border: 0 !important;
    background-color: whitesmoke;
    /* needed */
    -webkit-appearance: none;
    -moz-appearance: none;
    appearance: none;
    background-size: .6em;
    background-position: calc(100% - 1.3em) center;
    background-repeat: no-repeat;
}

.selma-select::-ms-expand {
    display: none;
}

.selma-button {
    width: 250px;
    padding: 12px;
    border: 0 !important;
    background-color: whitesmoke;
    /* needed */
    -webkit-appearance: none;
    -moz-appearance: none;
    appearance: none;
}

.card__hoverable {
    position: relative;
    text-decoration: underline;
    padding: 15px;
    display: flex;
    justify-content: space-between;
    align-items: center;
    color: #555555;
    background: #eeeeee;
    font-size: 1.1em;
    border-right: 2px solid #333333;
    border-left: 2px solid #333333;
}

.card__hoverable > .card__hoverable__tooltip {
    display: none;
}

.card__hoverable:hover > .card__hoverable__tooltip {
    display: inline;
    position: absolute;
    top: 1em;
    left: 1em;
    background: white;
    border: 1px solid black;
}
Customising the Layout
Changing the layouts and fields display is all available in the SELMA Plugin Settings menu, here you can change the fields that are displayed, the layout of the cards and add or change any CSS you feel necessary, to use the fields from SELMA please use the following syntax [#fieldname#], for example if the field you are using is the programme title [#progtitle#]. New fields that are not readily available can be added on request. The following is the fields provided by default:
- Programme ID – progid
- Intake ID – intakeid
- Programme Title – progtitle
- Programme Code – progcode
- Programme Aim – progaim
- Programme Entry Requirements – entryrequirements
- Programme Image – progimage
- Intake Fees – fees
- Intake Start Date – intakestartdate
- Intake End Date – intakeenddate
- Intake Start Time – intakestarttime
- Intake End Time – intakeendtime
- Intake Available Spaces – availablespaces
- Campus ID – campusid
- Campus Name – campus
- Campus City – campuscity
- Enrolment Form Link – enrollink
Saving Settings
After making changes to the plugin settings, make sure to click on the ‘Save Changes’ button to save your changes.
Photos
The Programme photos are taken from the WordPress website, you will upload these into your WordPress media gallery, these URLS will then need to be added to the correct programme in SELMA.
WordPress Settings
WordPress permalink settings will need to be set to post, as the SELMA Plugin uses WordPresses built in Rest API.
Using the Widget
Activating the SELMA Intake widget will be through short code, using the code [intake_widget]
Adding this to any page will drop the widget in that space, the widget is page size responsive but it is recommended to have a full width template on the page.
If you would like only single/preset programmes/campuses you can add the parameters to the short code are as follows:
programme=progid
campus=campusid